This guide will show you how to replace an air conditioner actuator on a VE Commodore. These actuators commonly fail on Series 1 vehicles and have been seen to fail on Series 2, however a revised unit is now being used.
There are multiple actuators behind the dashboard controlling modes, temperatures and air sources. Our guide will show you how to identify the faulty actuator and the steps to replace it.
HVAC = Heating, Ventilation and Air Conditioning
Common symptoms
Vents stuck in a certain mode such as feet, face or demister.
Loud clicking noise behind the dashboard when changing modes or temperature
Heating / Cooling not working properly. Often permanently on heat or cold.
Multiple actuators can be found on both the left and right sides of the dashboard. The same actuator units are used regardless of its purpose. Let’s go through some troubleshooting steps below:
Attempt a HVAC System Relearn
It’s possible that your actuators are not actually faulty but have ‘forgotten’ which position they are in. The relearn process runs all actuators for 10-15 seconds, allowing them to calibrate their positions.
To do this first close your doors and turn the radio off. You’ll need to listen to the motors and they’re very quiet.
Turn the Ignition to ‘on’ but do not start the car. Press and hold the rear demister button until you hear the actuators moving. After 10-15 seconds the actuators will stop and the system will be calibrated. Test the air conditioner system and check if your problem still exists. Be sure to cycle through each mode and heat / cool.
If the problem still exists or you heard loud clicking noises during this process, it is very likely that an actuator is faulty. Proceed to the next step.
Identifying the Faulty Actuator
If you heard loud clicking noises during the relearn process this will help with identification. Run the relearn again and listen for the clicking. Is it on the passenger or drivers side? Listen around the footwell area on both sides and you should be able to determine where it was louder. We now need to access that actuator.
If no clicking was heard and you still suspect the actuator is at fault, visual identification may be required to see if the motor and HVAC arms are moving when the relearn is in progress. This will involve trim removal from the drivers and/or passenger side of the vehicle. We’ll run through this process below.
Note: There is an electrical interlock between the AIR RECIRC function and the HOT/COLD mixing function. If the system detects a malfunction in the AIR RECIRC, the HOT/COLD mixing actuator is disabled. This fault is indicated by the LED on the RECIRC button blinking.When you run “relearn, if the HOT/COLD actuator is not moving, this does not necessarily indicate that the actuator has failed. It might be that the RECIRC system has failed, and the interlock has disabled the HOT/COLD mixing actuator. Confirmation of the fault is indicated by the blinking LED on the RECIRC button.
It is possible to have multiple actuators fail! Keep this in mind when performing your assessment.
Step 1
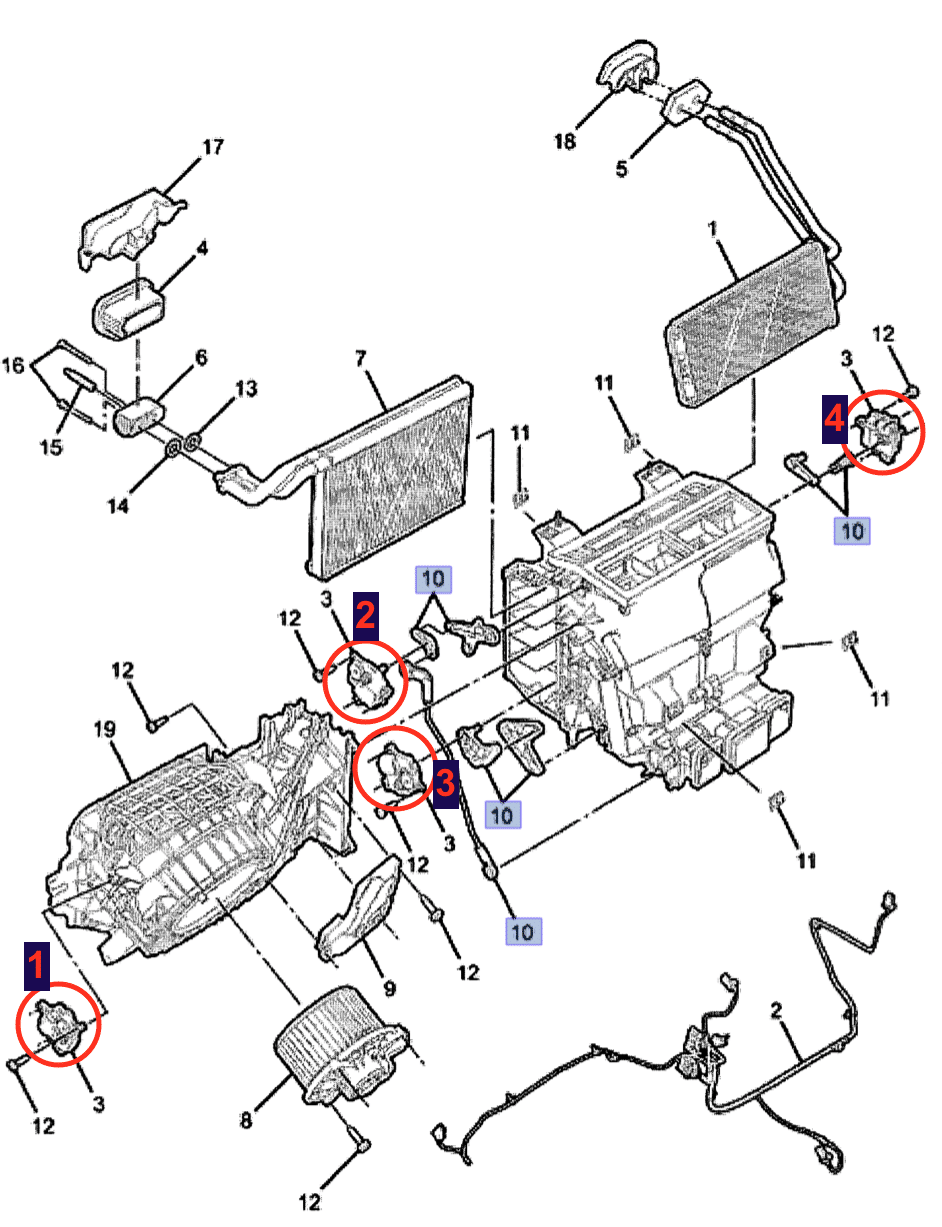
System Overview
There are 4 HVAC actuators in the system, each one is identical
Air Recirculation Door Actuator – Located above the blower fan and controls the recirculation function.
Floor Vents – Upper left side of centre console (Passenger Side)
Heat/Cool – Lower left side of centre console. Uses interconnecting levers to control the butterfly valve inside the heater box
Face Vents – Upper right side of centre console (Drivers Side)
Step 2
Drivers Side Actuator
The drivers side actuator which controls the air directions between feet, face, demister is usually the faulty unit. It is often identified as the air conditioner being ‘stuck’ on feet or demister modes. The process below outlines the actuator replacement procedure.
Using a trim removal tool, pop off the side trim piece. There are three clips, one on each corner.
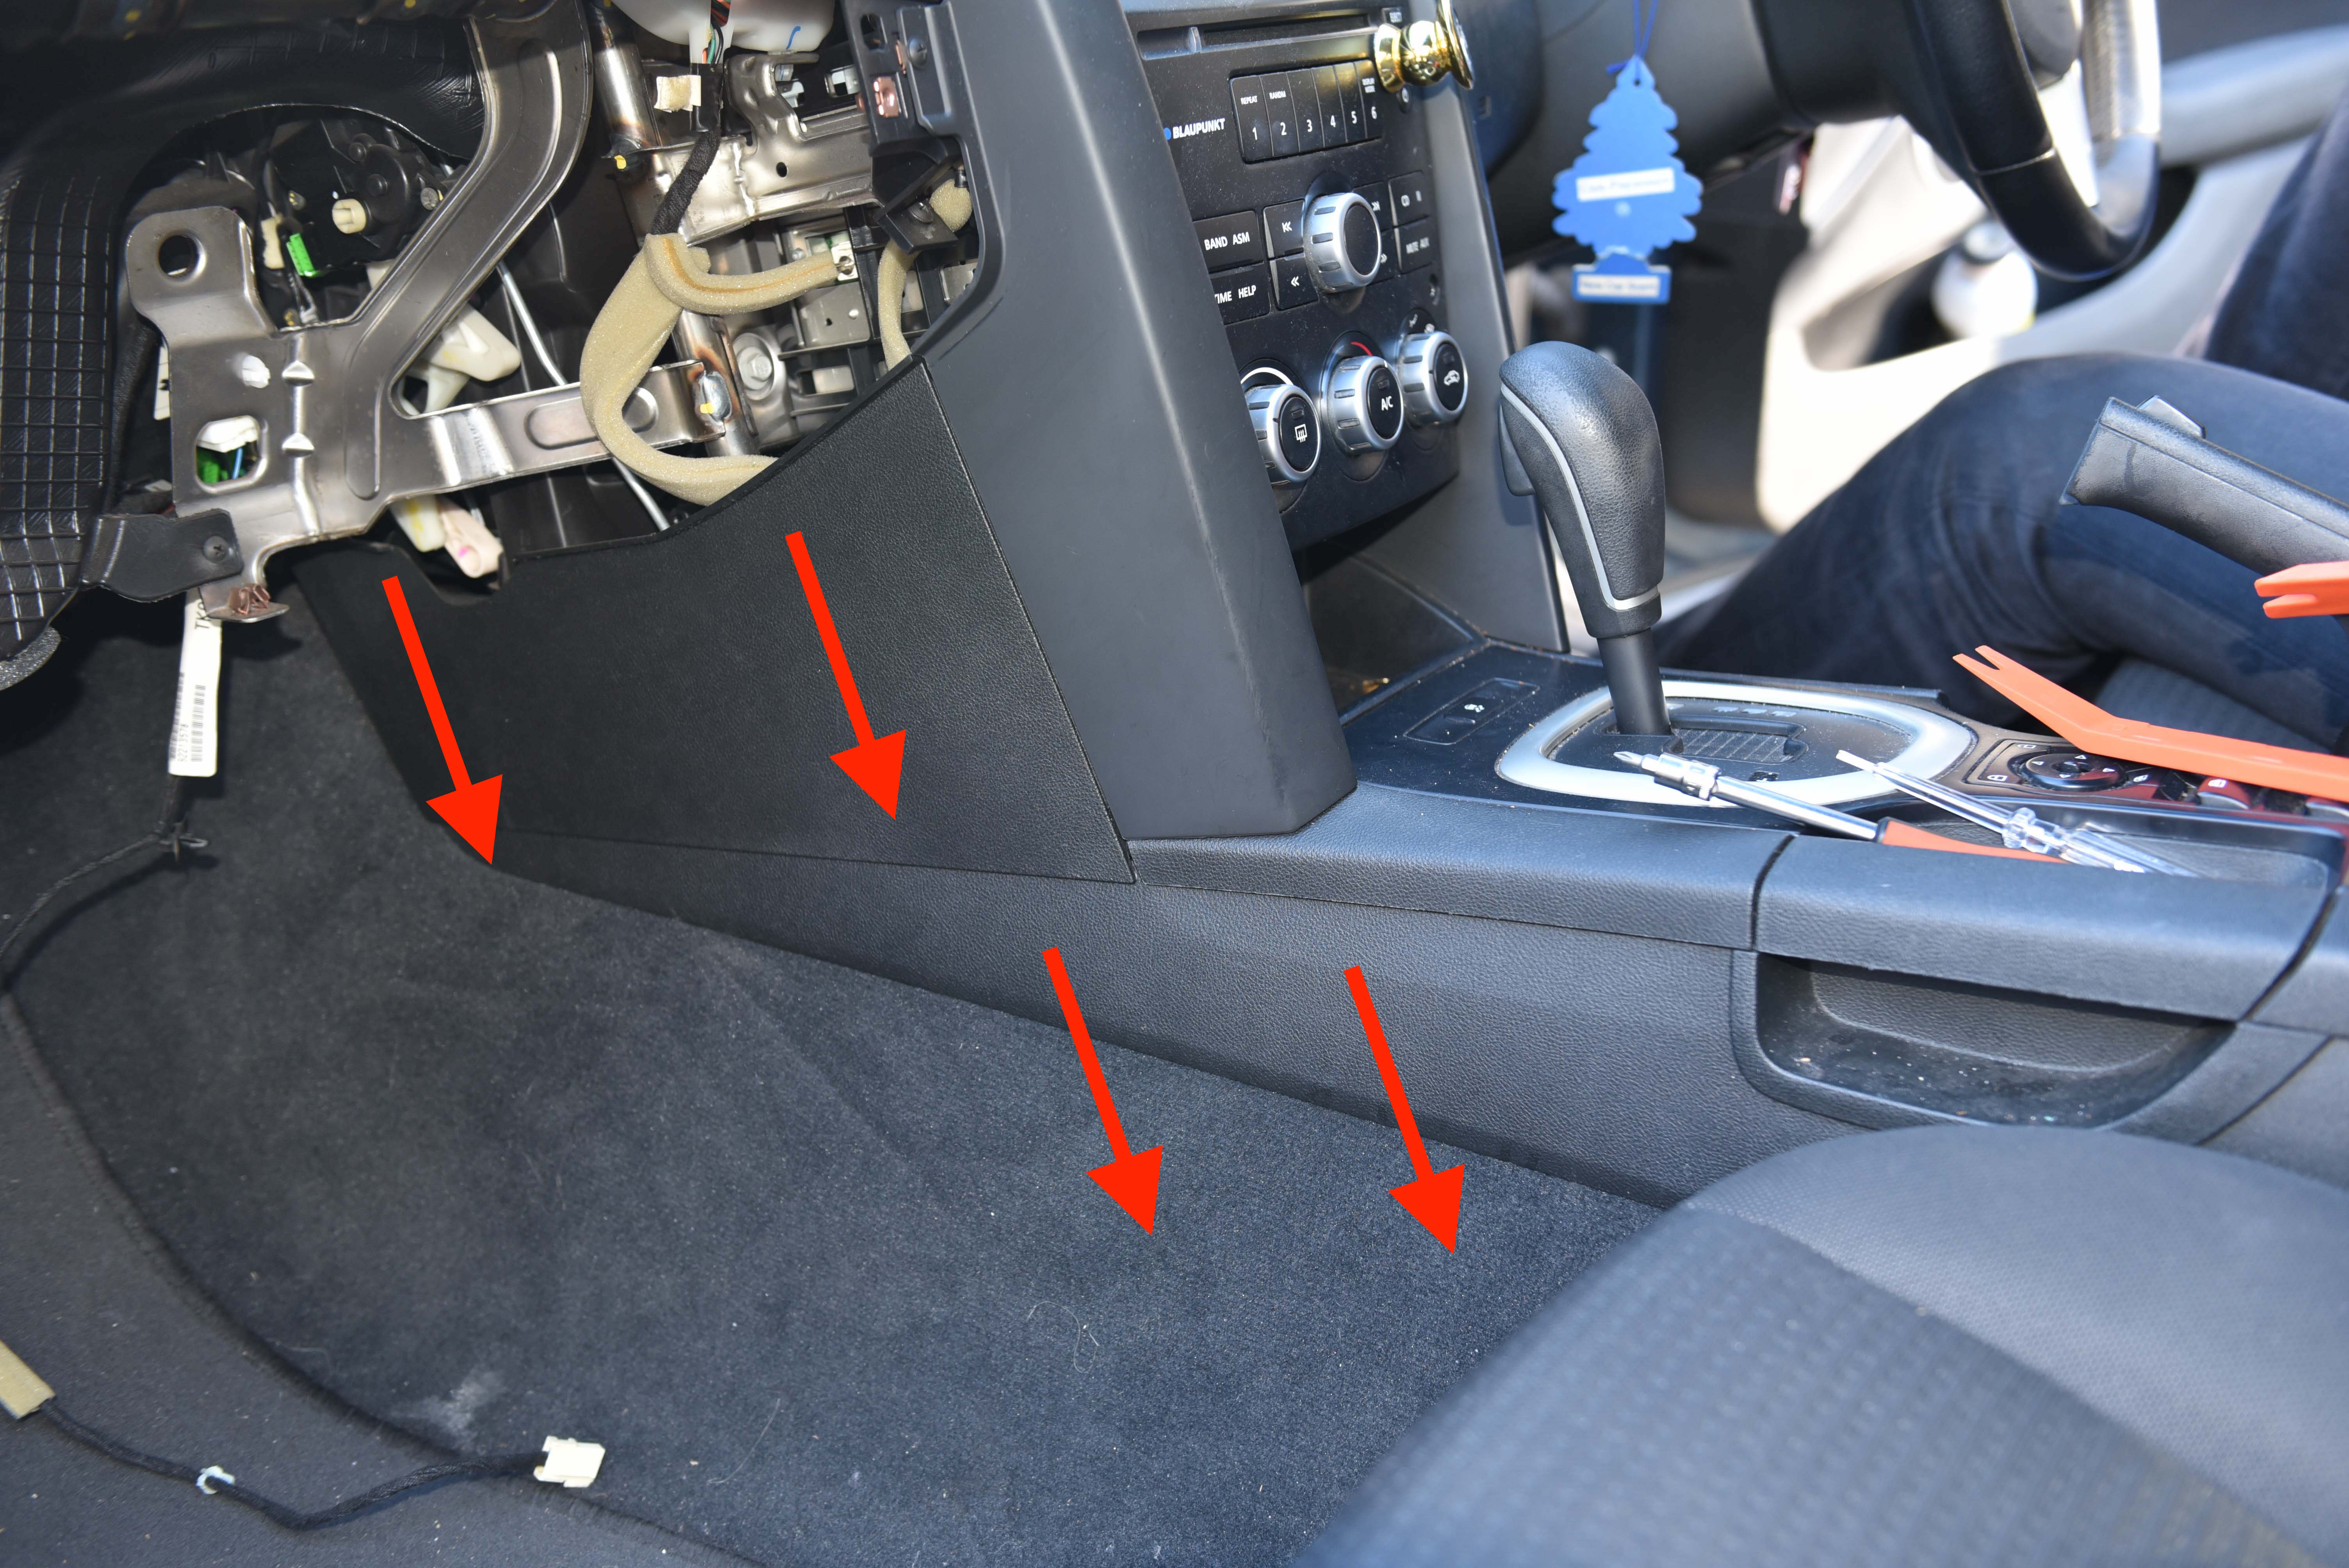
Step 3
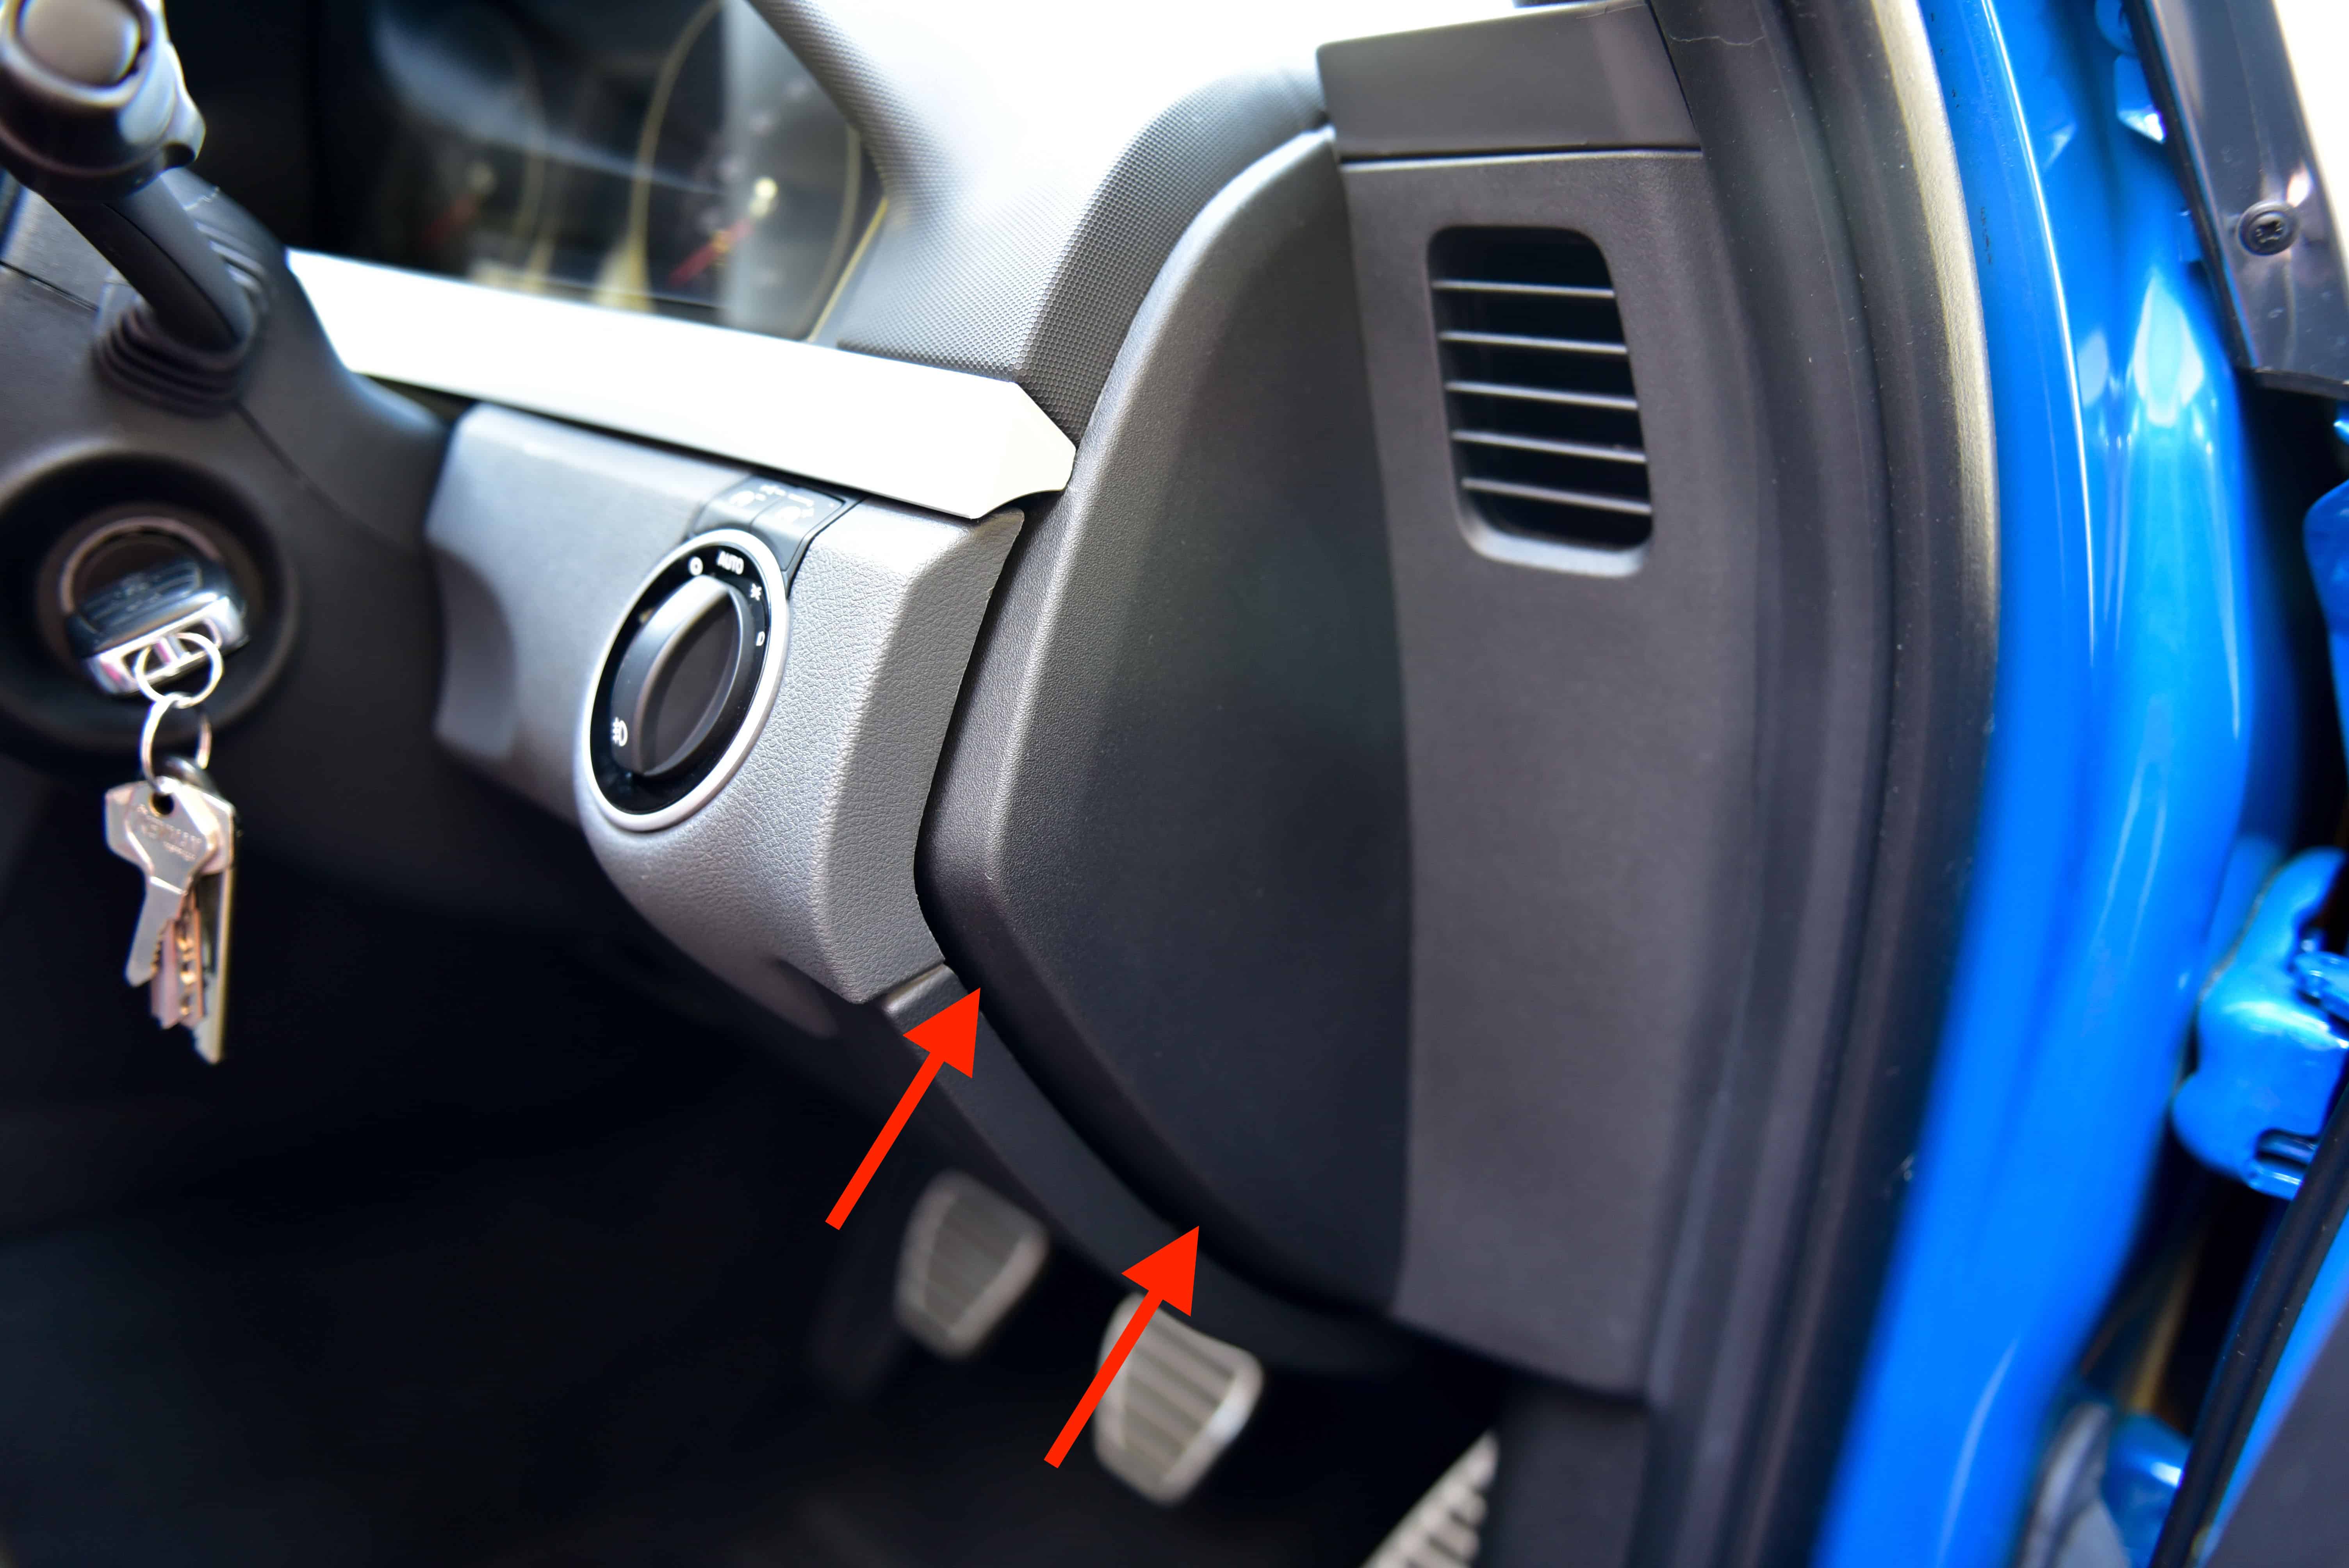
Wedge your fingers behind the lower section of the trim and firmly pull upwards as shown by the red arrows.
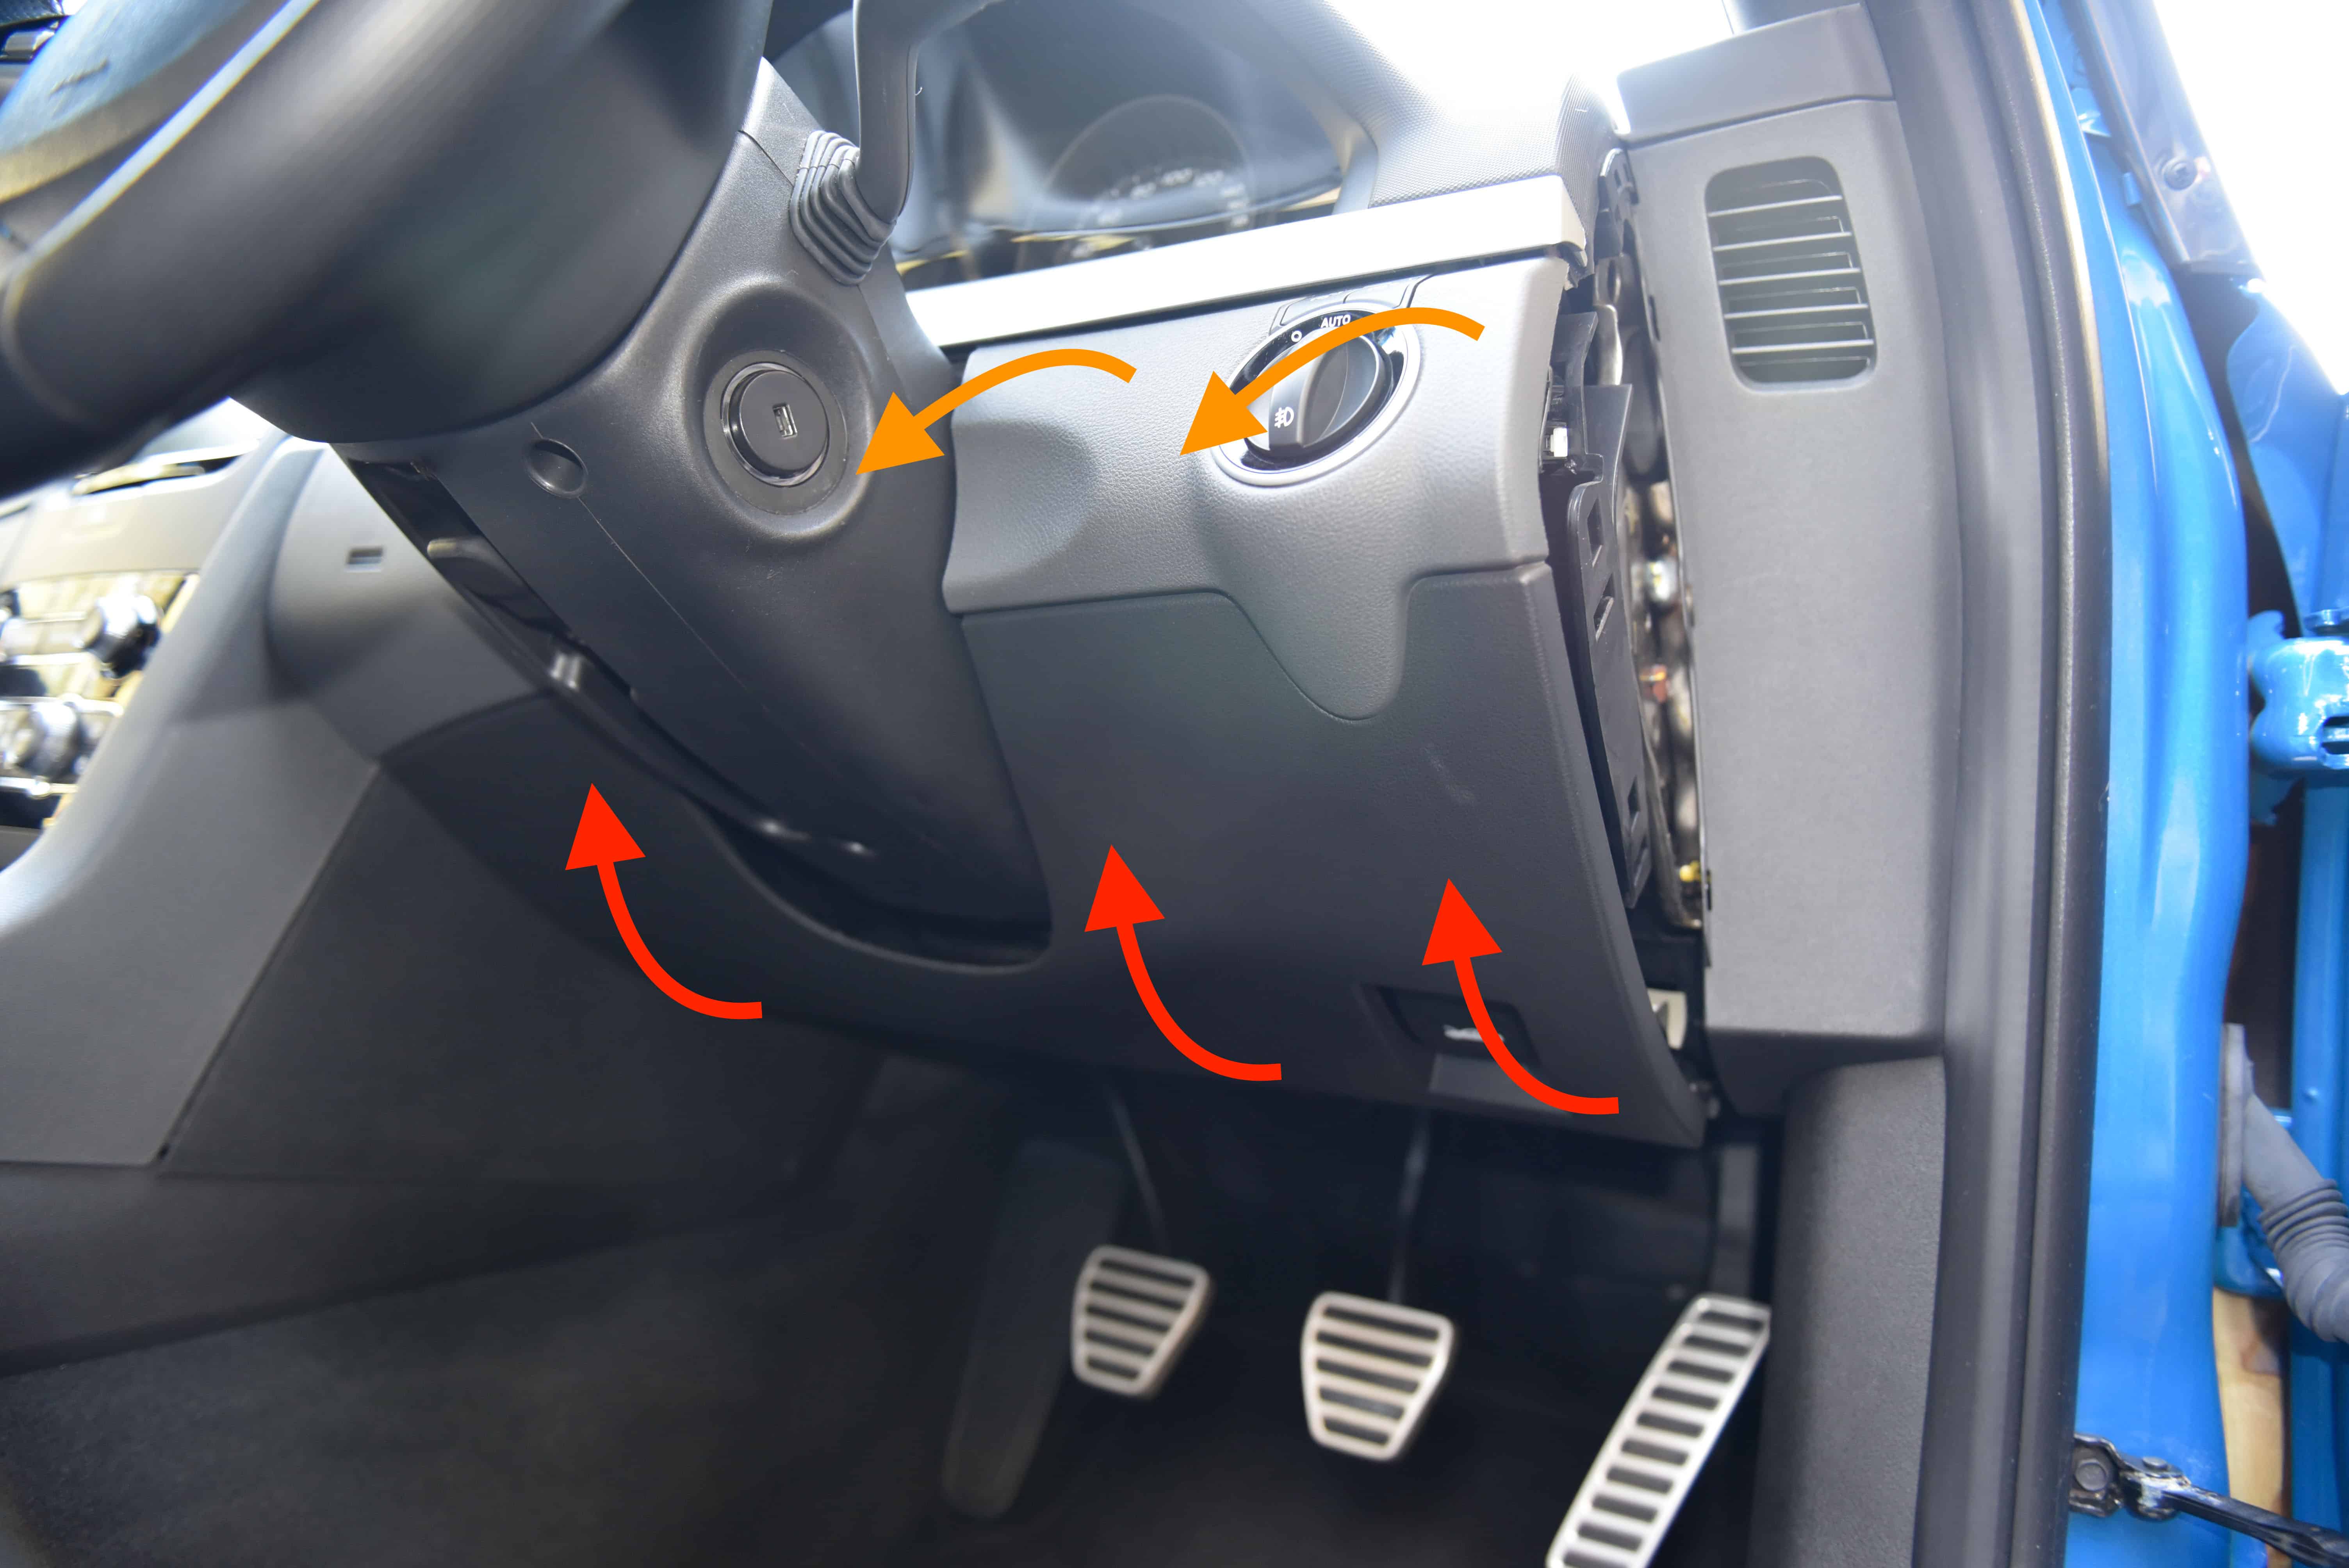
With the bottom clips released use a gentle hinging and pulling motion to release the top clips on both sides of the steering wheel. Pull away as shown by the orange arrows.
Be careful releasing the clips as the trim will drop downwards. It is quiet heavy.
Step 4
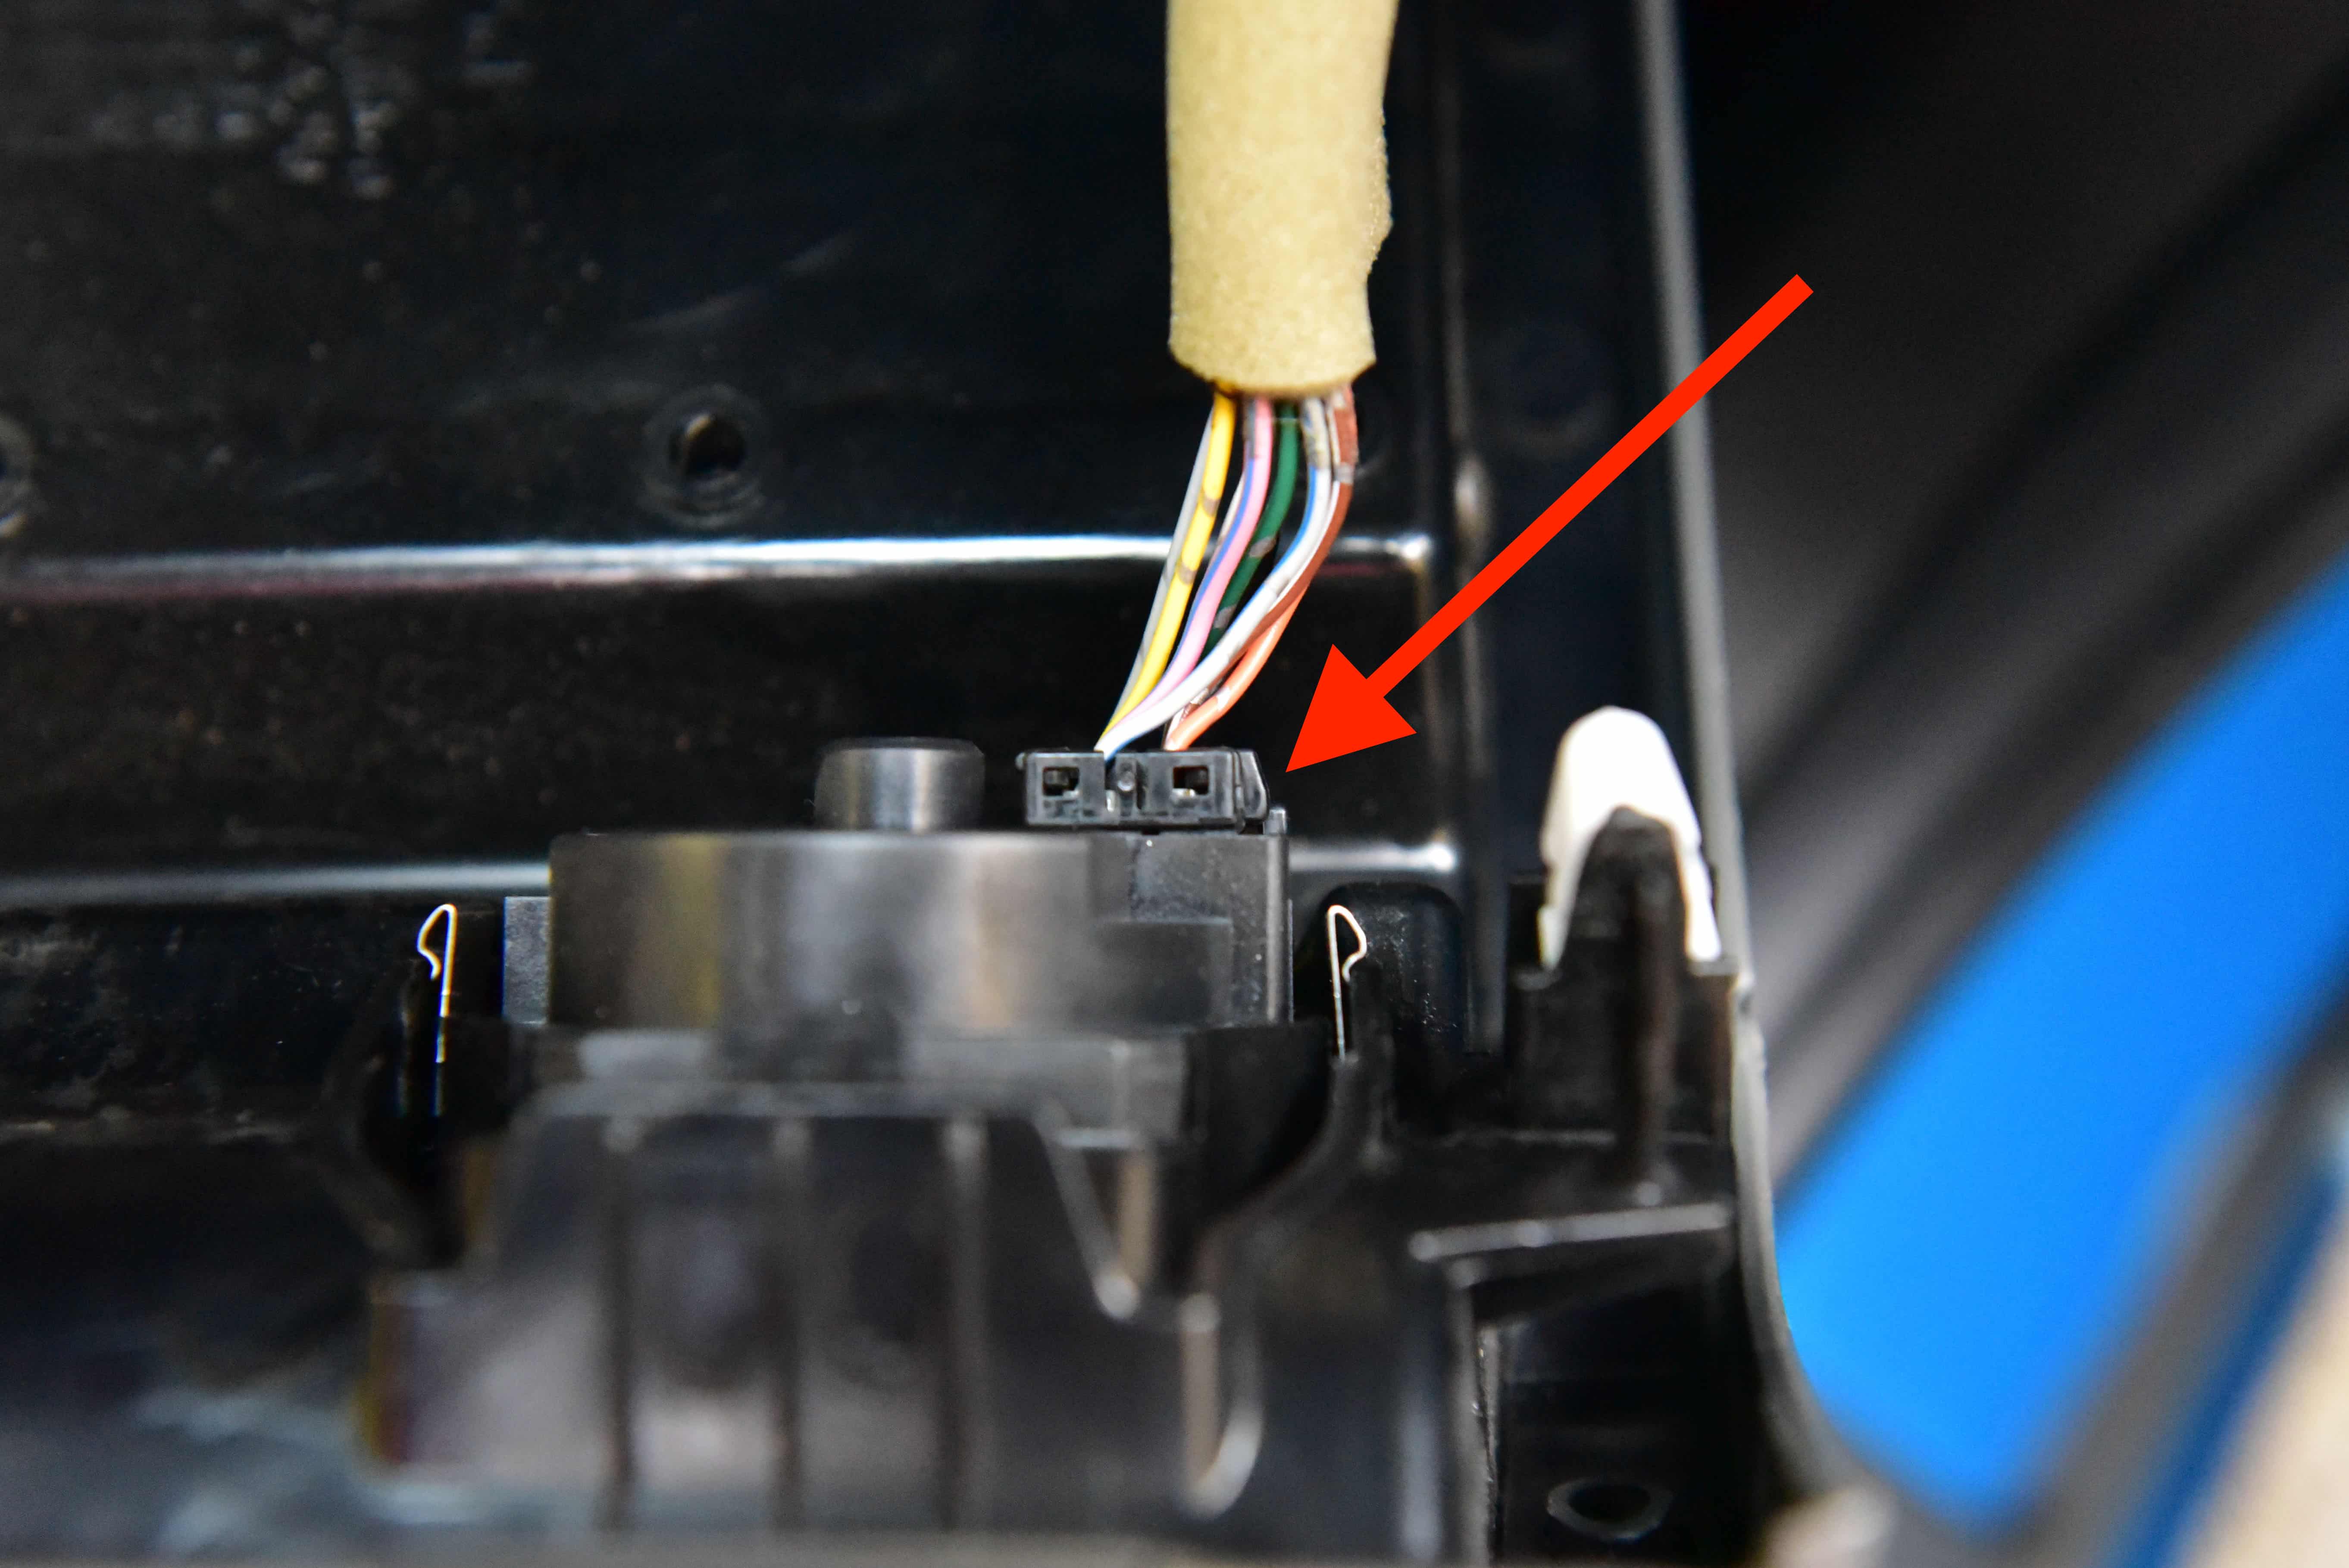
As the trim is released you will need to unplug the headlight switch. Push on the clip and unplug.
Step 5
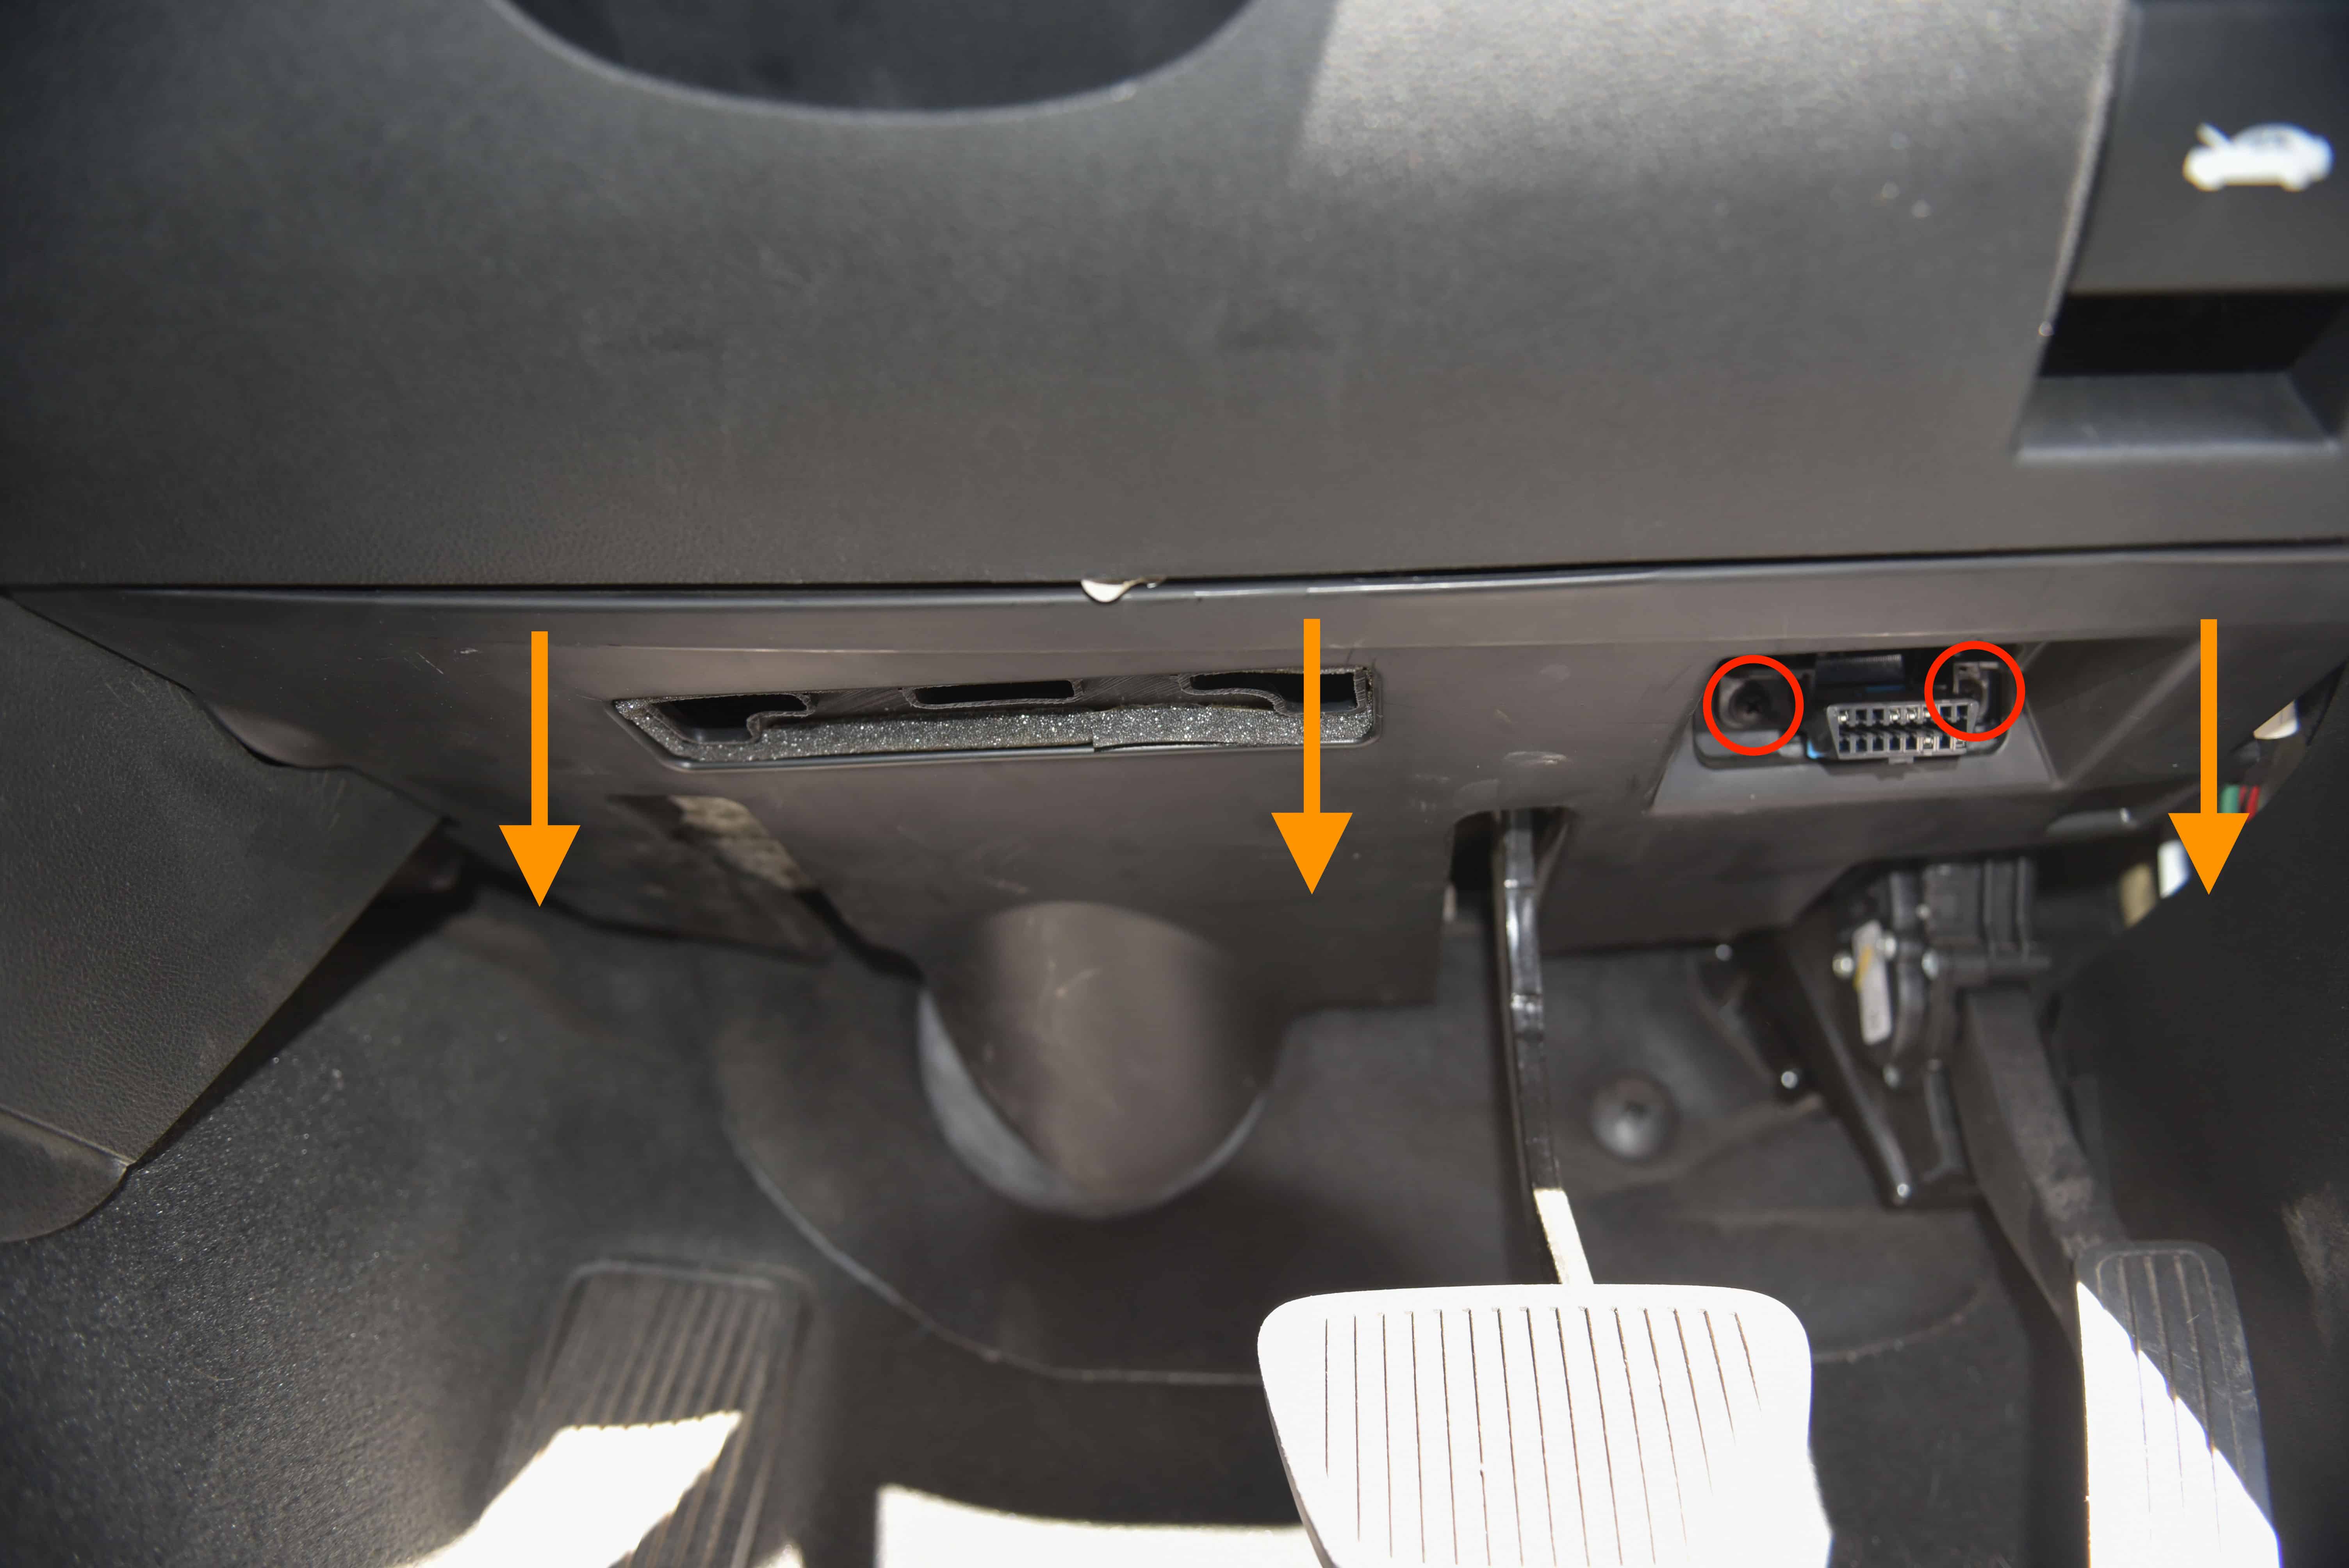
Unscrew the OBD port as circled and pull downwards on the kick panel trim. There are approximately 5 clips holding this trim in place.
Step 6
Remove the air conditioner ducting which is held in place by two screws.
Step 7
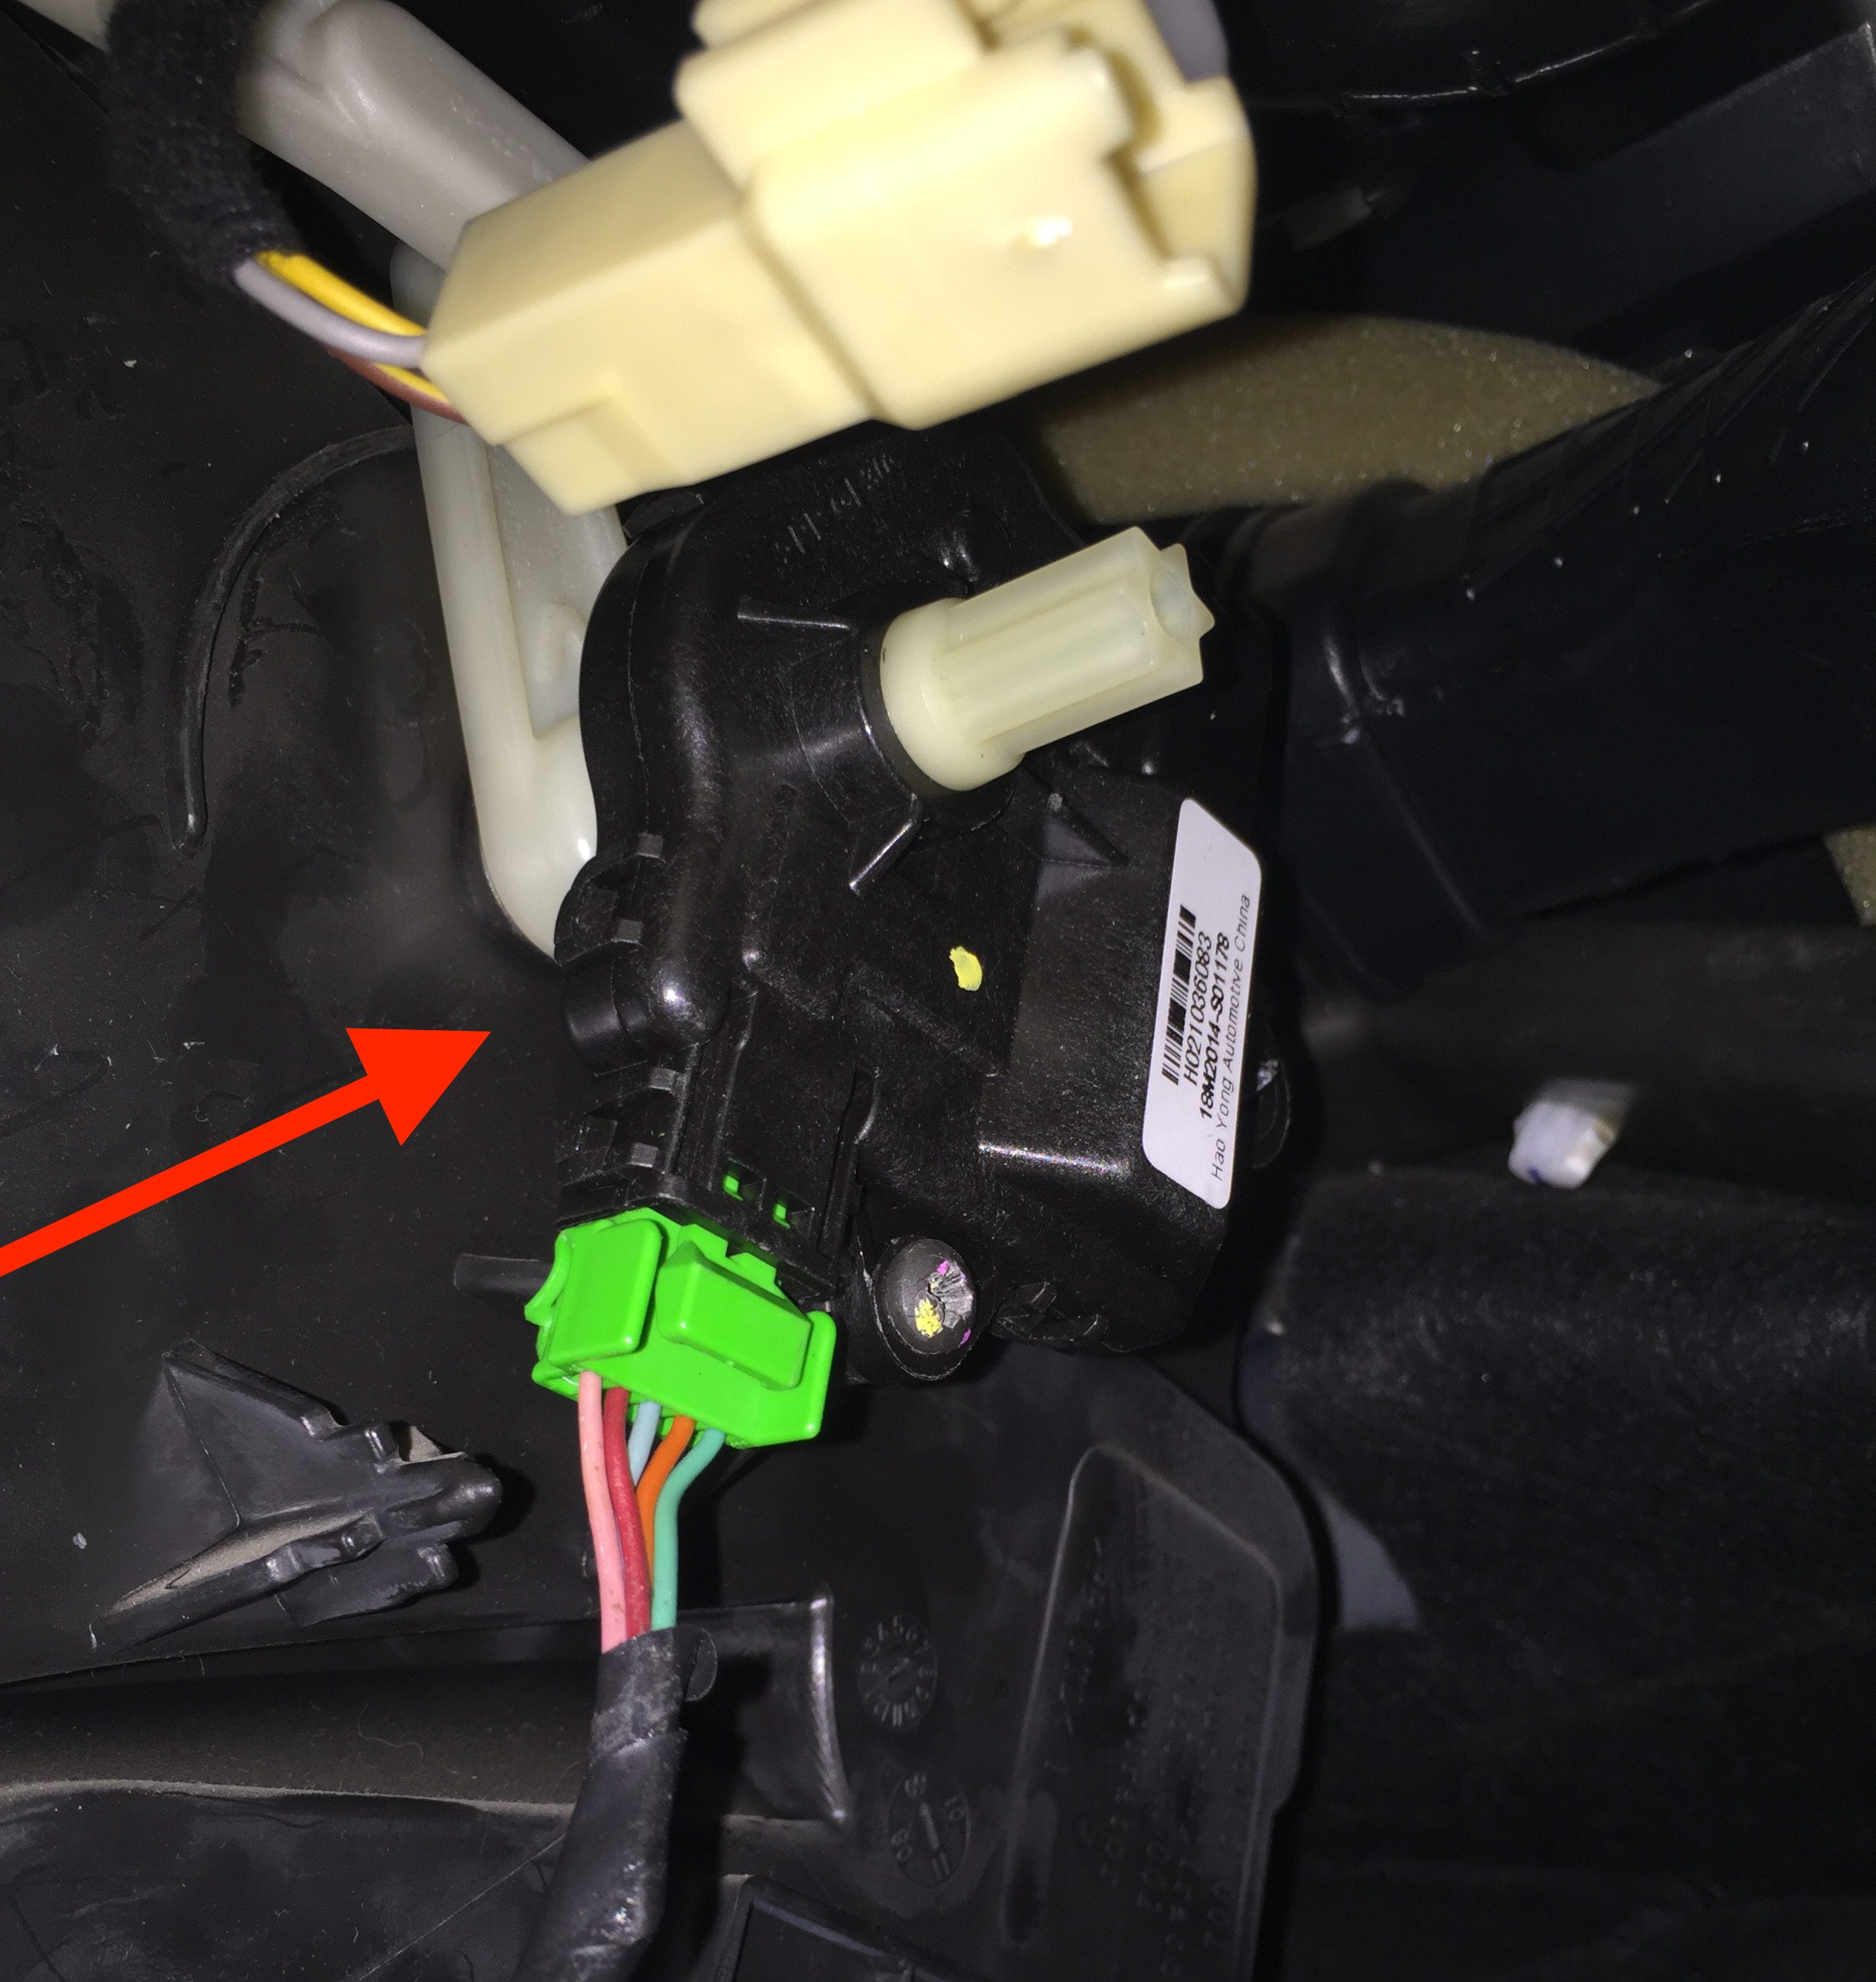
You’ll now need to locate the actuator. Look up beside the headunit and high in the dashboard your will see the actuator as pictured.
To verify the actuator is faulty, run the relearn process as described previously. If you feel or hear the actuator clicking, or the HVAC arms are not moving, the actuator is probably at fault and will need to be replaced.
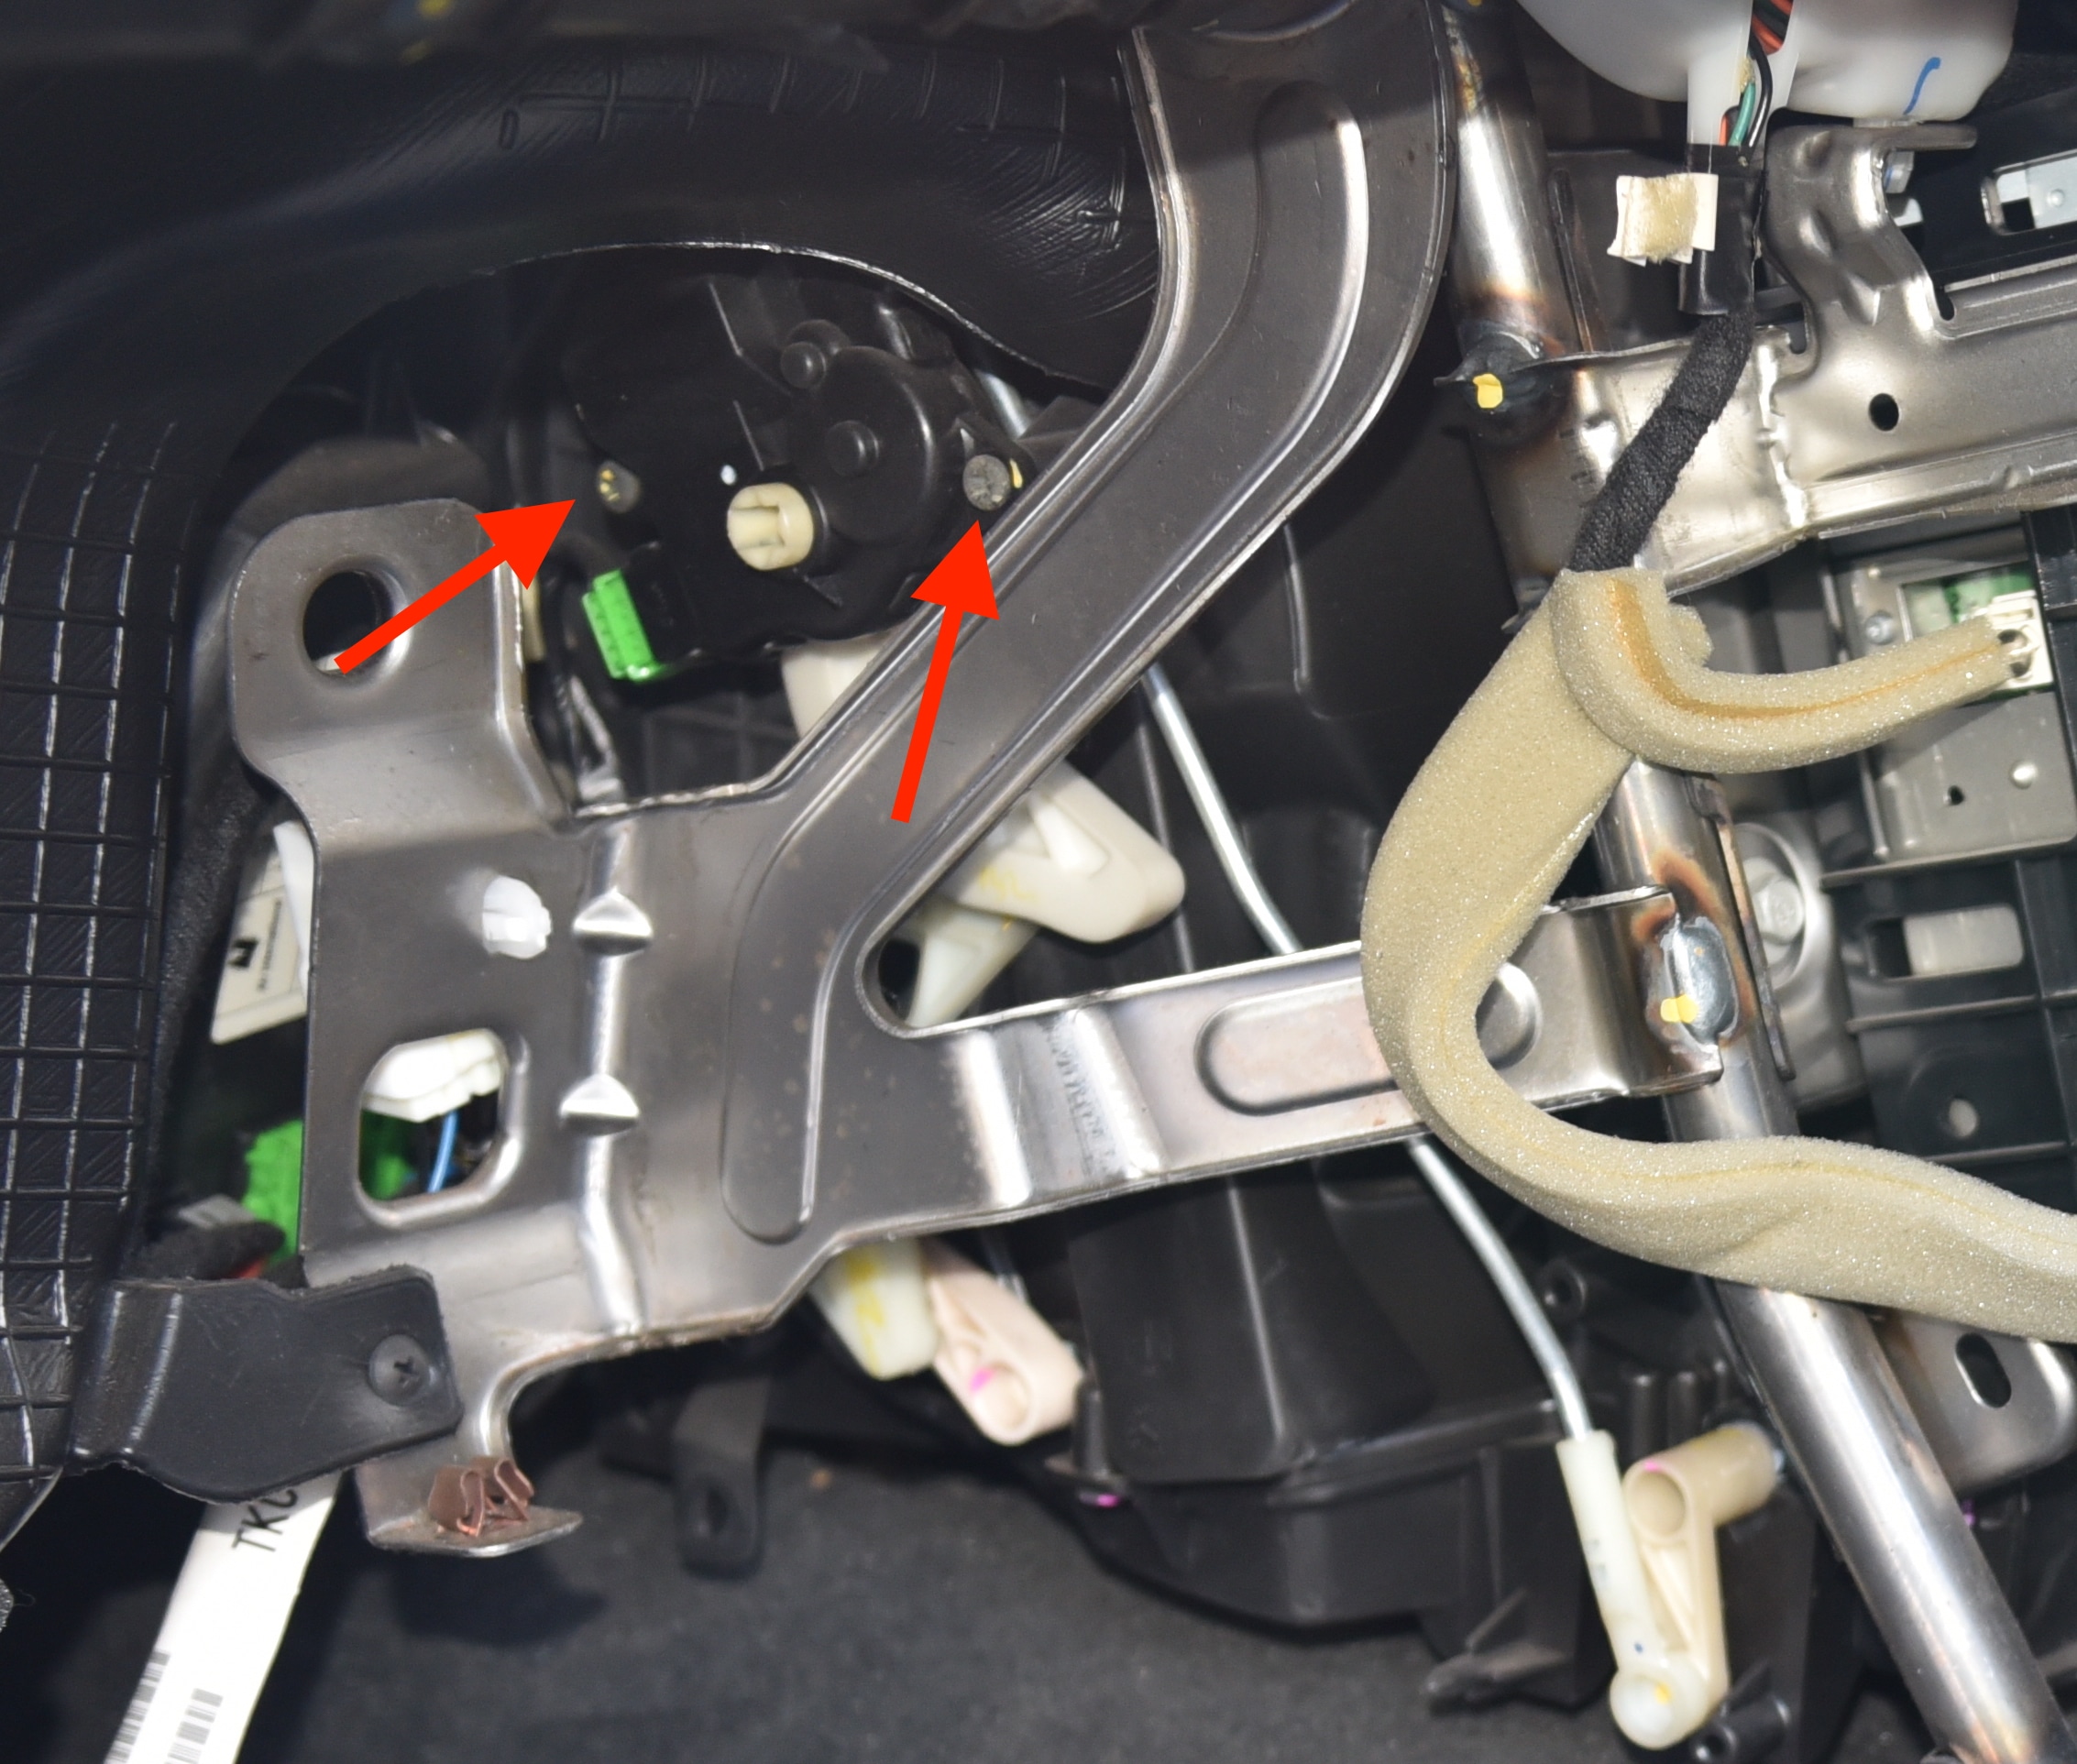
Step 8
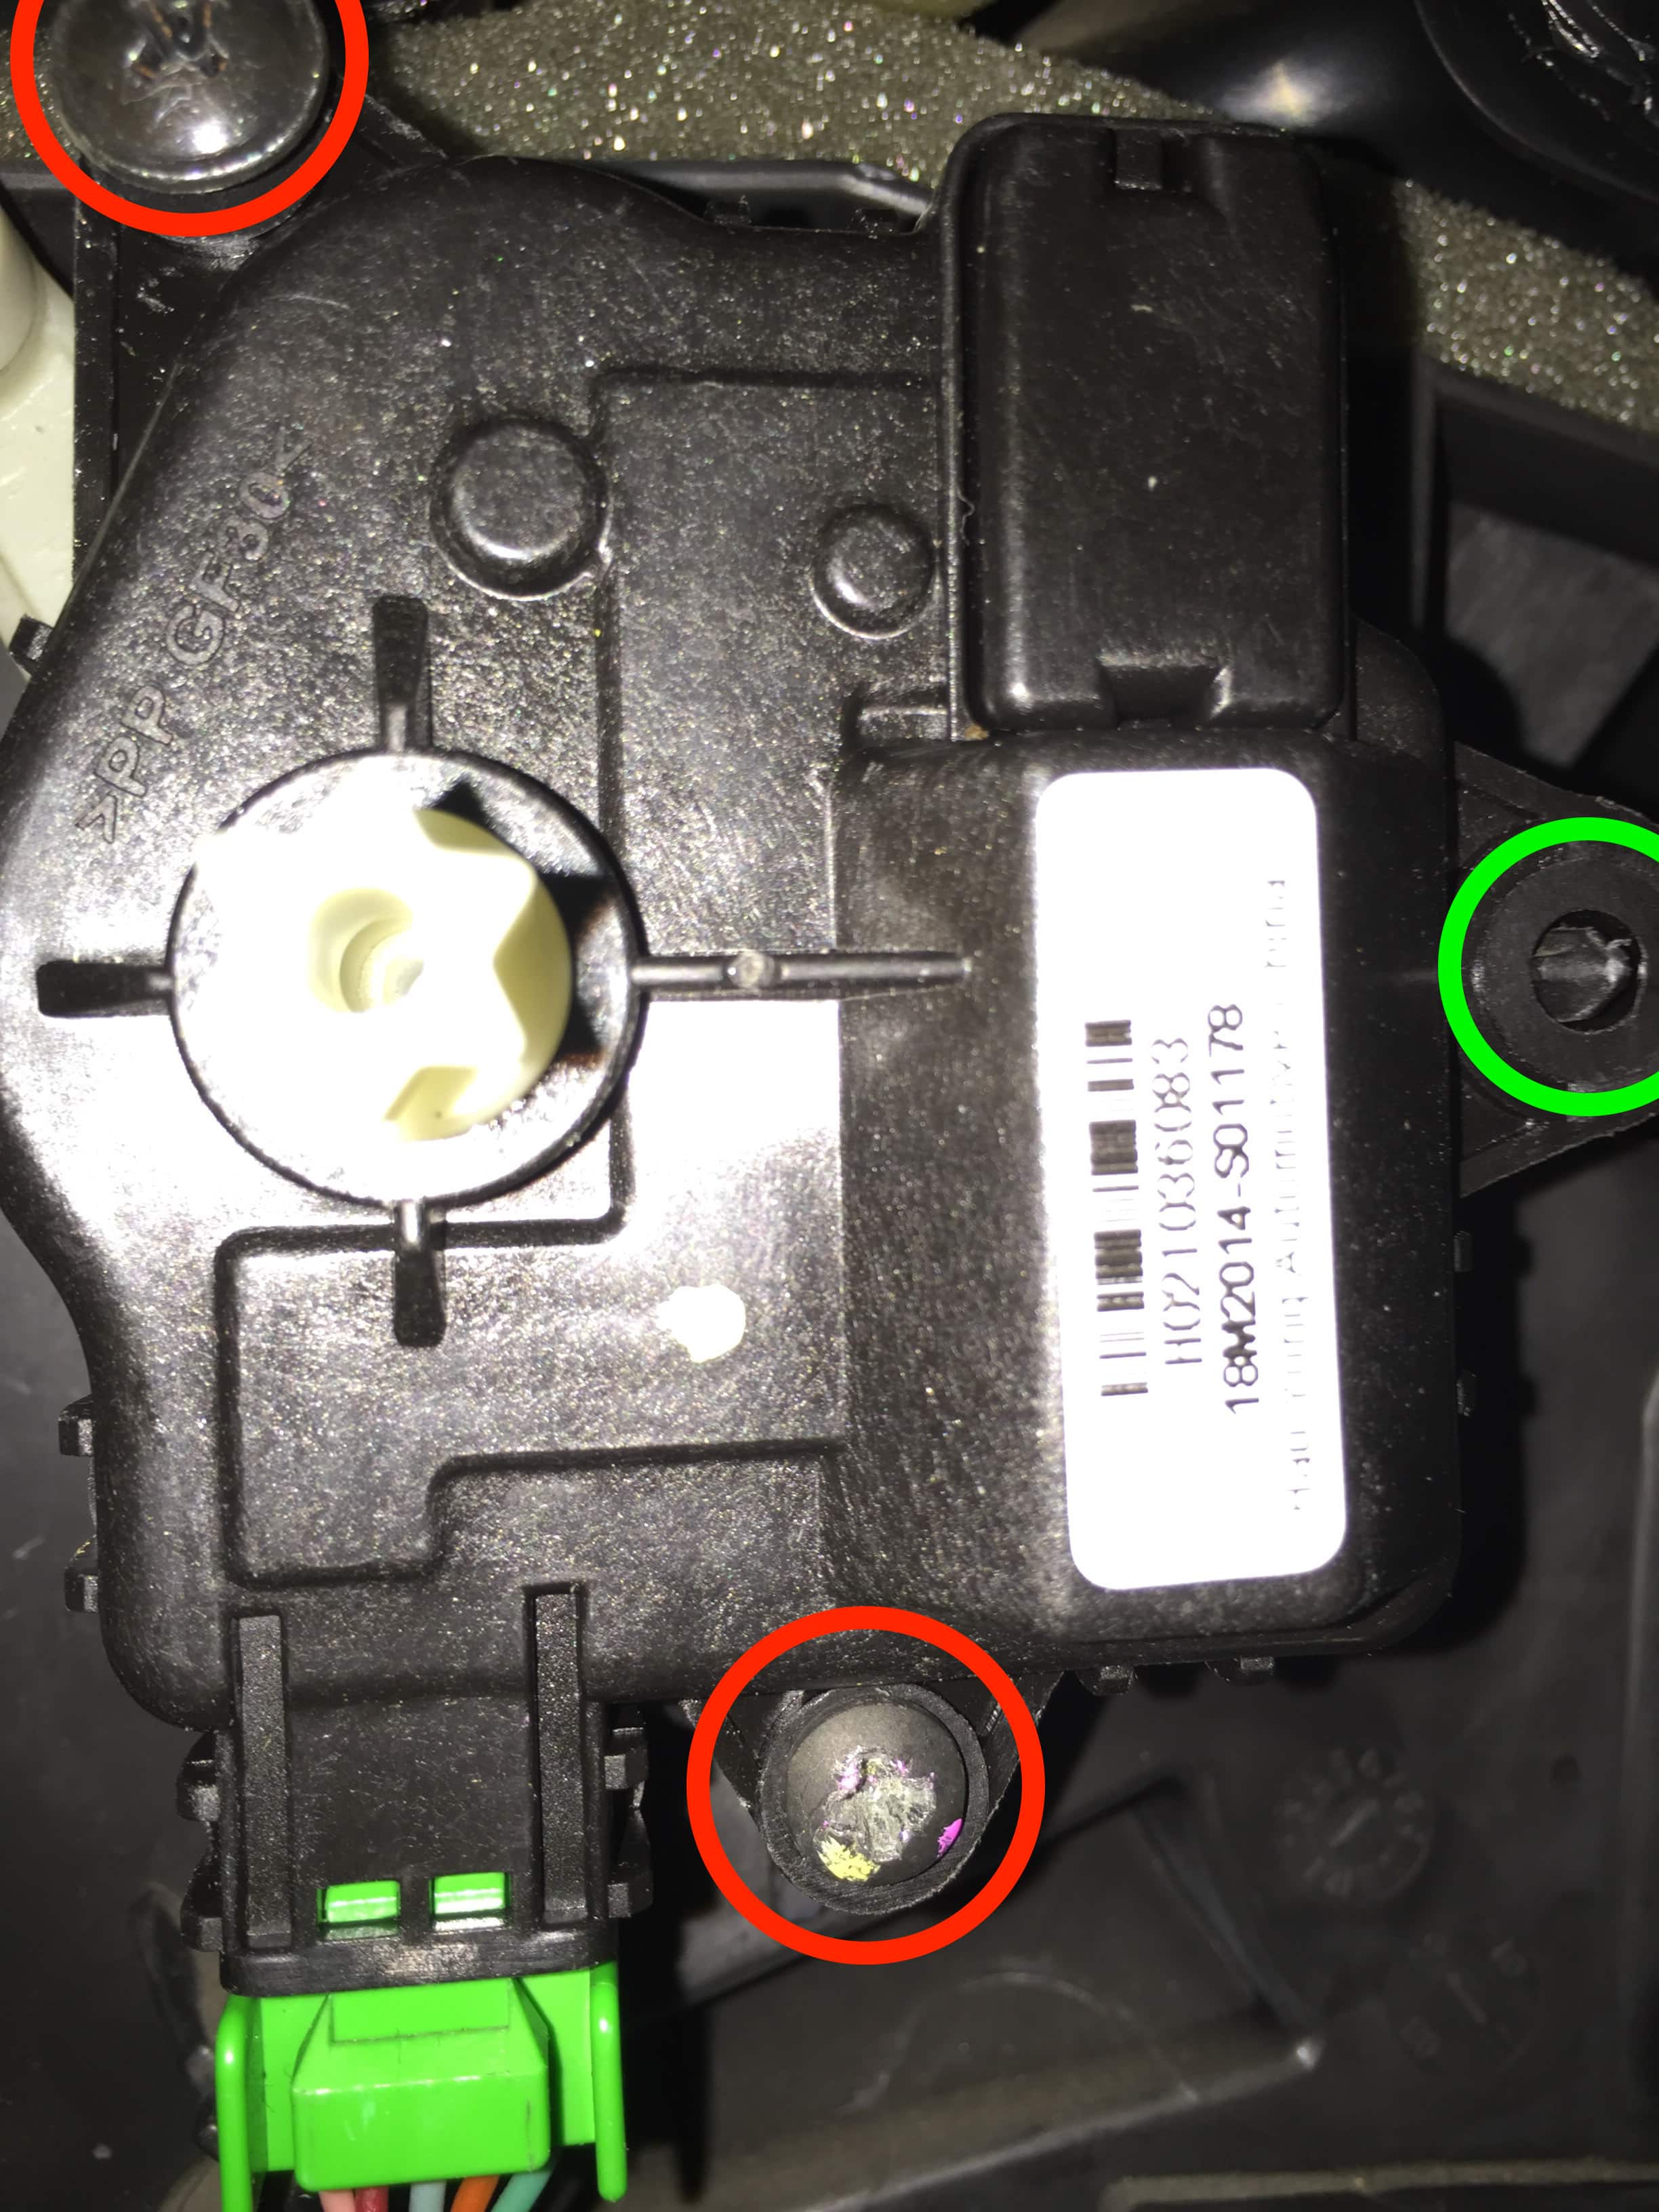
Replacing the actuator is a very difficult process due to the location in the vehicle. There are two screws (Red circles) holding the actuator in place, and one alignment pin (Green circle) to ensure the actuator is in the correct position. There is also a green wiring plug you will need to disconnect.
The bottom screw is relatively easy to access with a small stubby screwdriver or a ratcheting screwdriver set.
The top screw is extremely difficult to remove as there is limited space to operate. You may find yourself lying upside down in the footwell and painstakingly turning the screw millimetre by millimetre.
Once both screws are removed the motor will simply pull off from the HVAC arm. The HVAC arm may fall off, so take note of its orientation and position to simplify reinstallation.
Firstly reinstall any HVAC arms that may have fallen loose, then slide the arm onto the actuator – It can be in any position. Next place the actuator onto the alignment pin and begin to install the lower screw.
Commence installation of the upper screw, checking alignment and position of the actuator and HVAC arms.
Once both screws are tightened, connect the wiring harness and perform a HVAC relearn. You should now see the actuator moving smoothly without any clicking noises. When the relearn is complete, test operation between feet, face and demister. Keep in mind we have removed the ducting on the drivers feet!
Step 10
Passenger Side Actuator
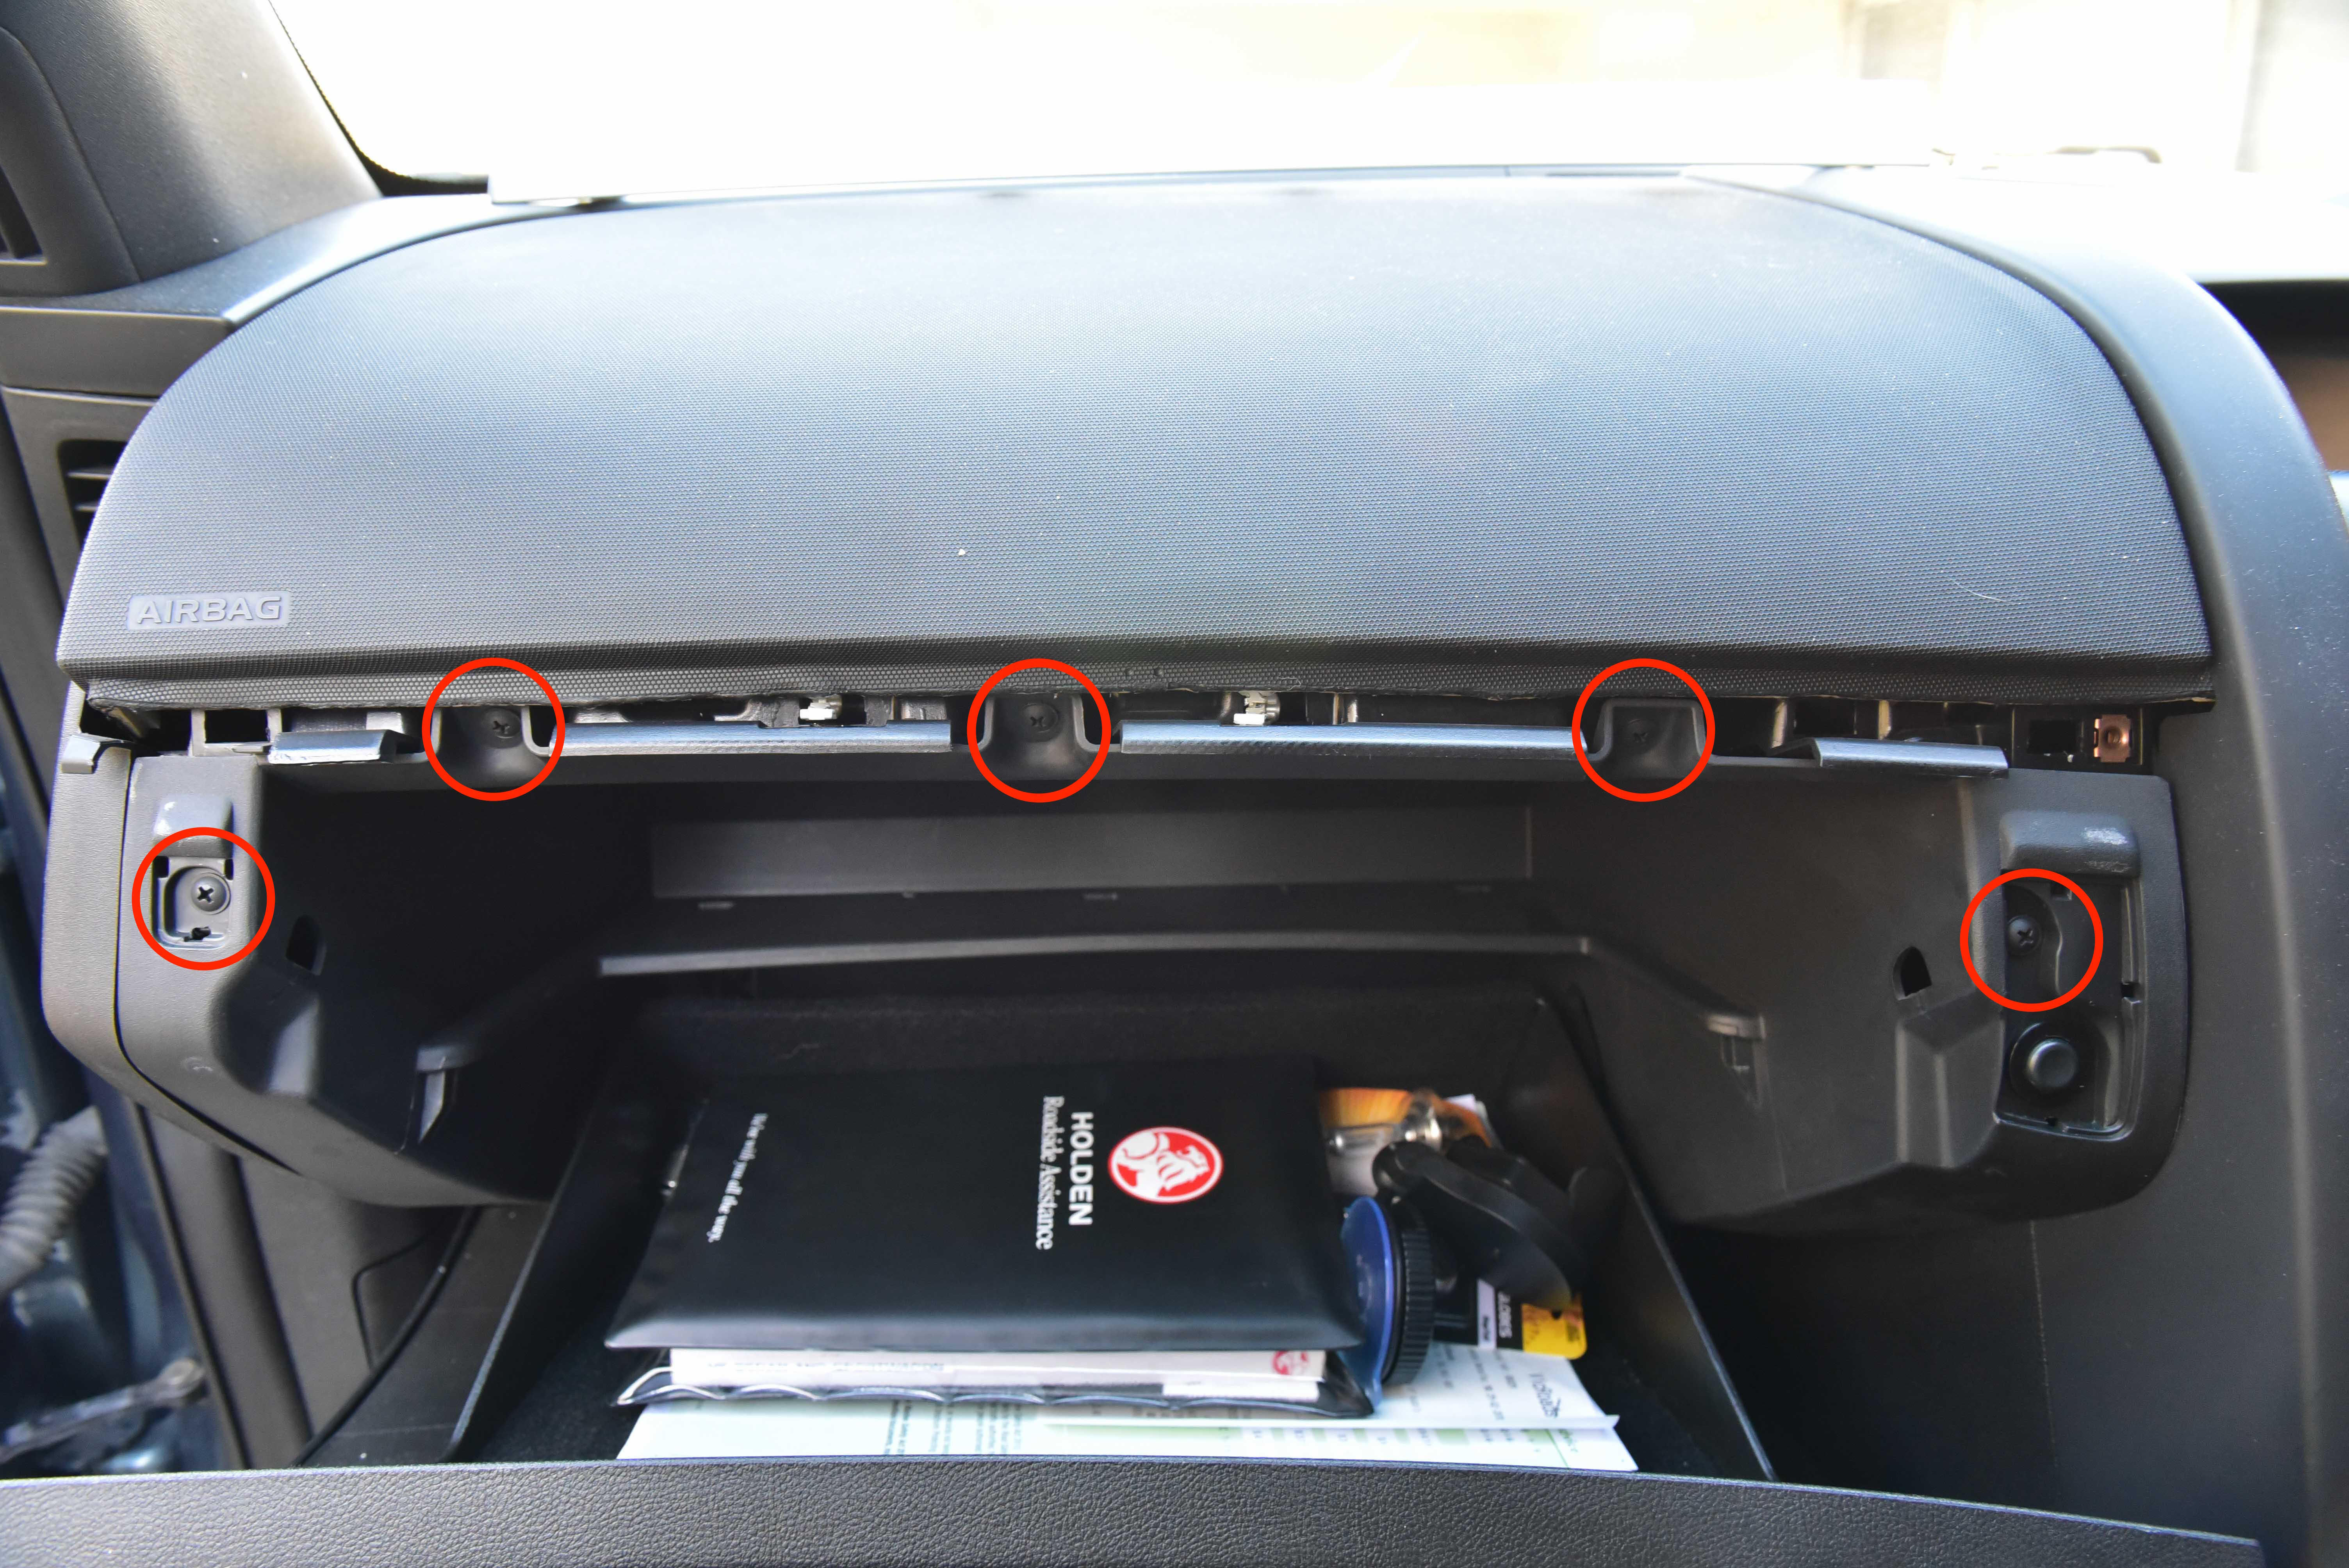
Remove the kick panel below the glove box. This is held in place by five clips.
Step 11
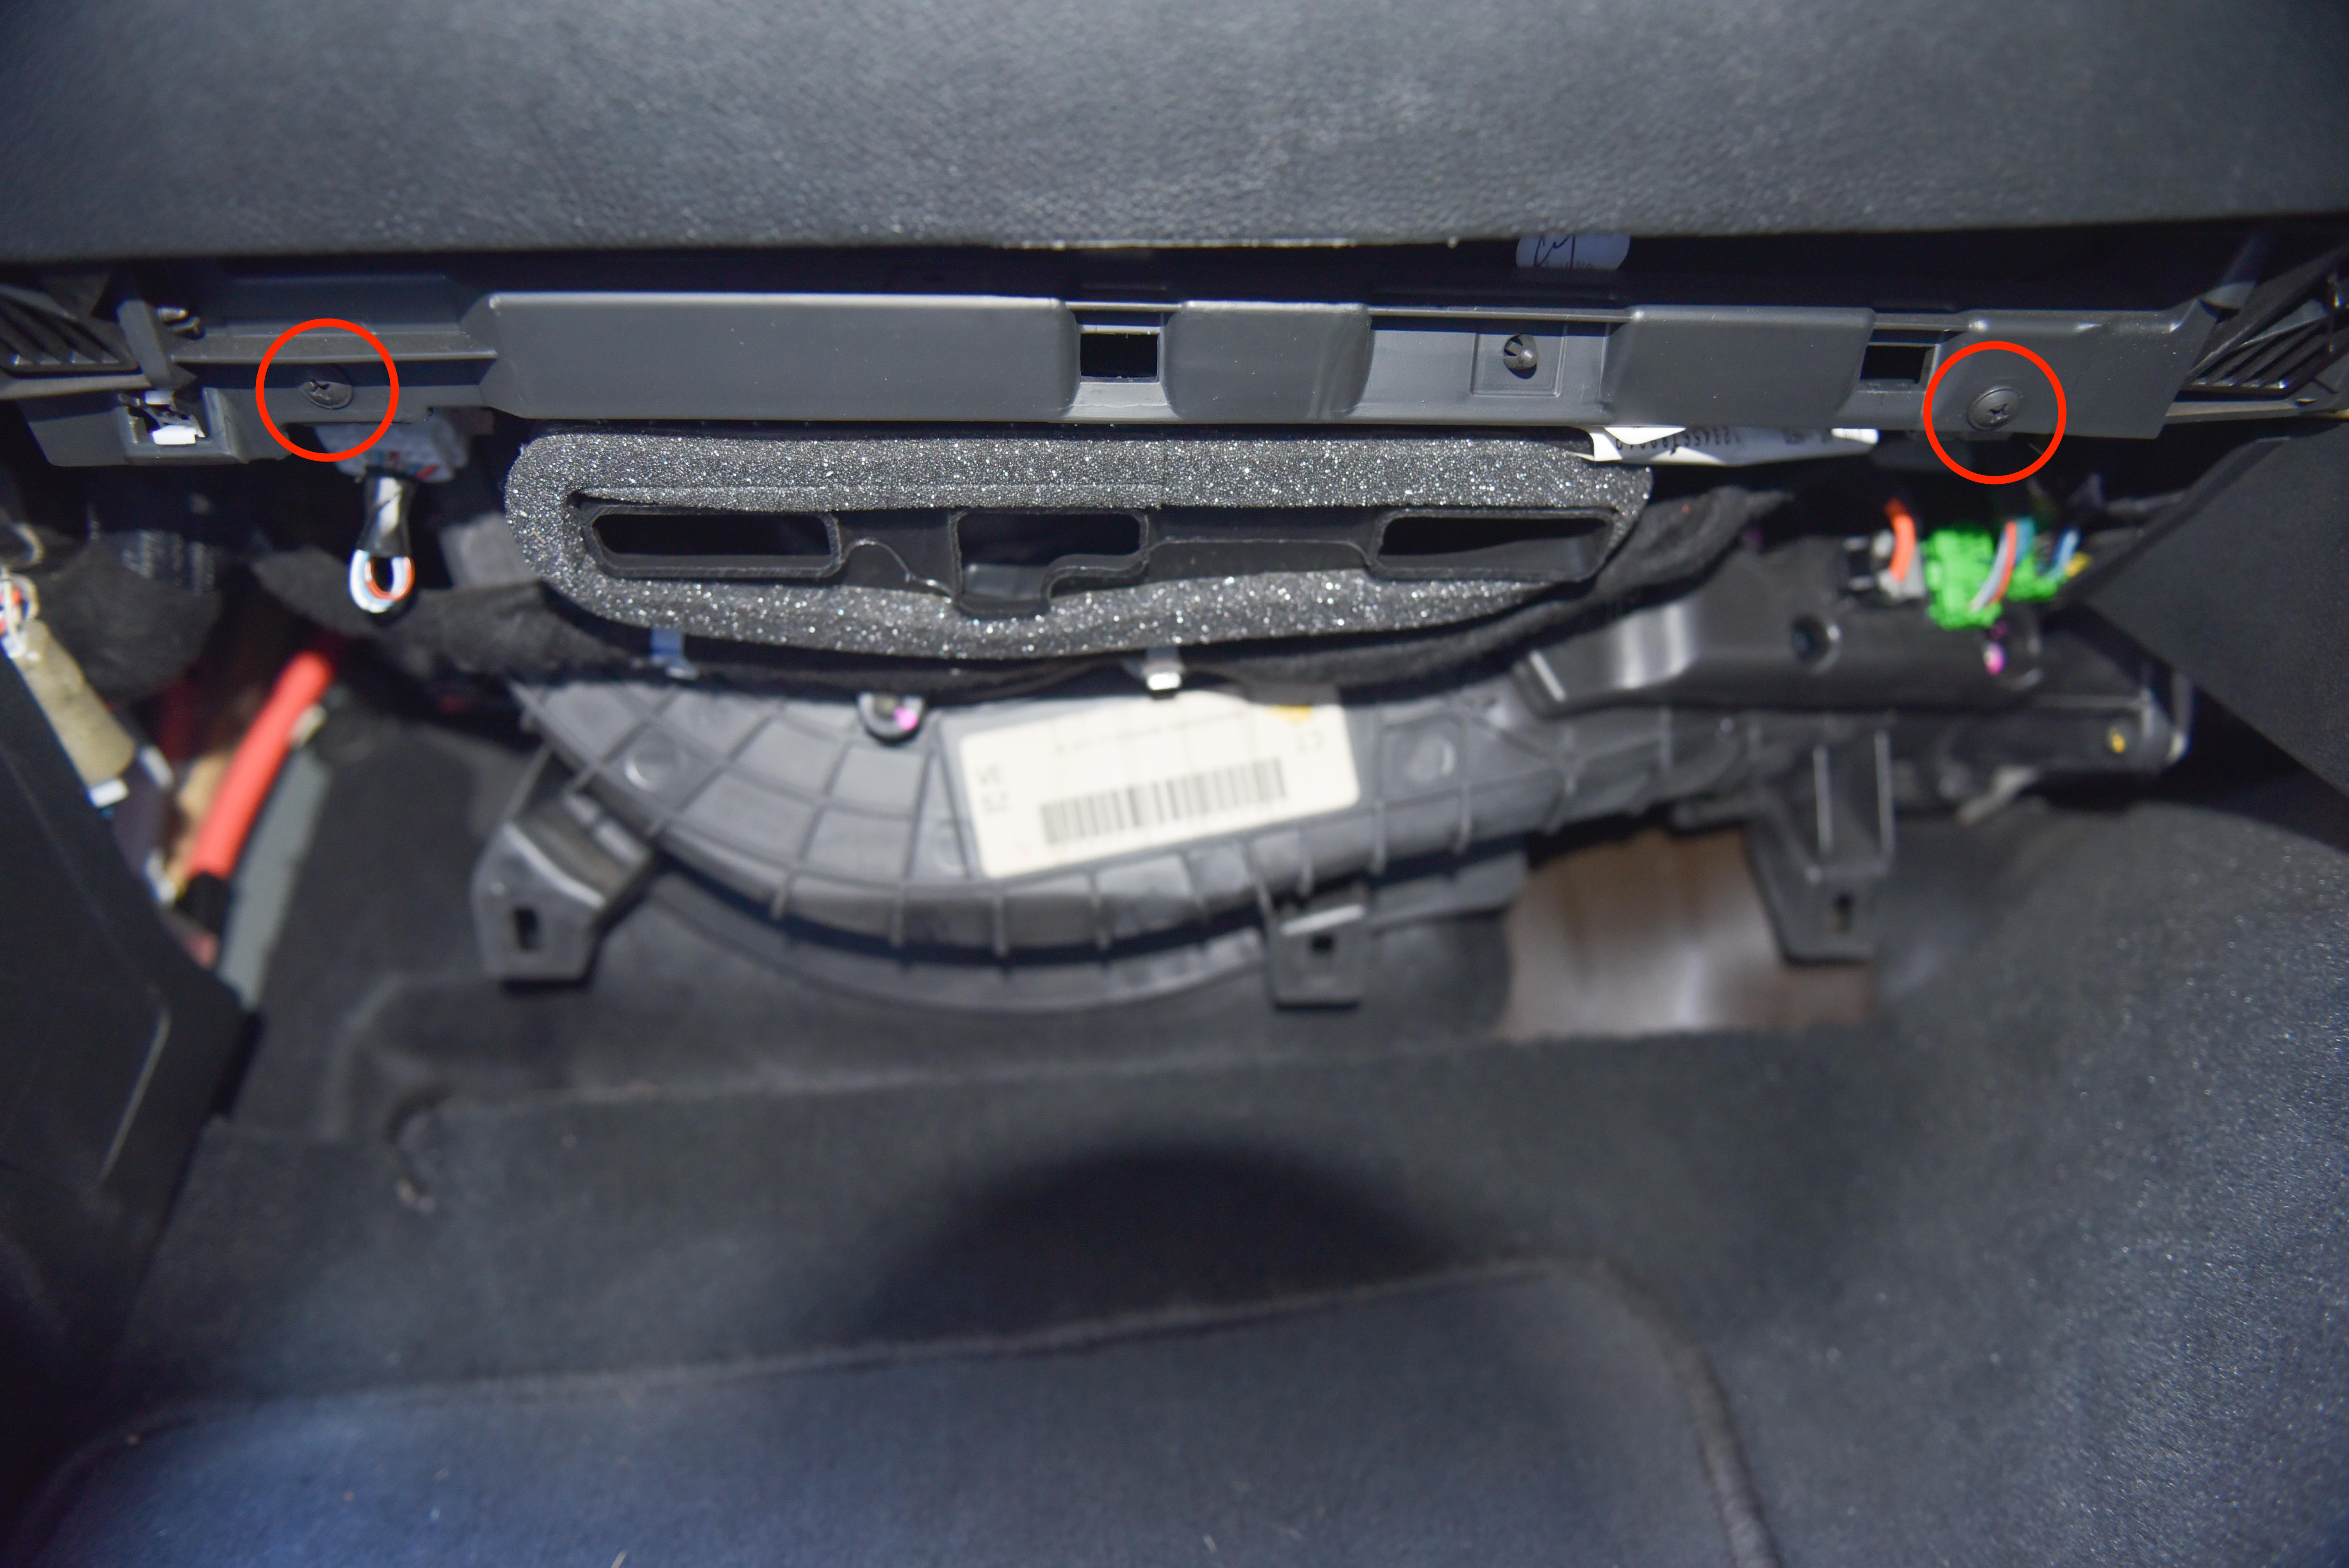
Remove the two screws which are now visible.
Step 12
Remove the five remaining screws. The far left and right screws are hidden behind small covers.
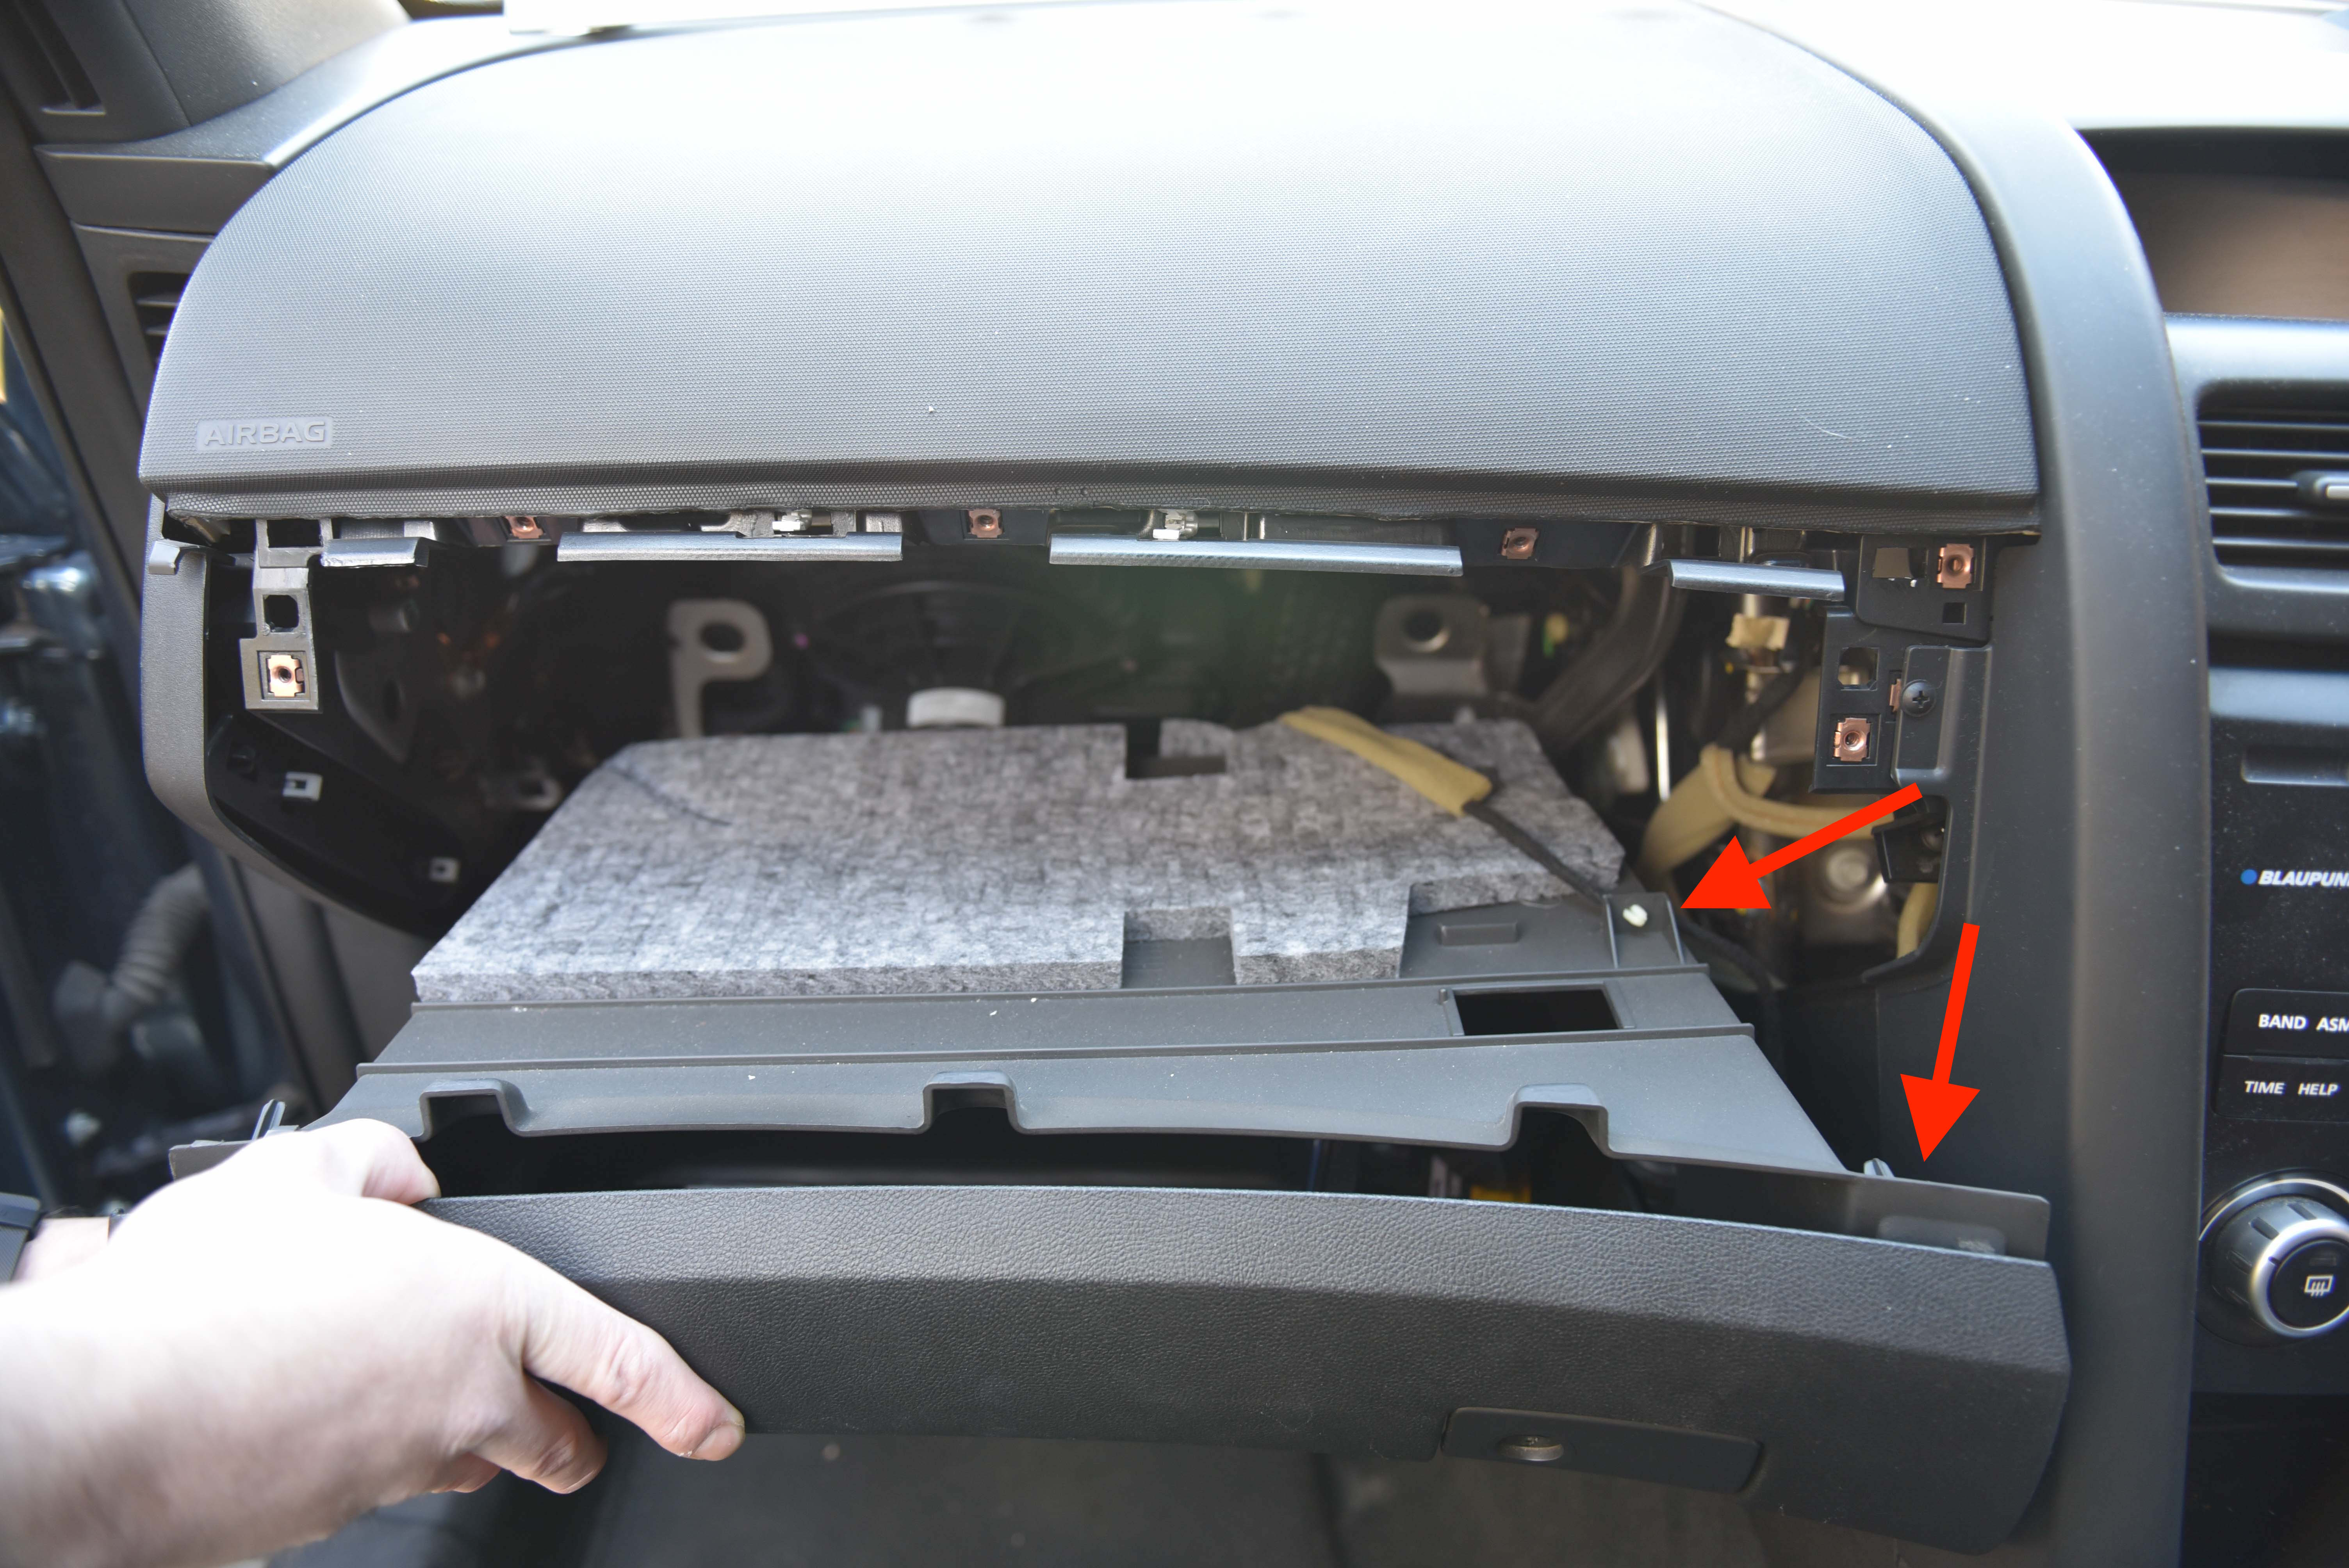
Step 13
The glovebox will now be loose. simply pull outwards and disconnect the boot release plug and loom.
Step 14
Pull outwards and down the side trim piece. It will unclip.
Step 15
Now we can see the passenger side actuator.
To verify the actuator is faulty, run the relearn process as described previously. If you feel or hear the actuator clicking, or the HVAC arms are not moving, the actuator is probably at fault and will need to be replaced.
Step 16
Remove the faulty actuator by unplugging the electrical connector, unscrewing the two screws and pulling the drive gear off the HVAC arm. This actuator is much easier to access compared to the drivers side.
Replace the actuator with a new unit. Screw into place and reconnect the wiring loom.
Once both screws are tightened, connect the wiring harness and perform a HVAC relearn. You should now see the actuator moving smoothly without any clicking noises. When the relearn is complete, test operation between feet, face and demister. Keep in mind we have removed the ducting on the passengers feet!
Did you find this guide helpful? Consider sharing it to help other car enthusiasts
Hi. I have a VE 09 SS ute and the recirculate vent has been closed for 12 months and no longer makes the clacking sound on start up.
I tried the relearn, and now the heater is stuck on hot.
Does this mean the recirc. Actuator is buggered and electrically stopped the cold air? If so, do you have instructions to get above the blower fan ?
Any help would be appreciated.
Well, I pulled the glovebox out and replaced the actuator on the side of the fan. What a bastard.
ADVICE always check the actuators action by pressing the relearn before pulling anything out. You can see which actuator is turning before you start. It appeared the air mixer one (top) wasn’t working. I moved the vent linkage to the open setting and refit. I got the cool a/c going again.
Still no recirc that I was trying to fix.
A very educational threat related to VE Commodore HVAC System. I am not sure if you will be able to direct me in the right direction to rectify my SS air con.
So it started last Saturday, I started the air – con first time after winter and I hear a hissing noise with no cold air coming out of the went. Few attempts later after switching the car off and restarting the AC light does not turns on and no hissing noise could be heard and the vents will only blow hot air.
Could this be an actuator issue? Refrigerant leakage? Or a compressor issue?
Hello, It sounds like a seal has gone and refrigerant has leaked out. This is why it’s crucial to use your A/C all year round, even in winter as it keeps the system lubricated.
Thank you Team AI for coming back to my question. I hope you would not mind me asking another question.
So went to my local Mechanic and he tried to check leaks in the system unfortunately could not find one. He hooked a R134 refrigerant cylinder to the system and tried to give a system a little bit of gas just to make sure if the Compressor is engaging or not, please note the system was not fully re-gased. In the mean while all the fuses and connections were checked to rule out power issues. Unfortunately th A/C button does bot lit after this.
My question is does the needs to be fully re-gased for the A/C button to engage the compressor or is there an issue with the button it self.
The car is still at his place for the last few days and we are still unable to determine a possible cause which is stopping the A/C to work.
Would really appreciate if you could respond to this.
Staff @ AutoInstruct October 12, 2017
Hello, Honestly I am unsure. It sounds like there could be an issue with the HVAC system, and a sensor somewhere (Such as a pressure sensor)


This Post Has 222 Comments
Thanks heaps this site saved me a lot of money
Awesome!
Hey guys
I have a 2009 Ve commodore sedan
And it is stuck on the front window setting and stuck on heating won’t cool or change
Any ideas ?
Likely to be the drivers side actuator
Where are you located would like to come grab one of possible
Hello, Sorry we don’t offer pickup.
I’ve lost the original position of the drivers side arm as it fell off during removal. Do you have a pic or diagram of how it should go on? Thanks.
Hi, Other than the pictures in this tutorial we don’t have anything else sorry.
Hi. I have a VE 09 SS ute and the recirculate vent has been closed for 12 months and no longer makes the clacking sound on start up.
I tried the relearn, and now the heater is stuck on hot.
Does this mean the recirc. Actuator is buggered and electrically stopped the cold air? If so, do you have instructions to get above the blower fan ?
Any help would be appreciated.
Hi Nigel, It does sound possible. However we don’t have instructions on accessing the area above the blower sorry.
Well, I pulled the glovebox out and replaced the actuator on the side of the fan. What a bastard.
ADVICE always check the actuators action by pressing the relearn before pulling anything out. You can see which actuator is turning before you start. It appeared the air mixer one (top) wasn’t working. I moved the vent linkage to the open setting and refit. I got the cool a/c going again.
Still no recirc that I was trying to fix.
Hi AI Team,
A very educational threat related to VE Commodore HVAC System. I am not sure if you will be able to direct me in the right direction to rectify my SS air con.
So it started last Saturday, I started the air – con first time after winter and I hear a hissing noise with no cold air coming out of the went. Few attempts later after switching the car off and restarting the AC light does not turns on and no hissing noise could be heard and the vents will only blow hot air.
Could this be an actuator issue? Refrigerant leakage? Or a compressor issue?
Your help would be really appreciated.
Hello, It sounds like a seal has gone and refrigerant has leaked out. This is why it’s crucial to use your A/C all year round, even in winter as it keeps the system lubricated.
Thank you Team AI for coming back to my question. I hope you would not mind me asking another question.
So went to my local Mechanic and he tried to check leaks in the system unfortunately could not find one. He hooked a R134 refrigerant cylinder to the system and tried to give a system a little bit of gas just to make sure if the Compressor is engaging or not, please note the system was not fully re-gased. In the mean while all the fuses and connections were checked to rule out power issues. Unfortunately th A/C button does bot lit after this.
My question is does the needs to be fully re-gased for the A/C button to engage the compressor or is there an issue with the button it self.
The car is still at his place for the last few days and we are still unable to determine a possible cause which is stopping the A/C to work.
Would really appreciate if you could respond to this.
Hello, Honestly I am unsure. It sounds like there could be an issue with the HVAC system, and a sensor somewhere (Such as a pressure sensor)