The concept of installing a dash cam can seem quite daunting, however it is actually relatively simple with some basic tools and electrical knowledge. In the tutorial below AutoInstruct will show you how to install a front dashcam.
For this tutorial we’re installing a BlackVue DR650S-1CH in a MK2 Volkswagen Tiguan.
Work at your own risk. This work is inherently dangerous and must only be carried out by a qualified mechanic. AutoInstruct will not be held responsible for damage to your vehicle or personal injury / death as a result of the information we provide.
Step 1
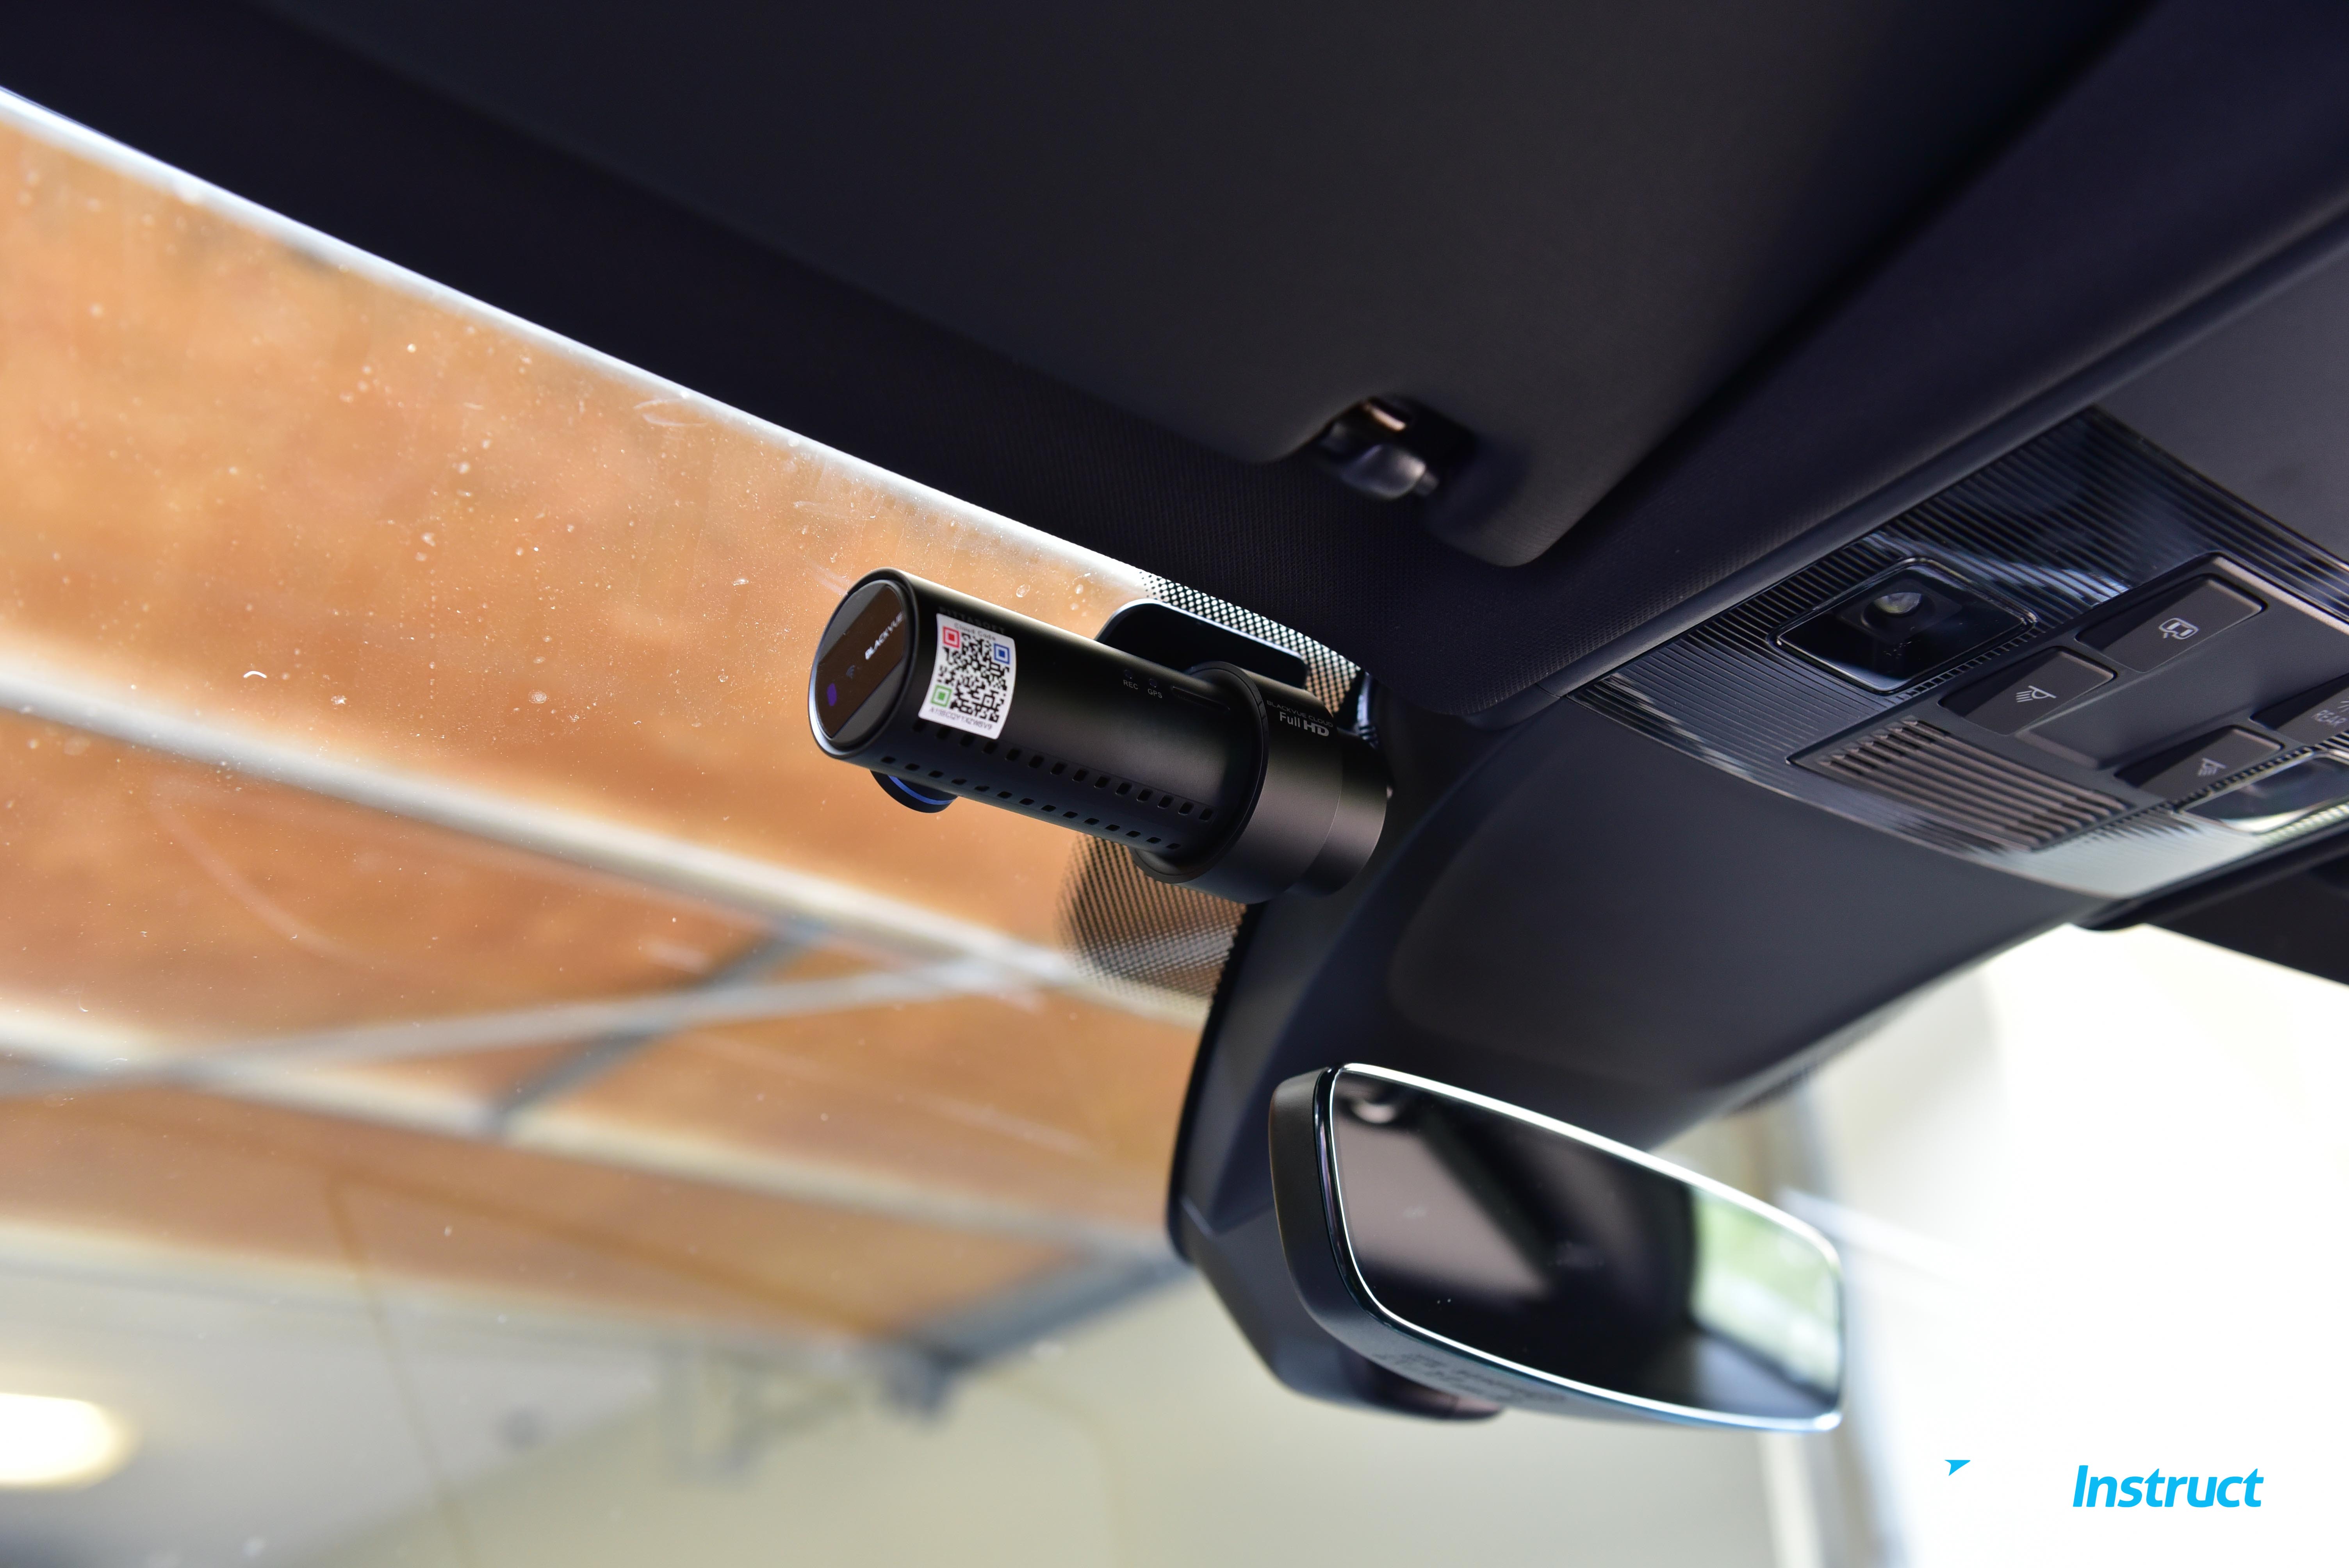
First, we need to choose a suitable mounting location on the front windshield. Power on the camera using the cigarette lighter and check the footage to ensure you are happy with the position. Being a Right Hand Drive (RHD) vehicle we’ve chosen to mount the camera on the left-hand side.
Ensure you leave adequate space between the camera and mirror to allow for movement in the mirror. Once the spot is chosen, stick the camera to the windshield.
Step 2
We will run the power cable in the direction shown, leading to the fuse box behind the glovebox.
For Left Hand Drive (LHD) models, this fuse box is located behind the driver’s knee coin tray.
Step 3
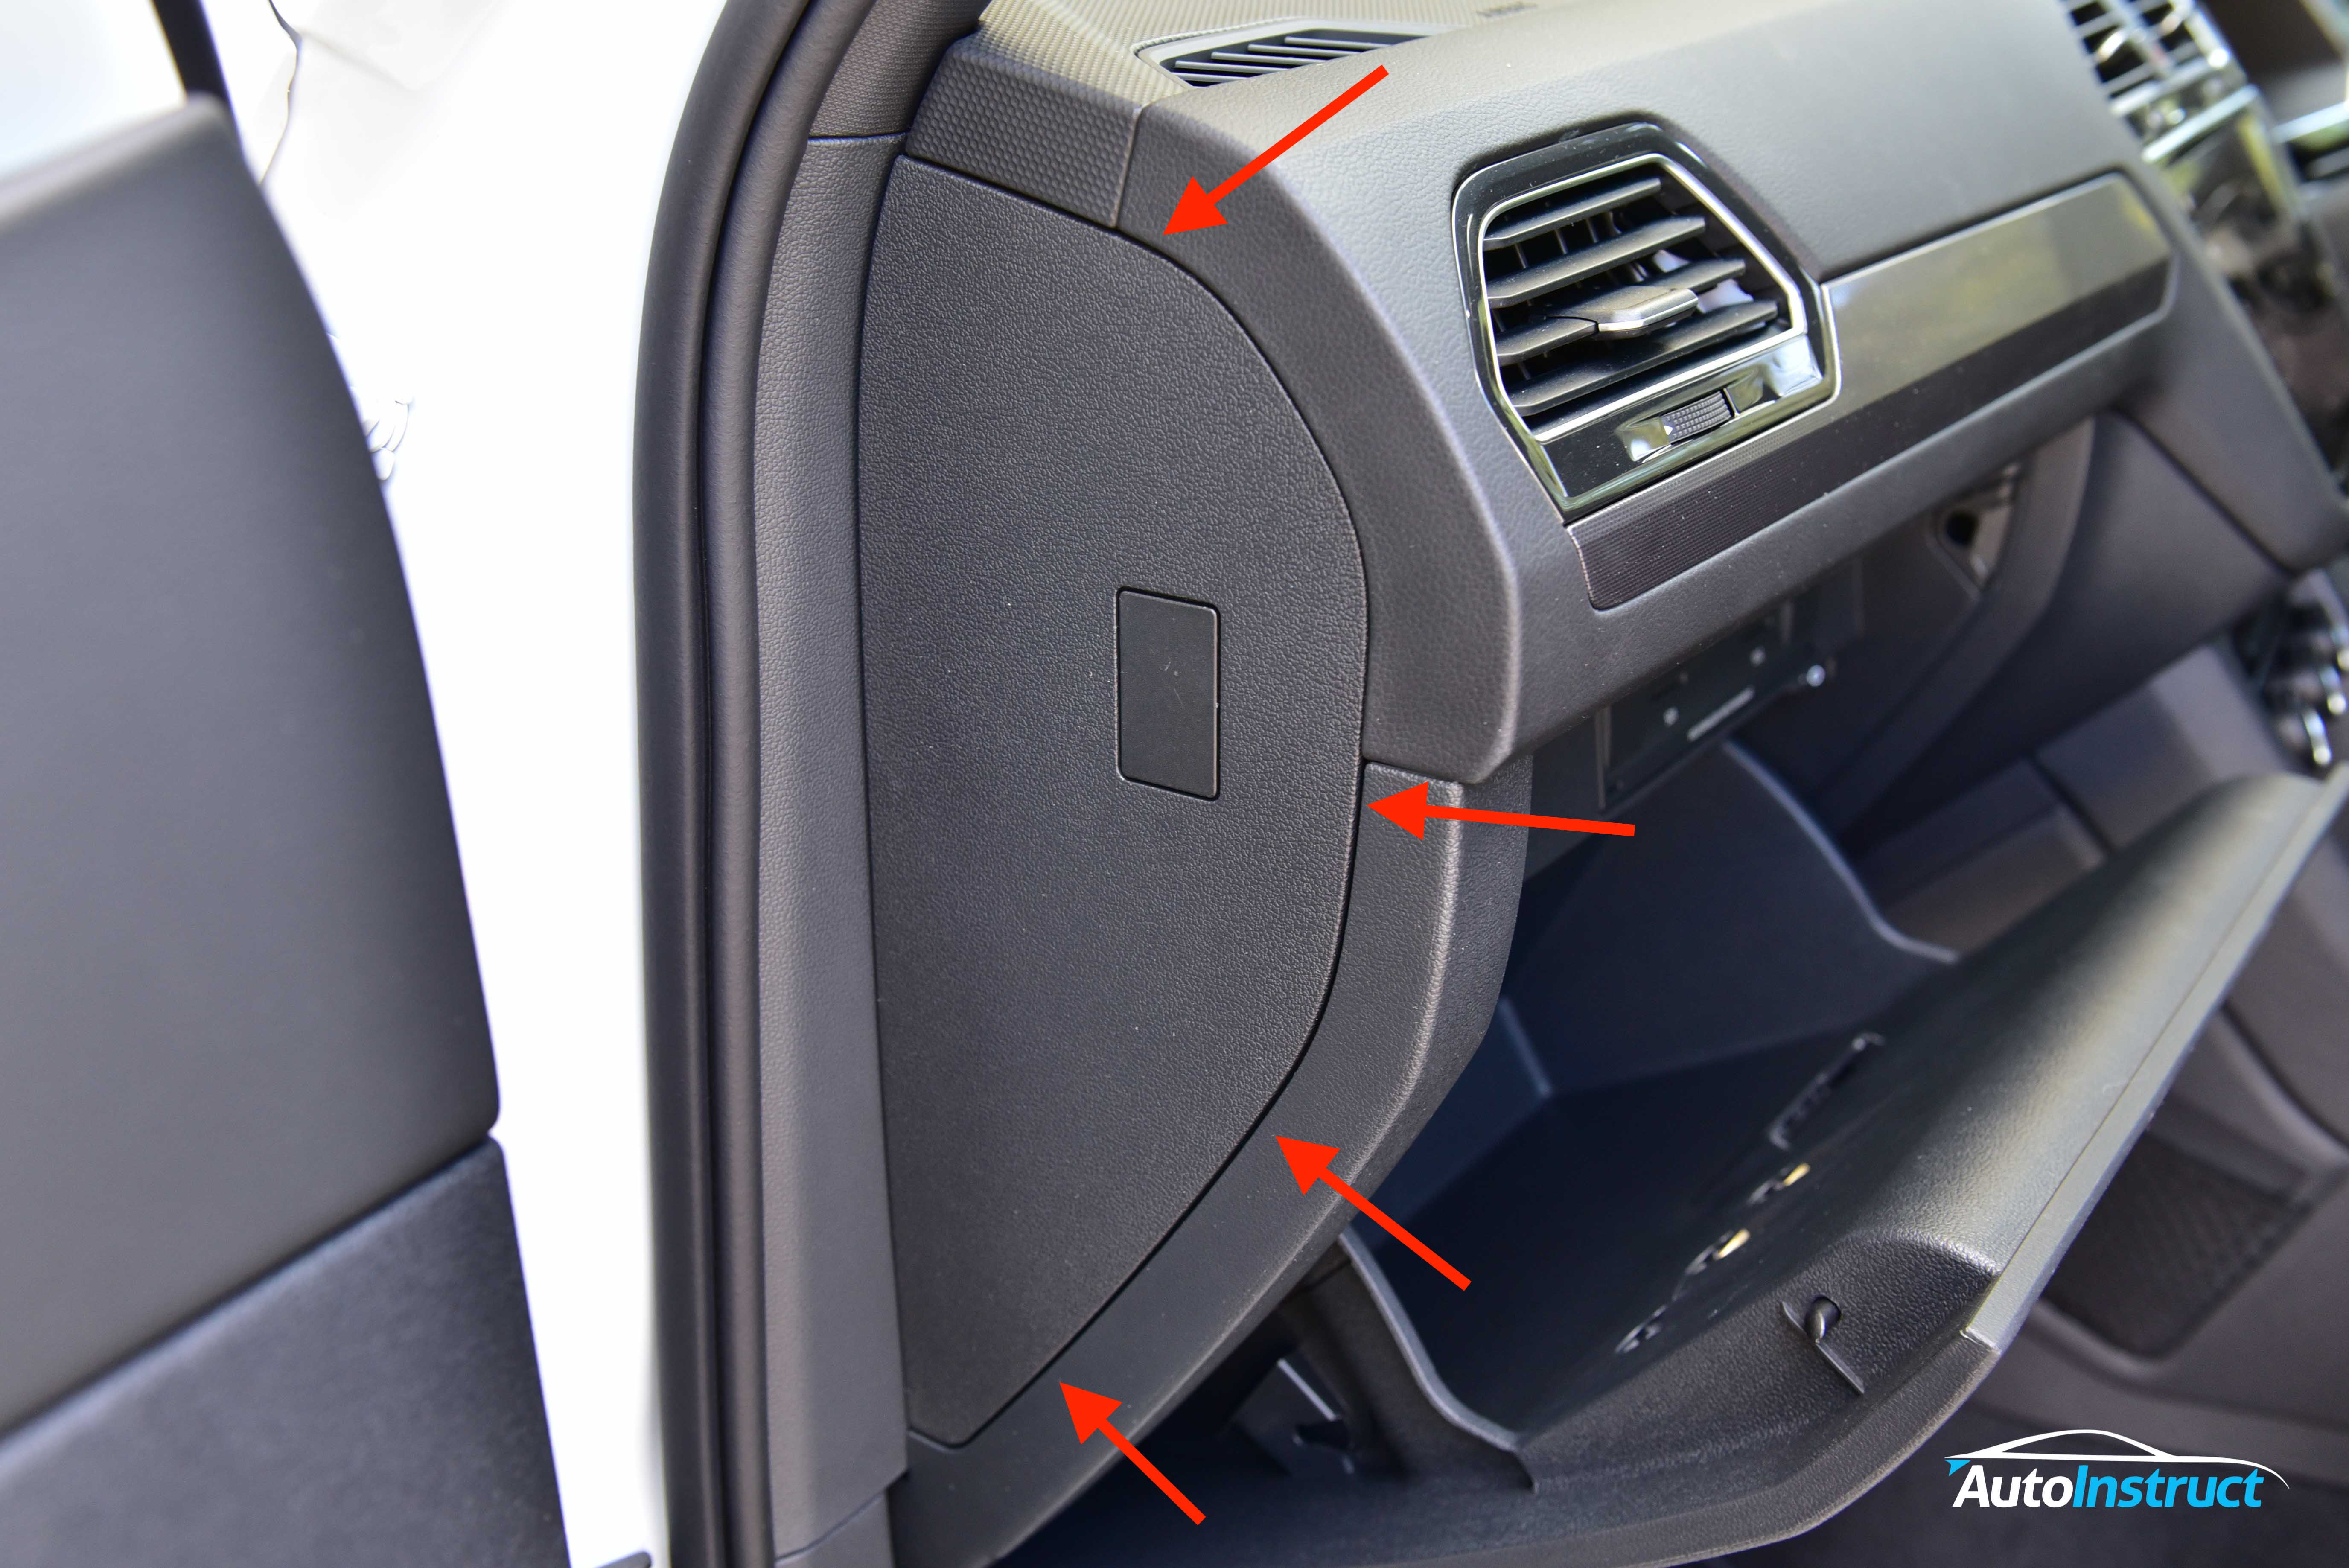
Using a trim removal tool gently remove the side cover of the glove box. There are four clips holding this in place as pictured.
Step 4
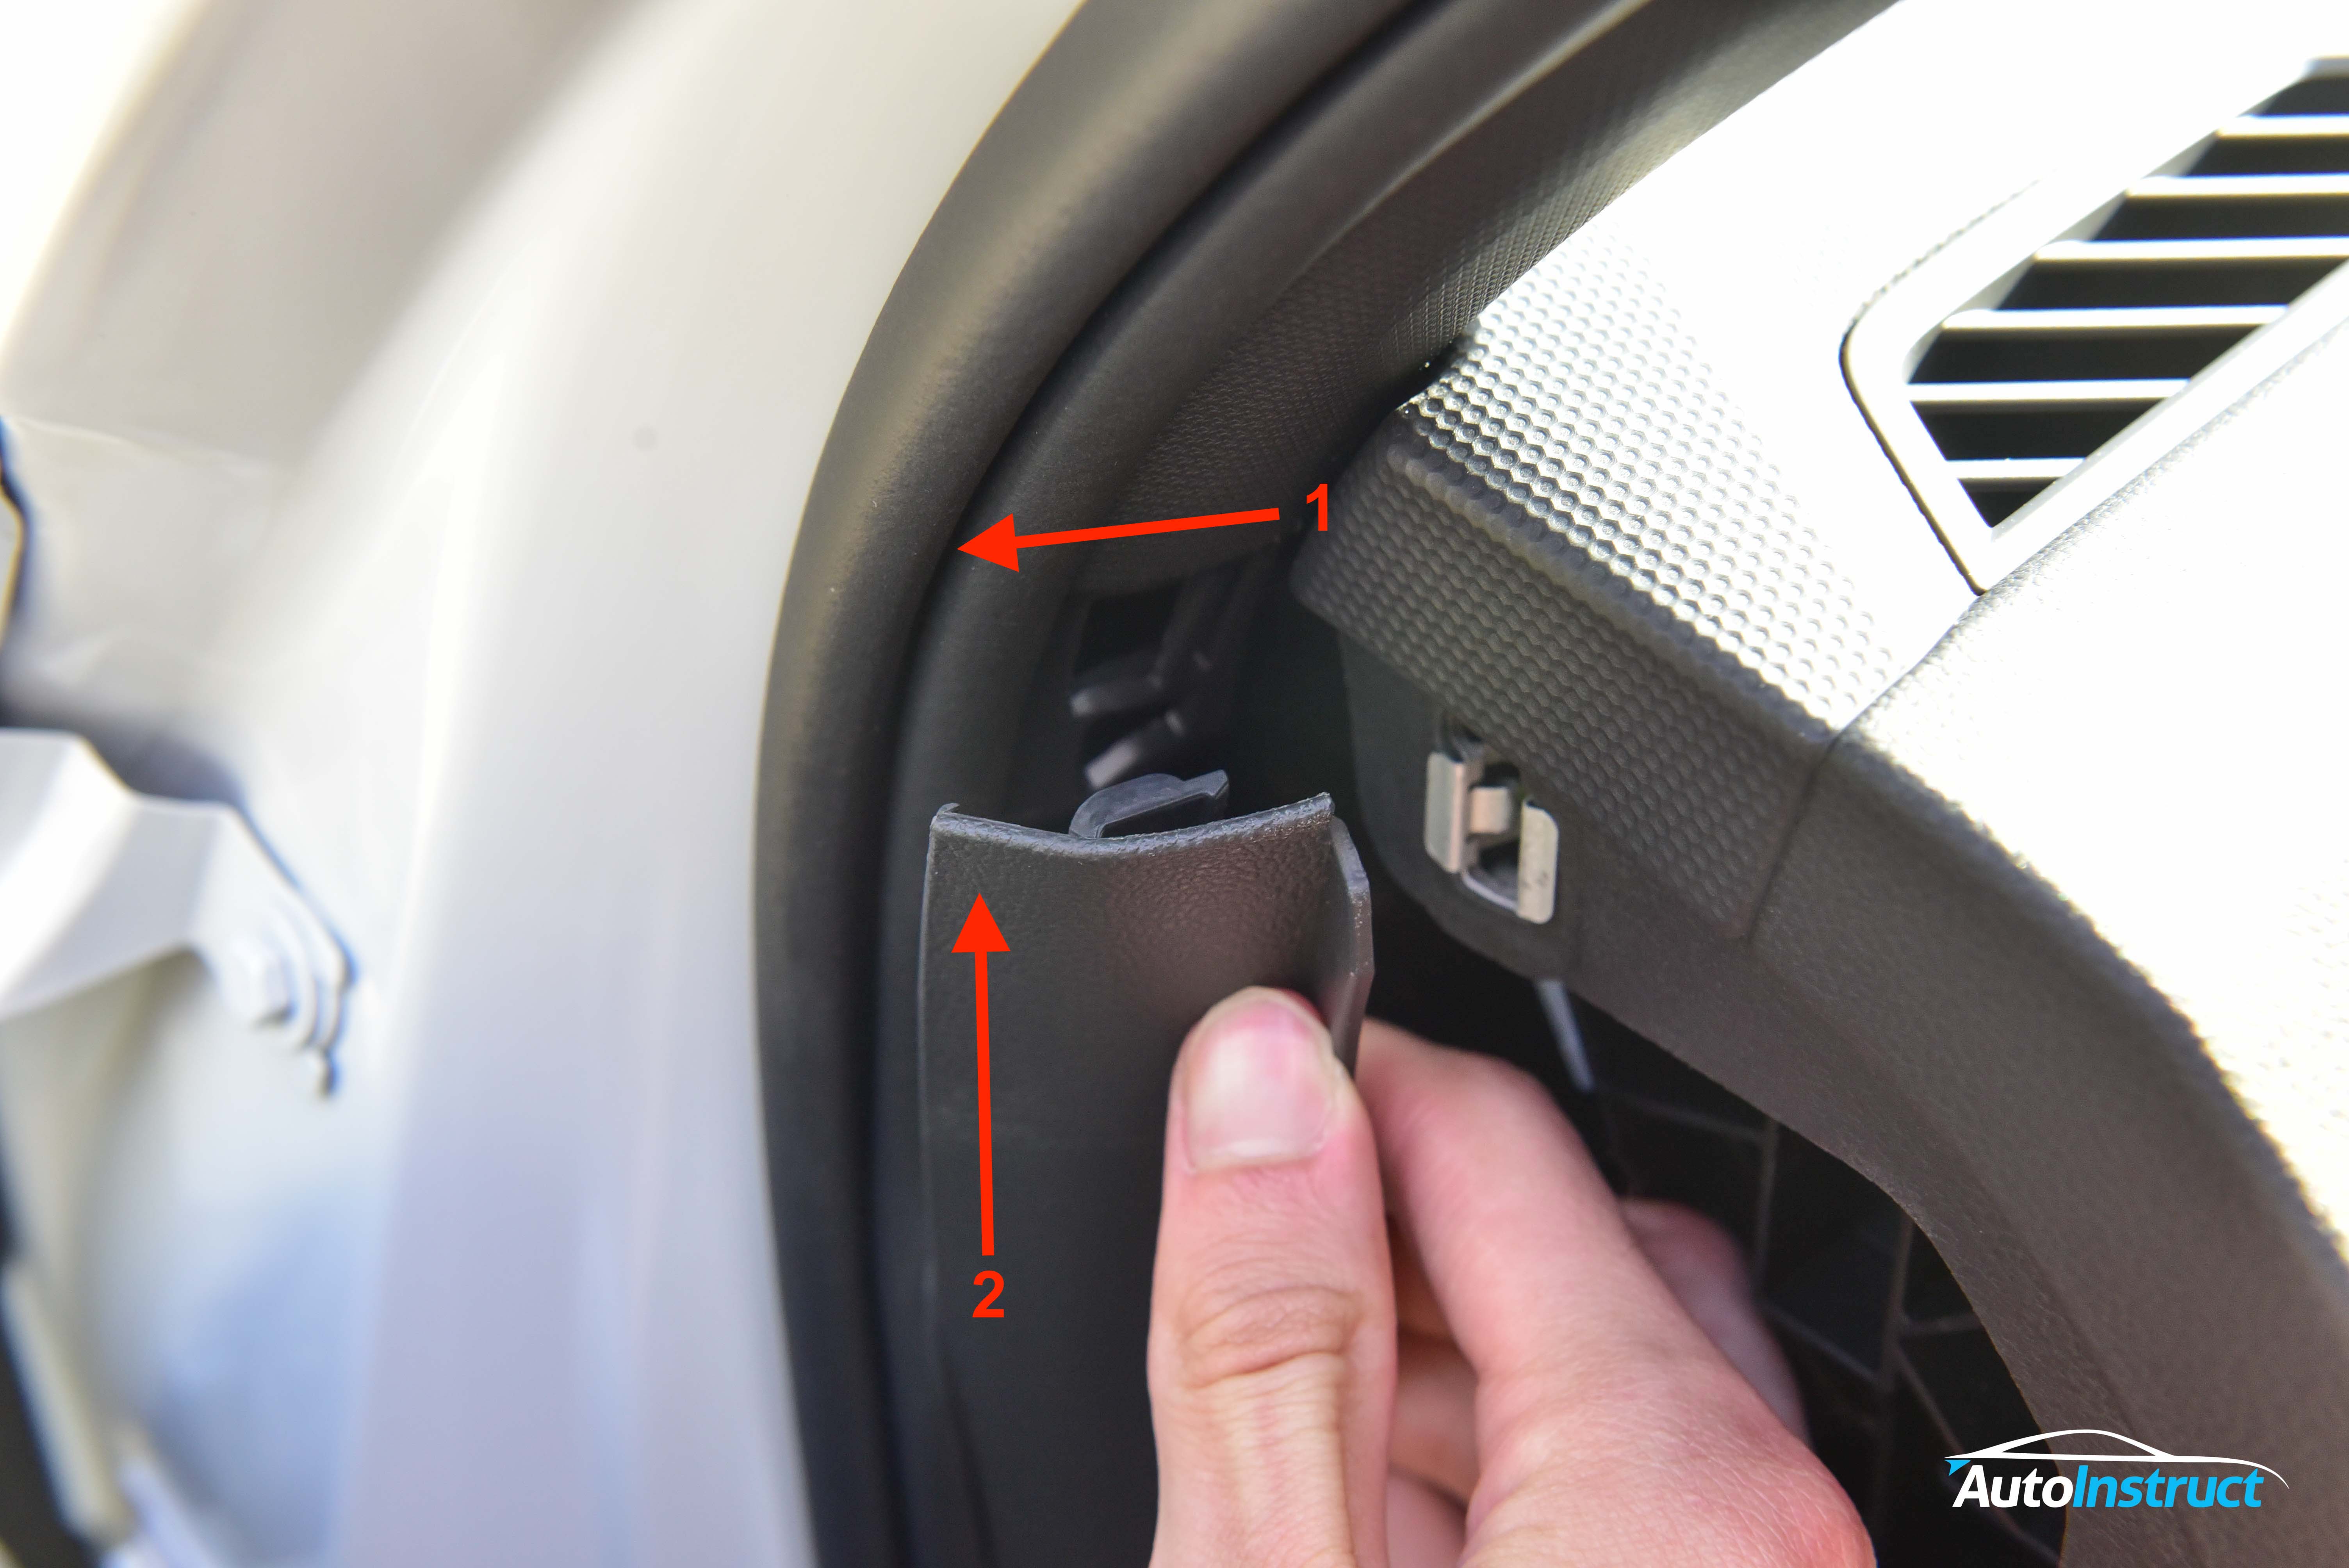
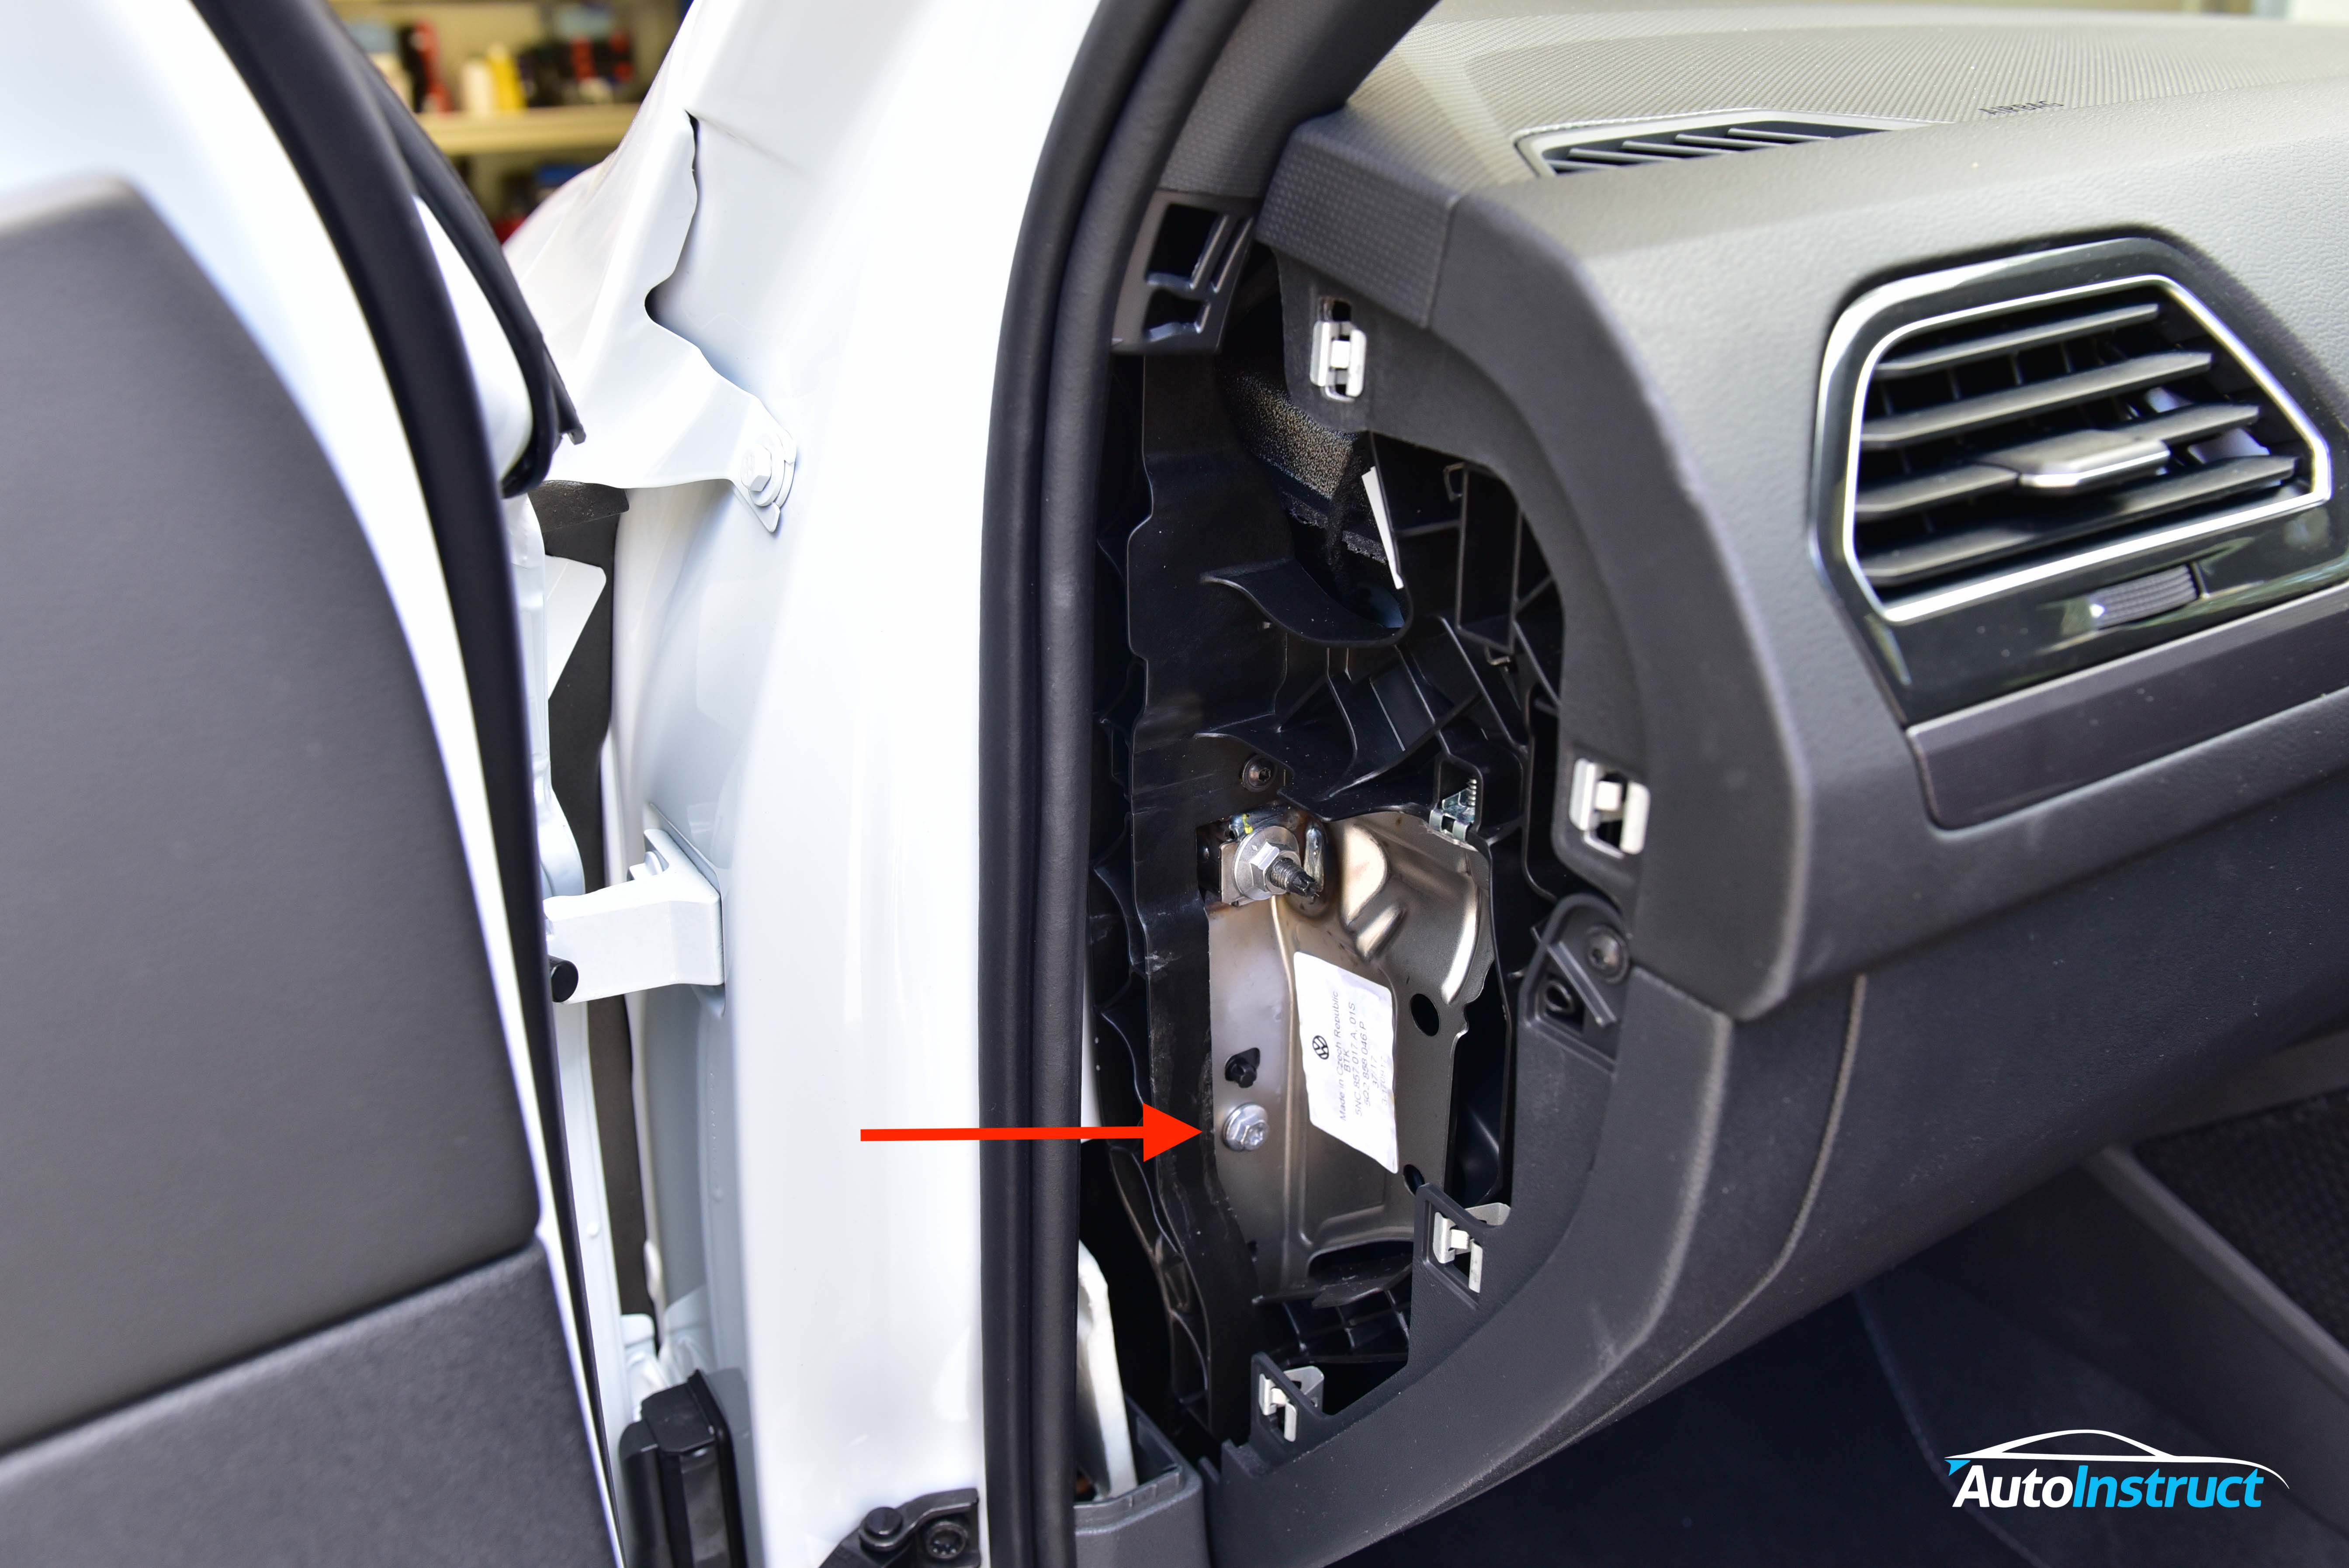
Remove the vertical spear which runs alongside the door seal. Grasp the top section and pull towards the door to unclip as pictured.
Next, slide the spear upwards to release the lower clip.
Step 5
When feeding the cables we need to ensure we do not obsecure the airbag in the event of a deployment. Essentially this means we never run the cables between the airbag and vehicle occupants.
Step 6
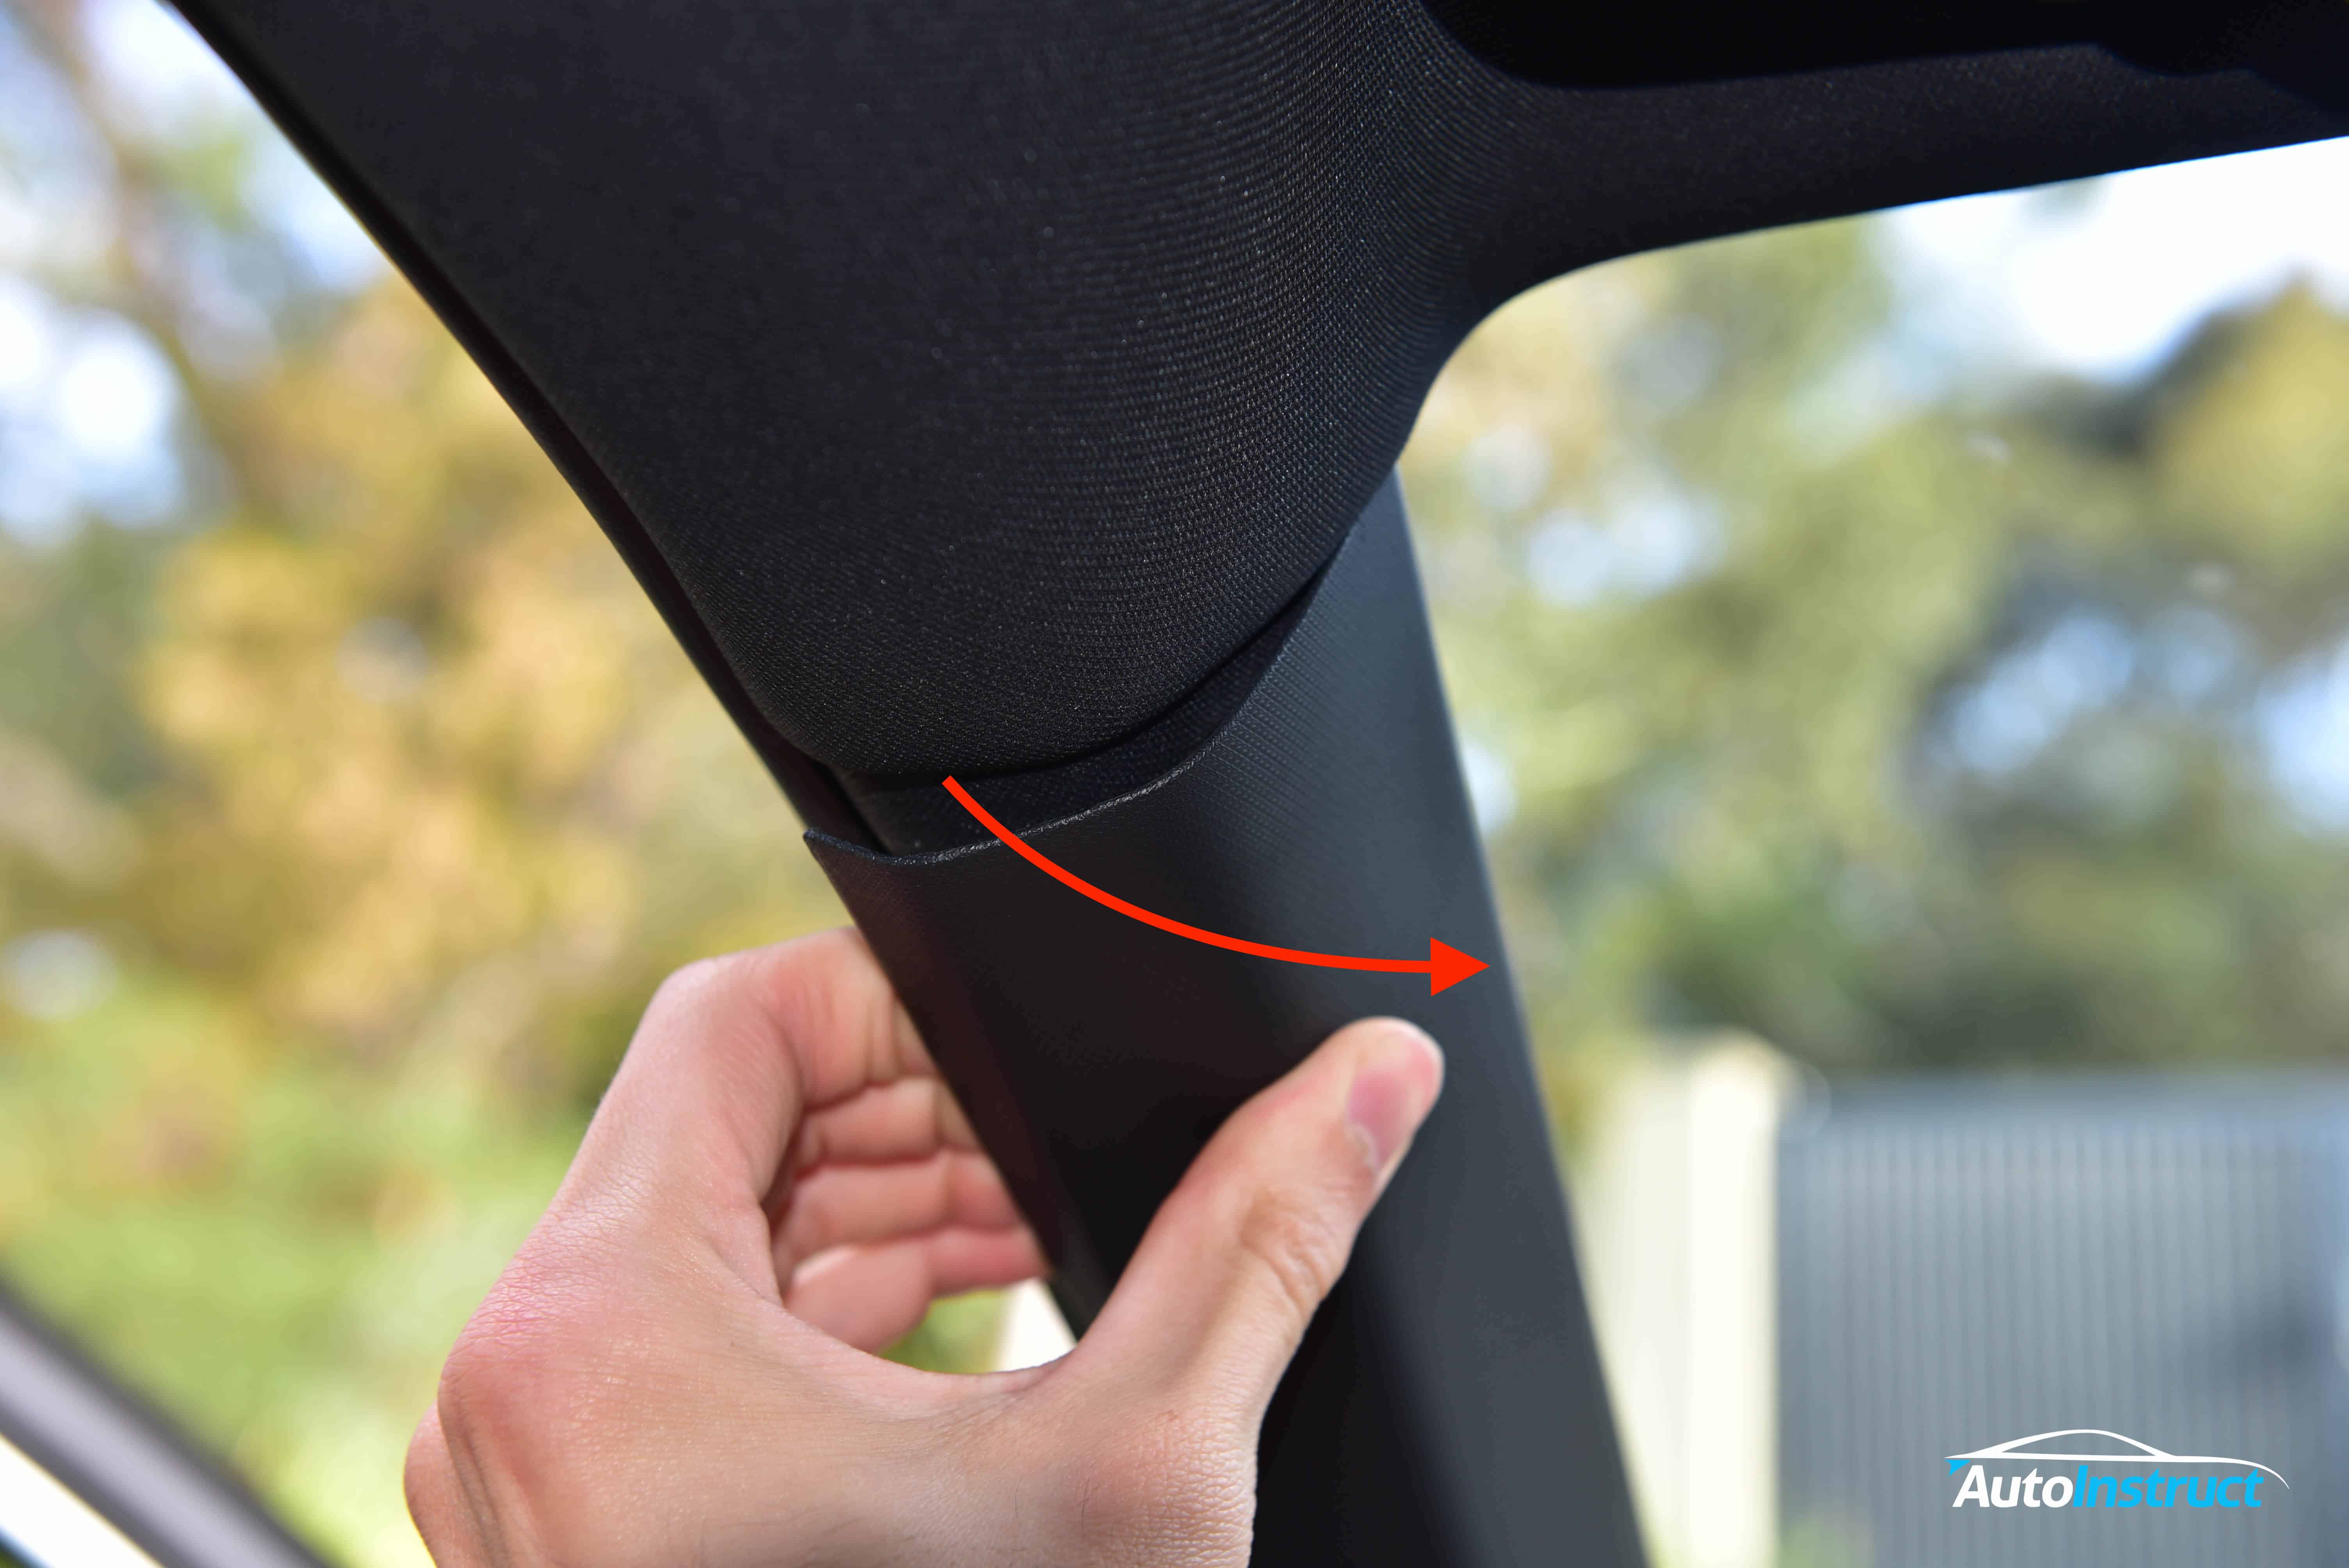
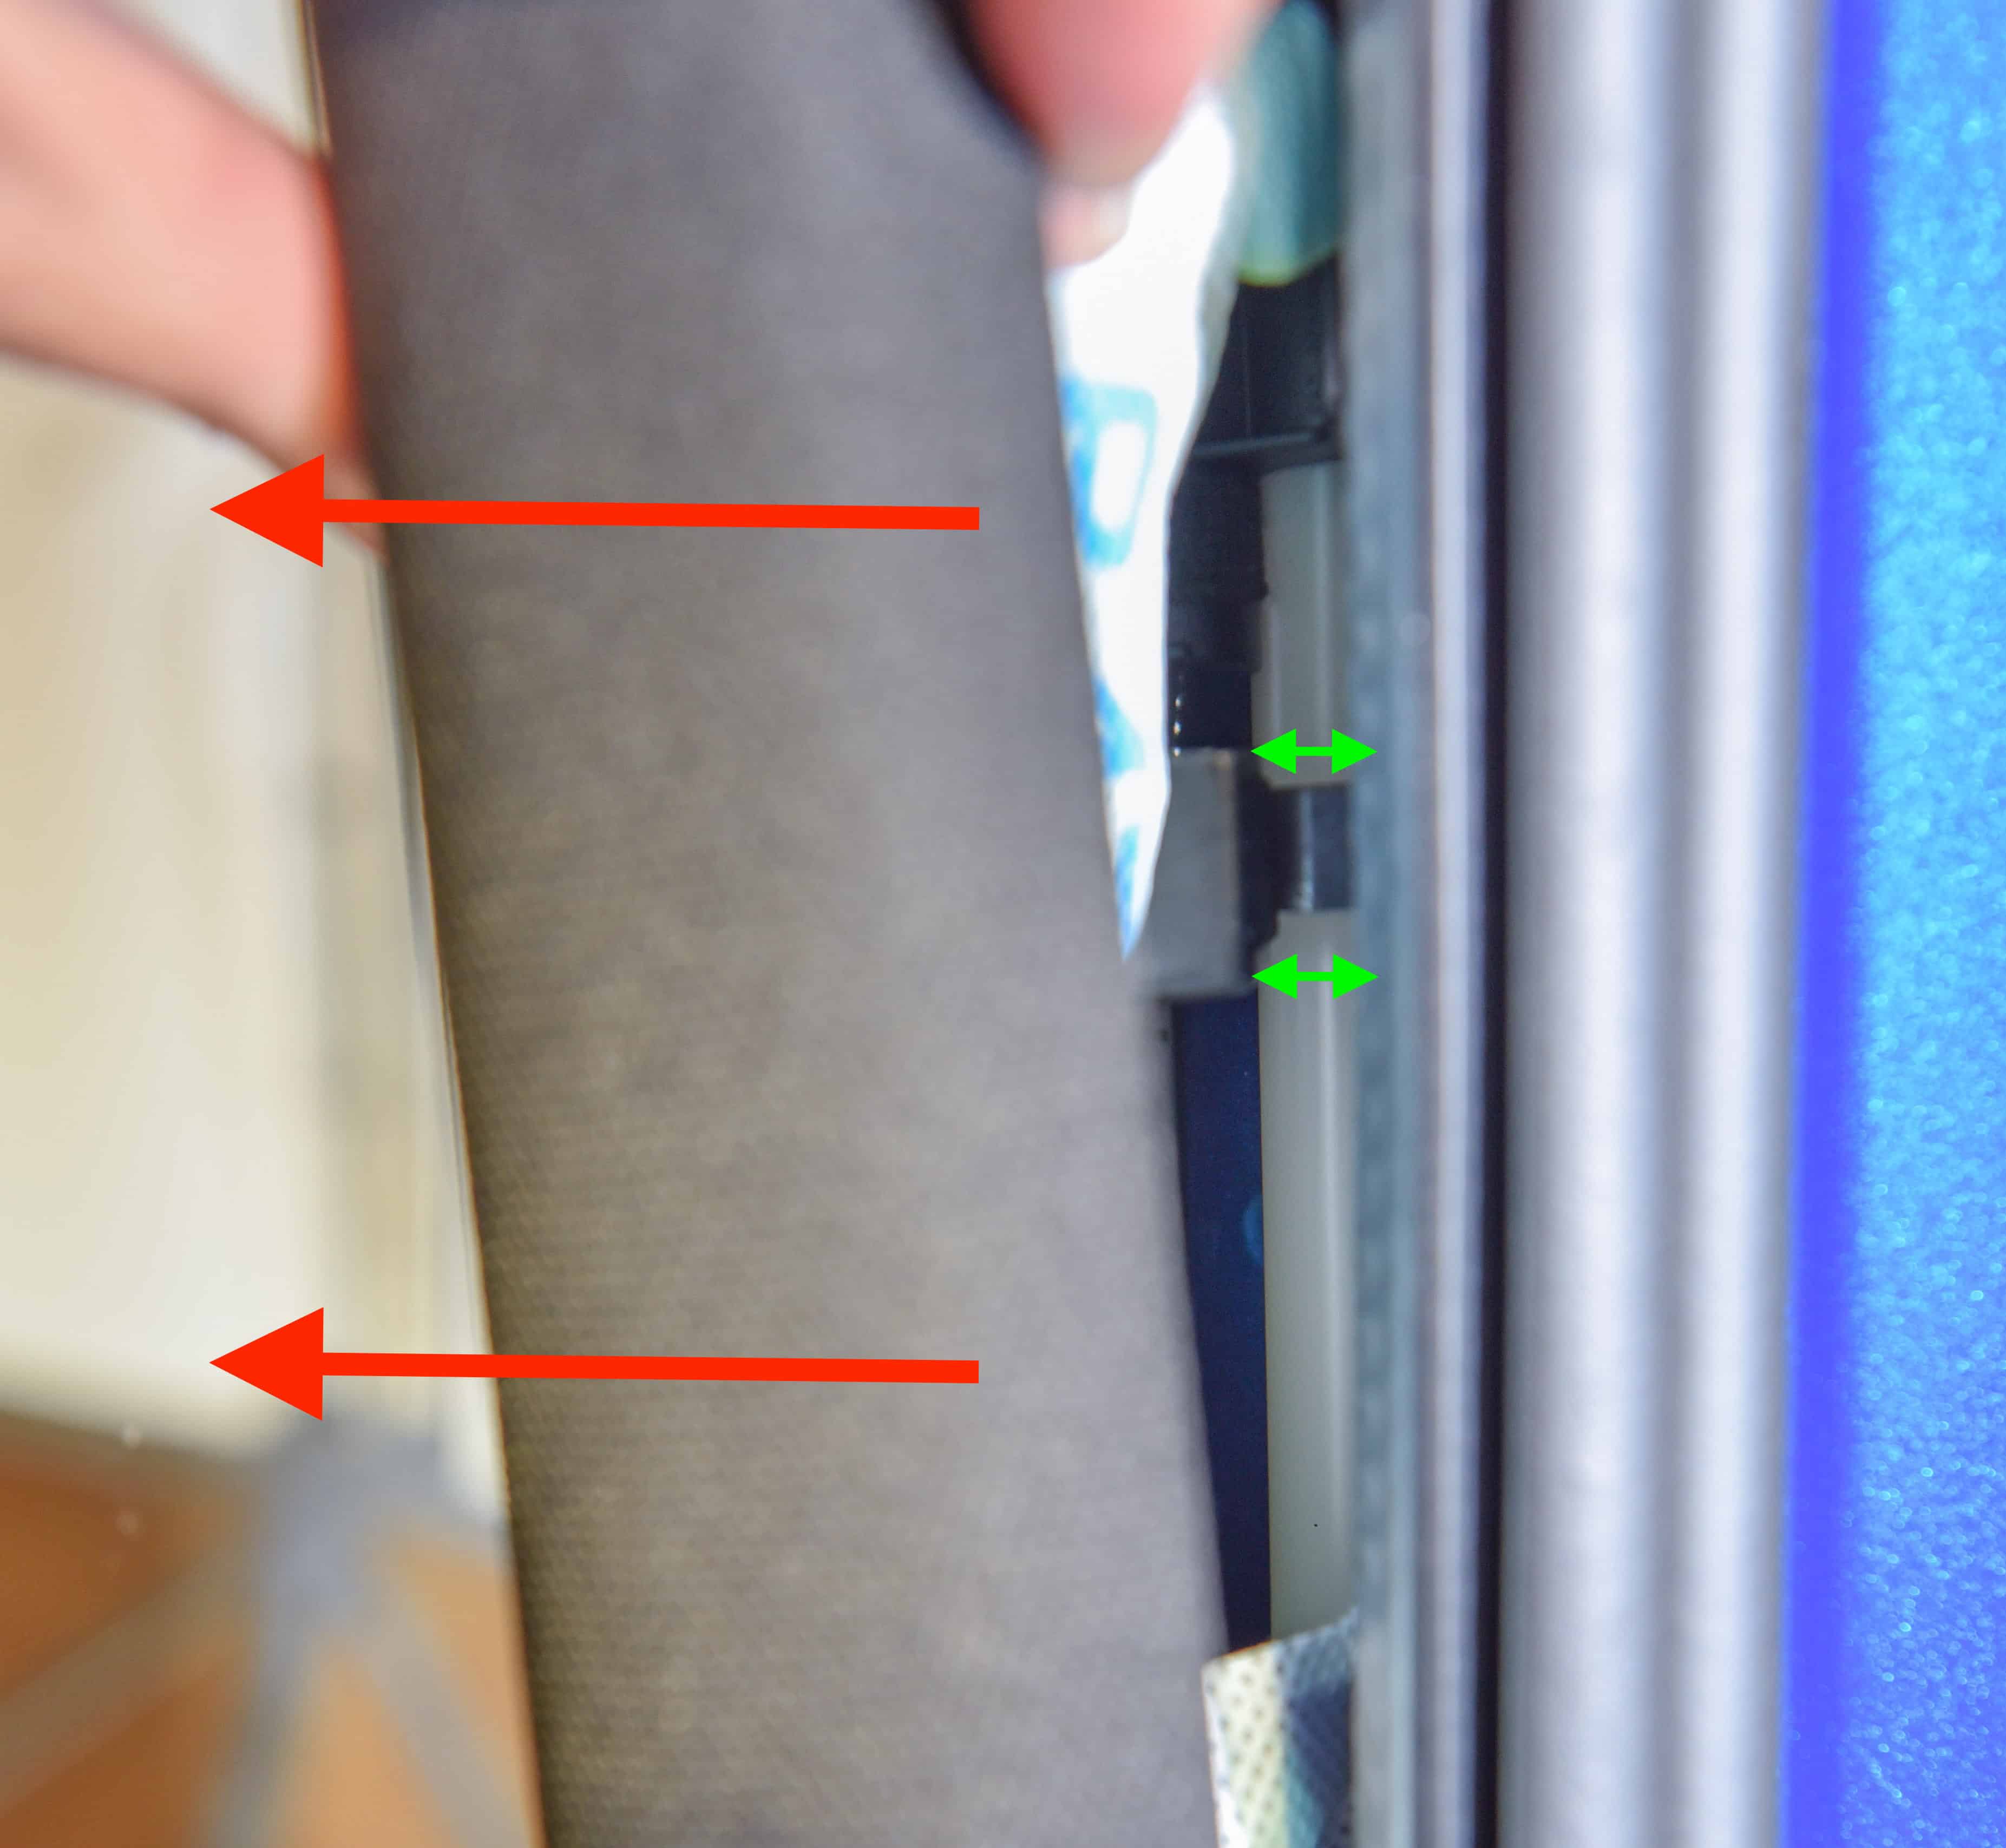
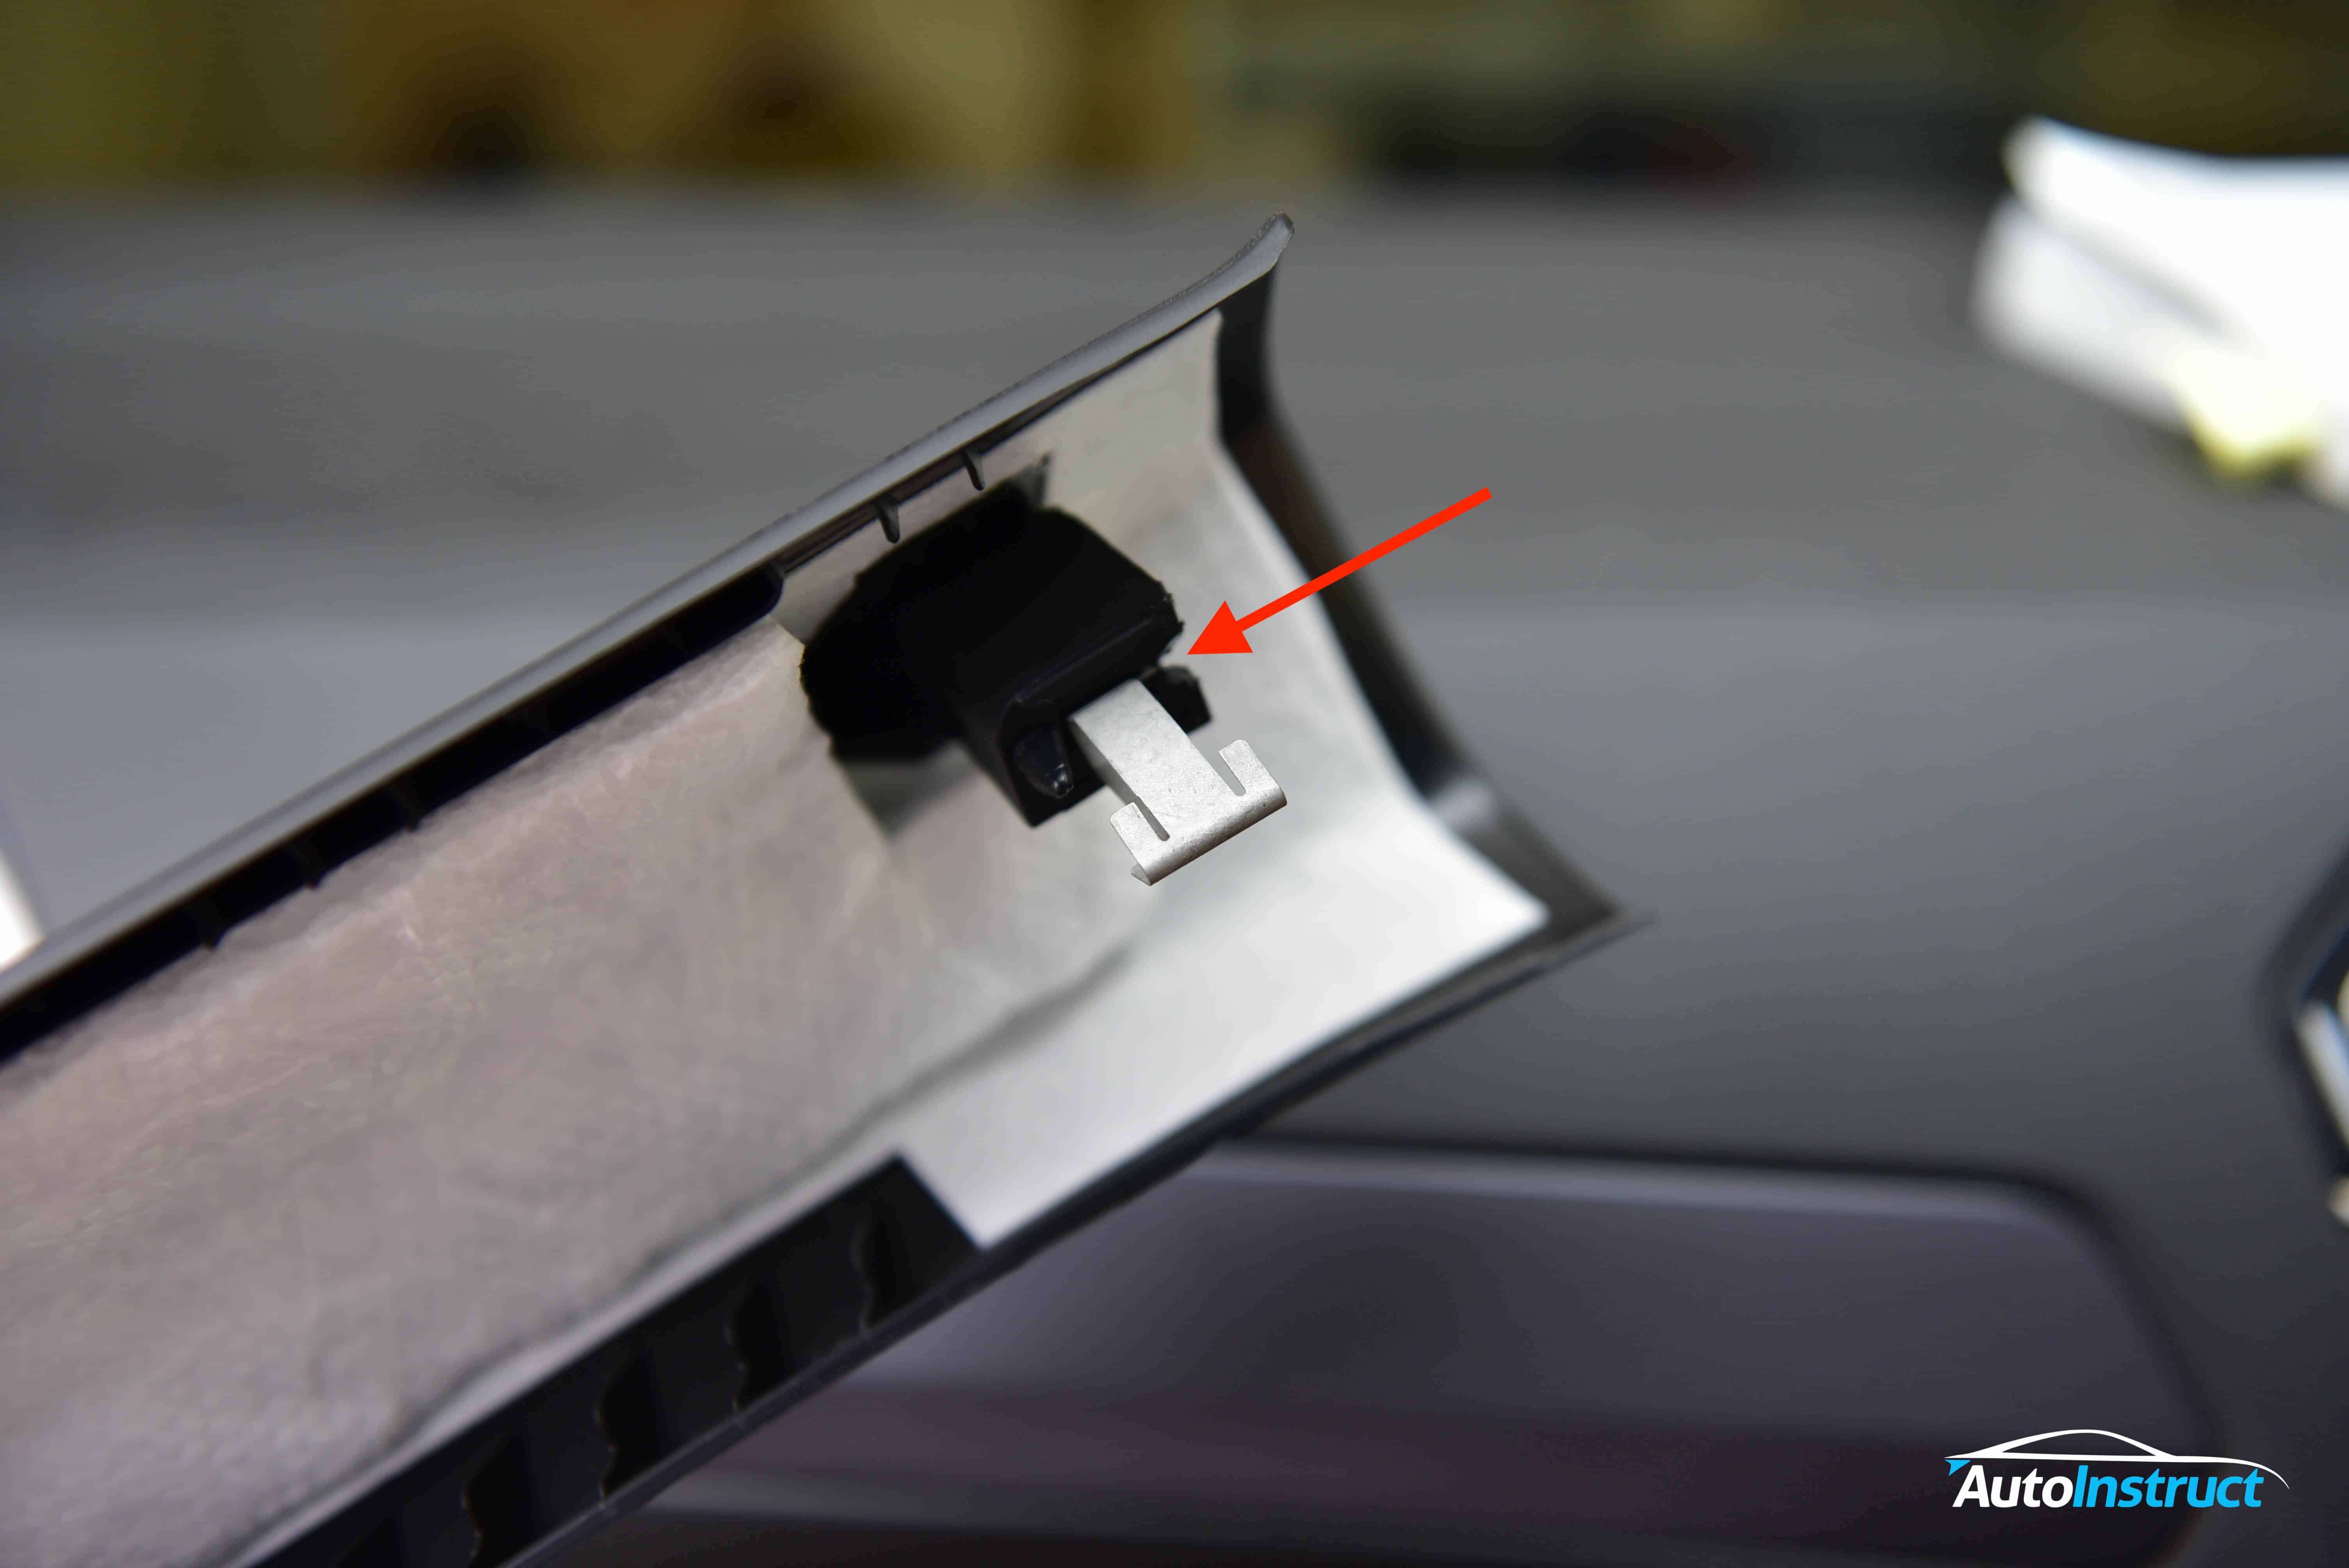
To run the cable we will remove the A-Pillar trim. To do this, grasp the pillar near the window seal and gently pull down to make a small gap. Then pull towards the centre of the car, and the first clip will partially release.
Step 7
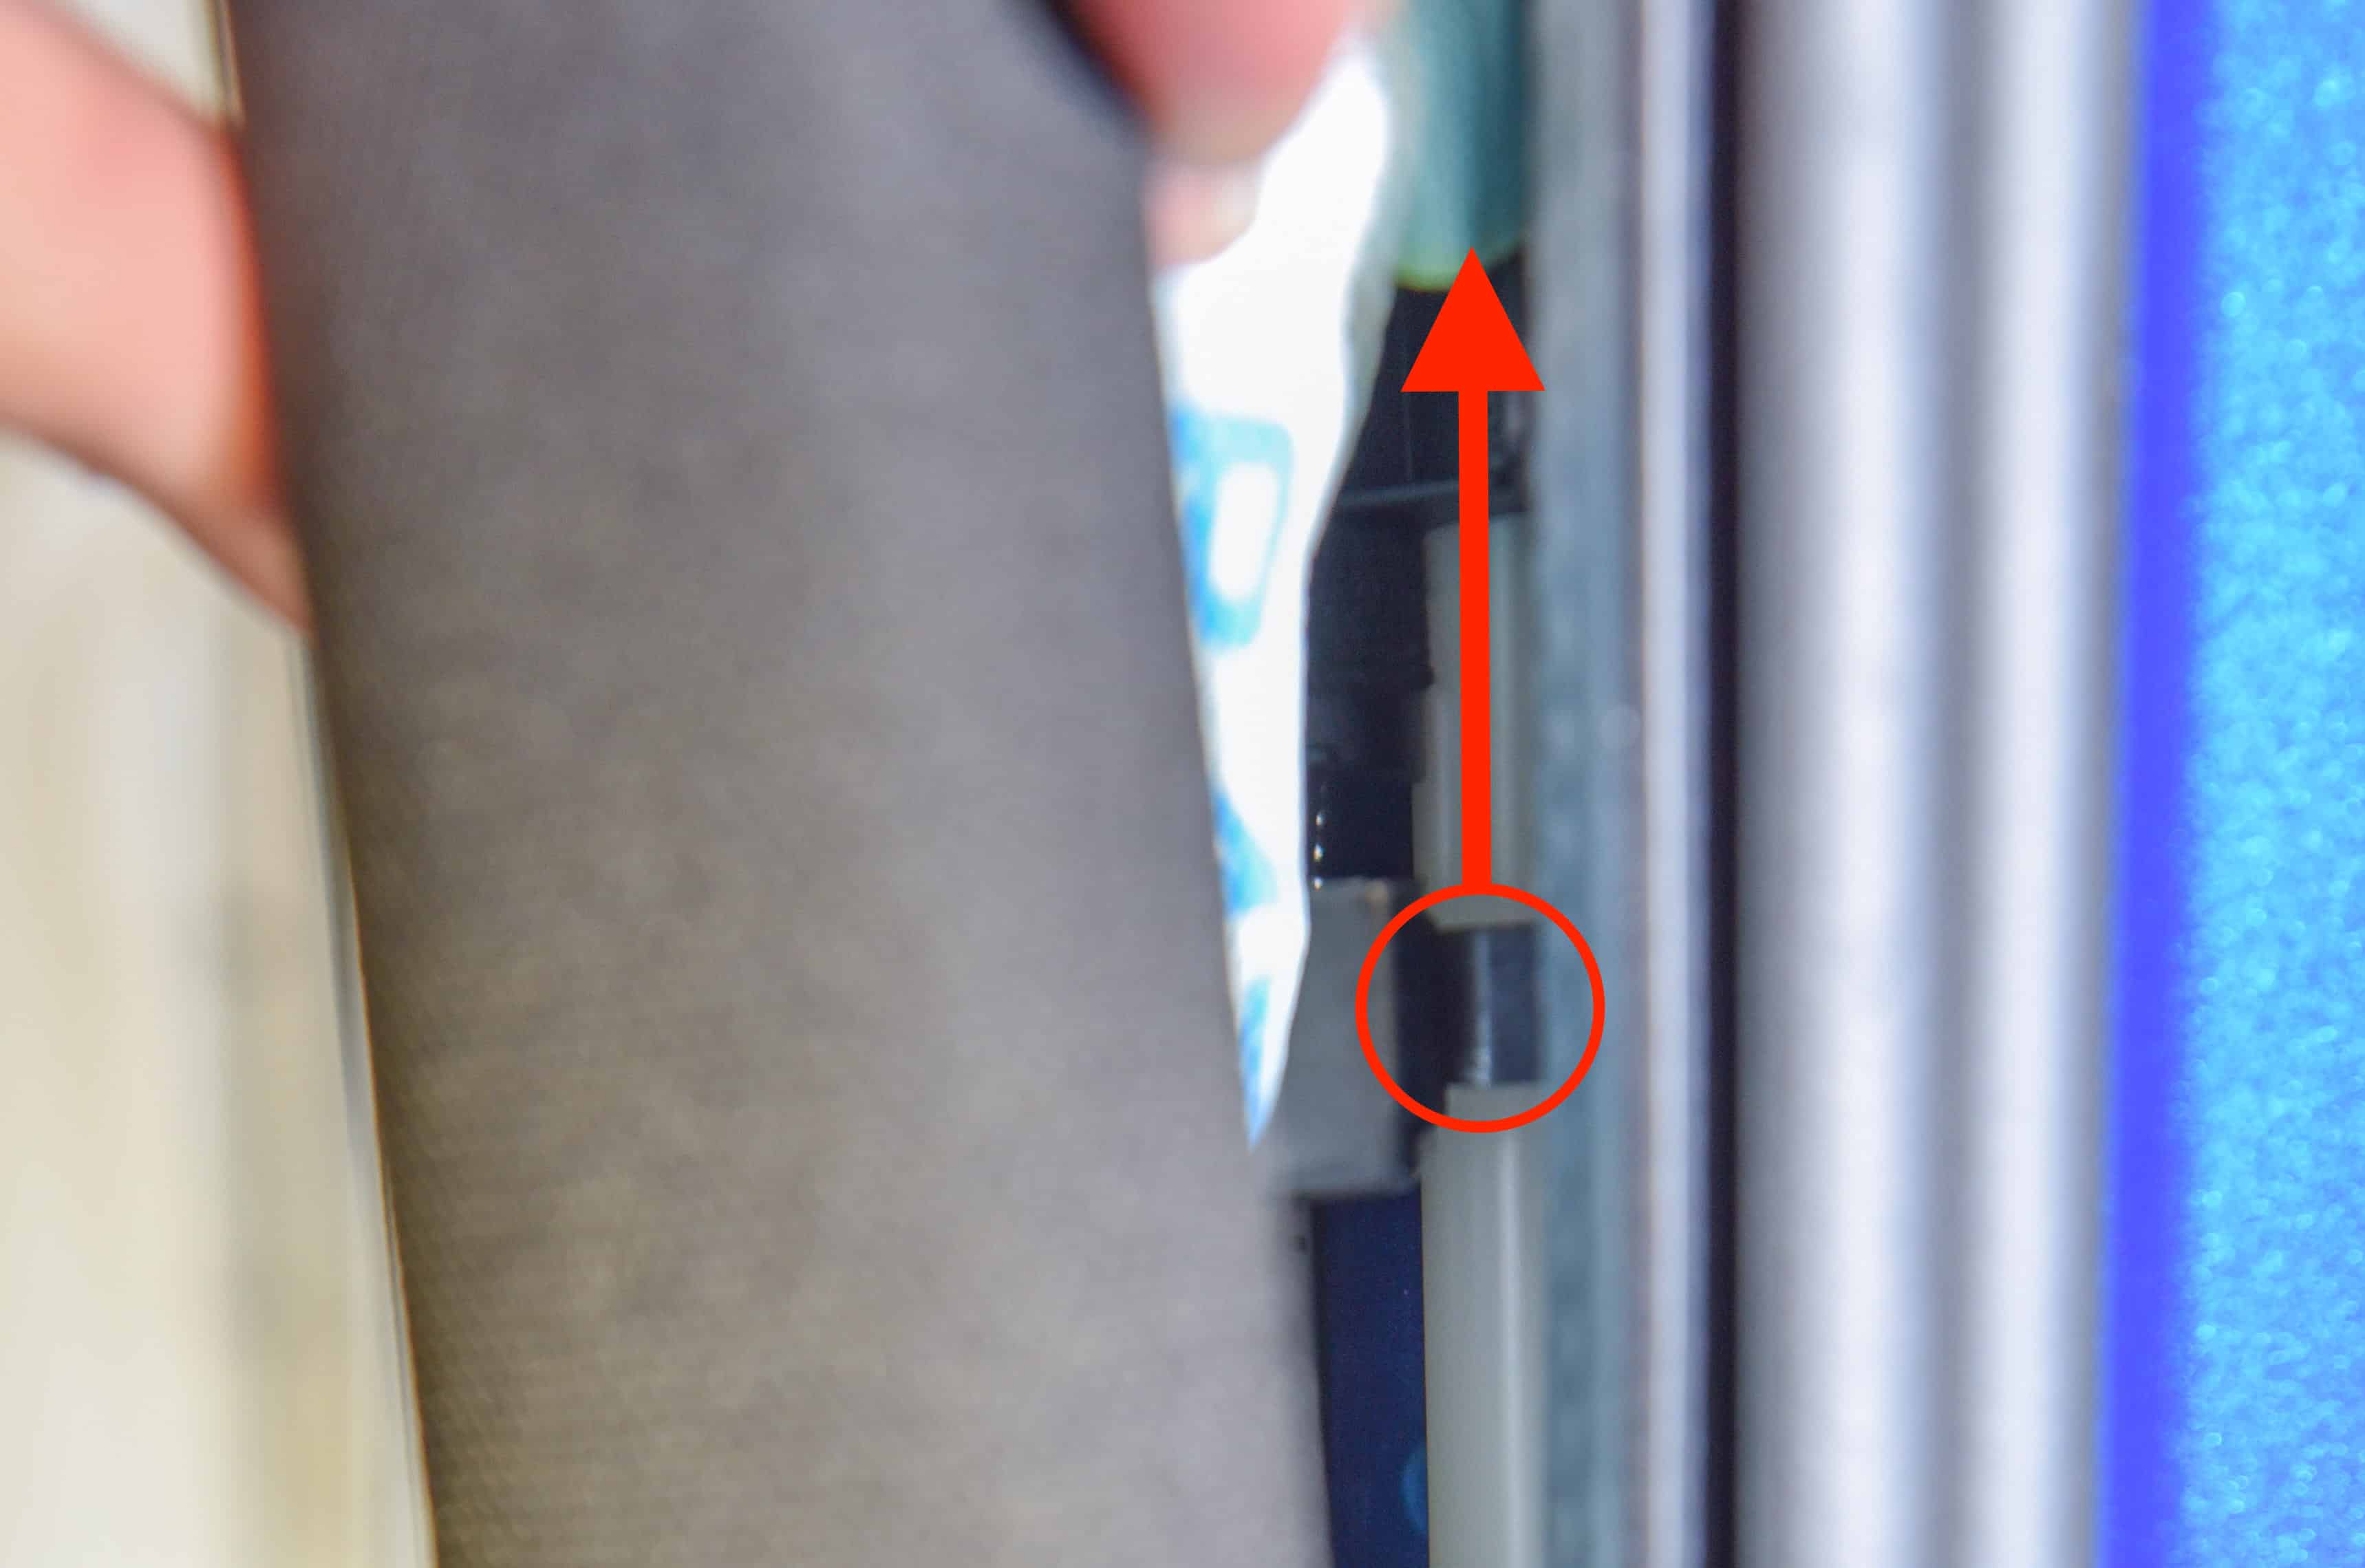
With the first A-Pillar clip now partially released, we will use a pair of long nose pliers or a trim removal tool to slide the clip out from the trim, allowing us to remove the A-Pillar. The clip will stay attached to the vehicle.
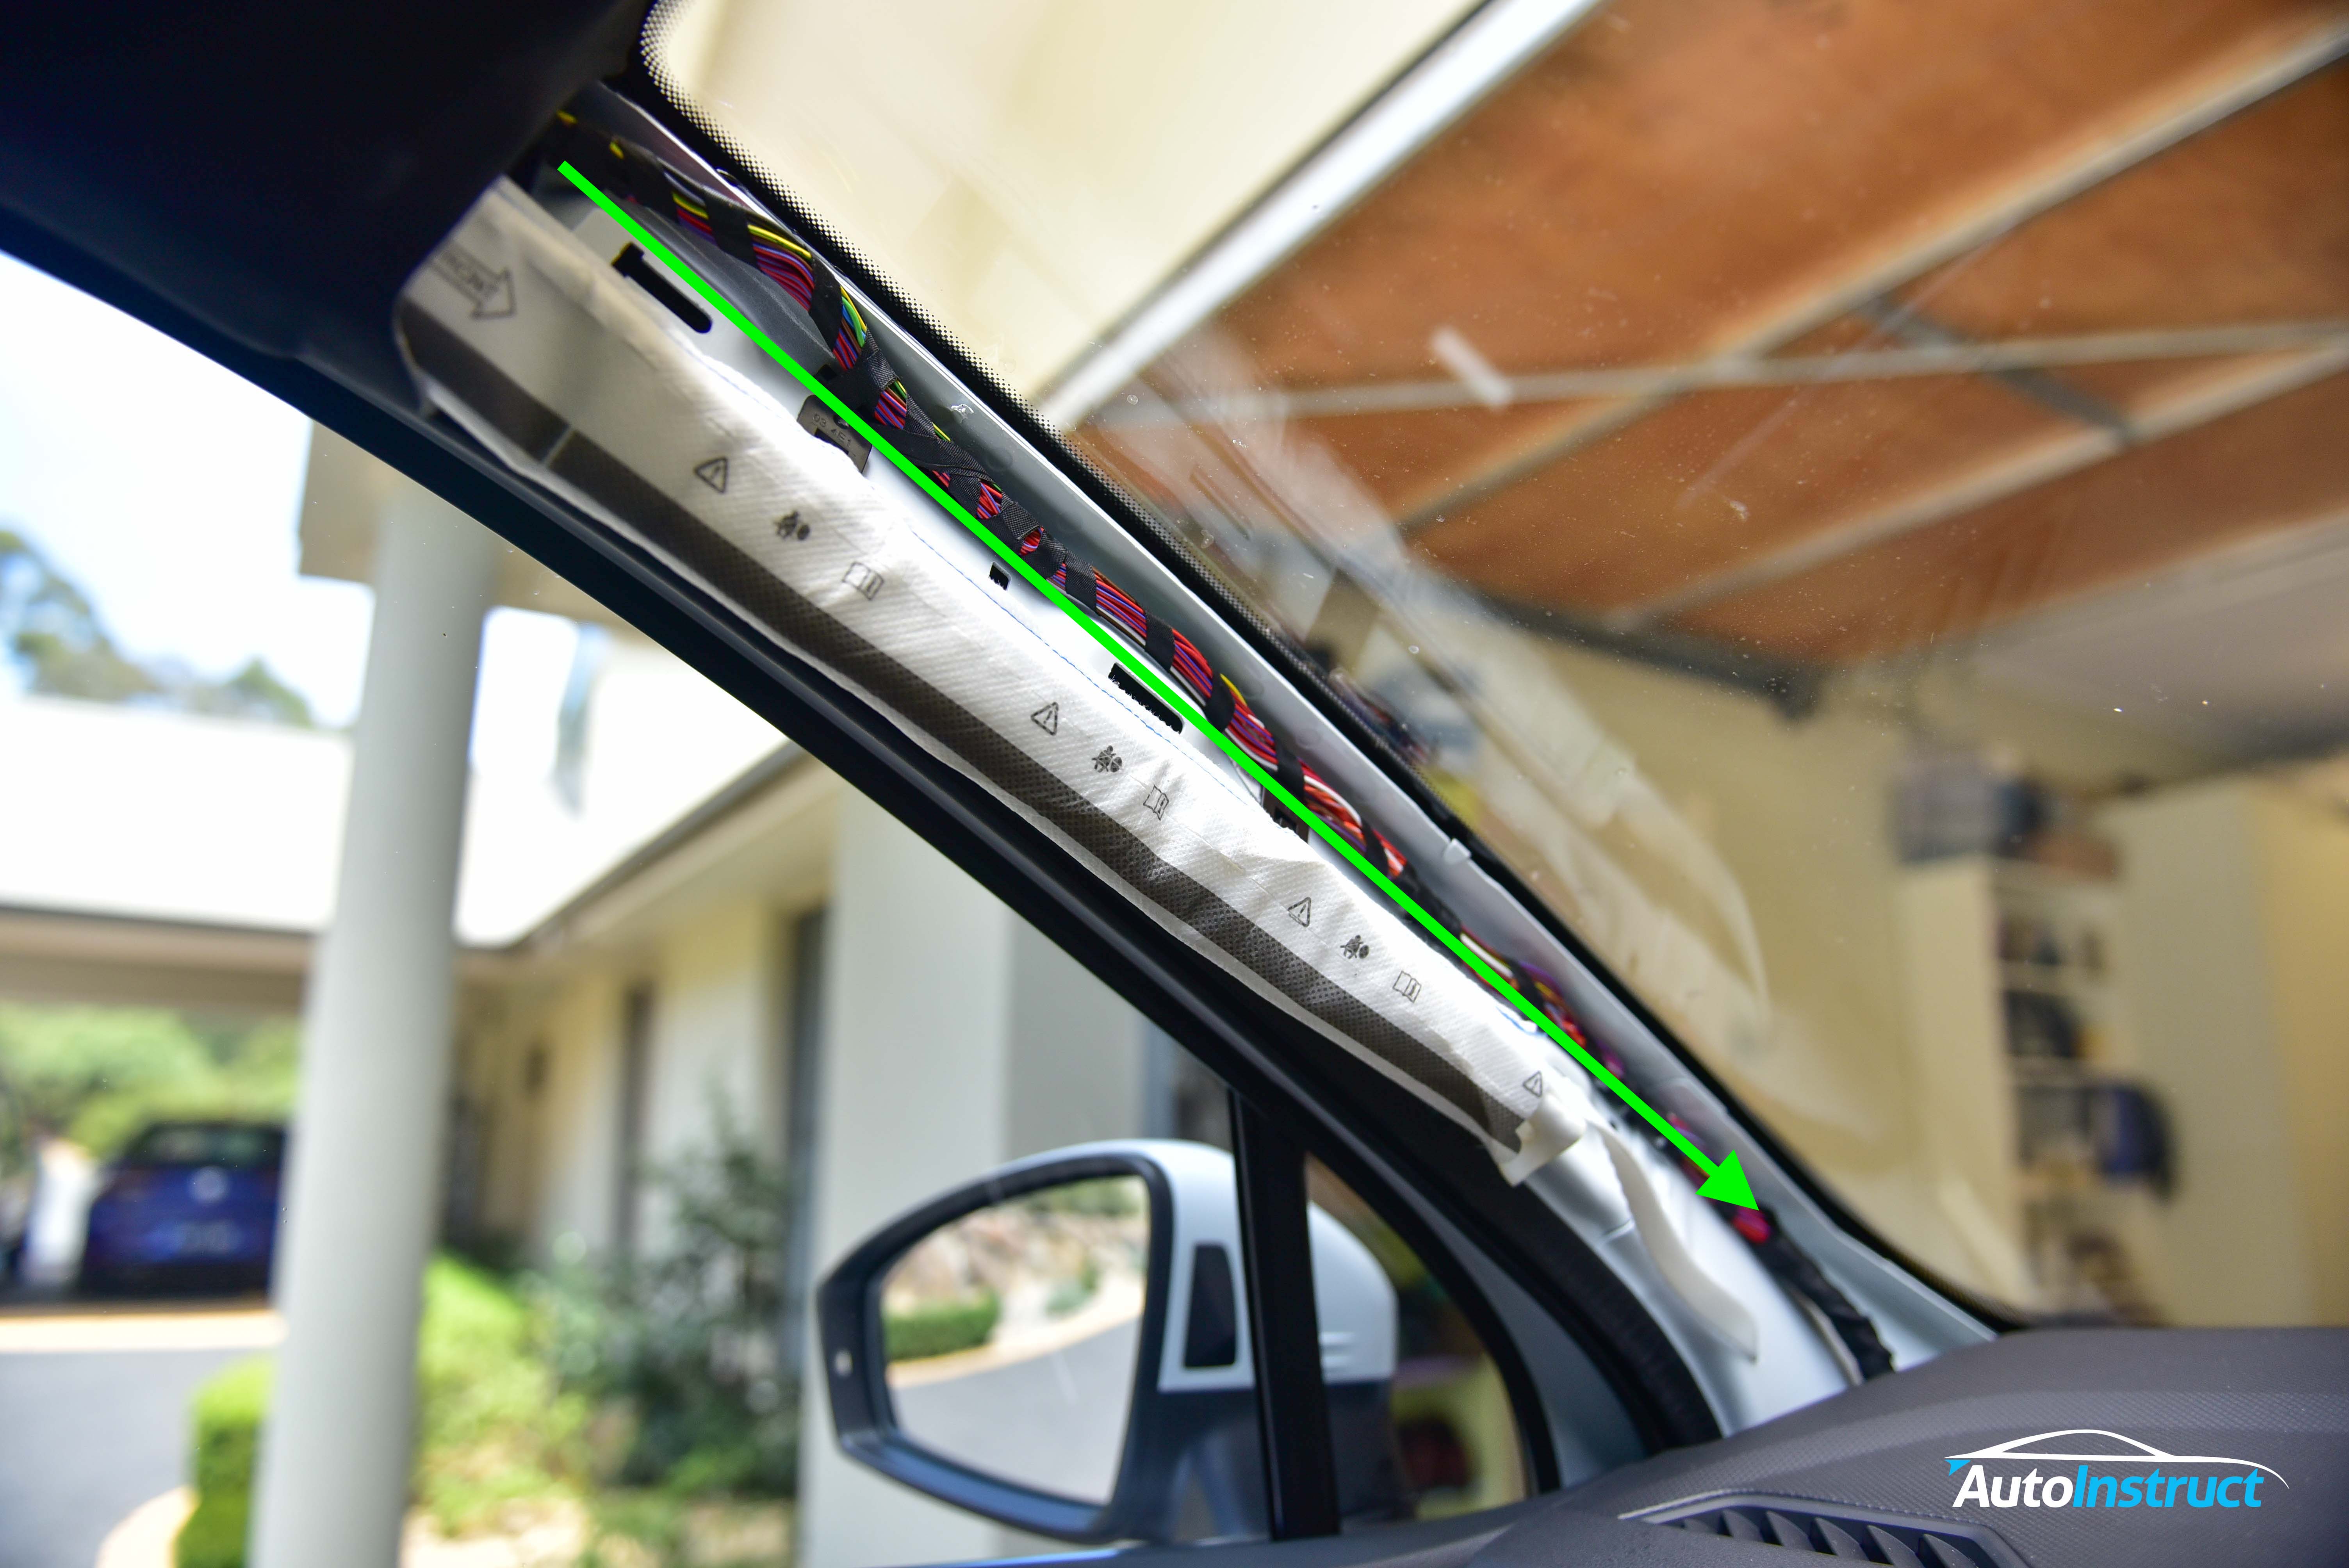
Work your way towards the dashboard, releasing the second and third clips, which will easily release as they are basic clips. Once all three clips have been released, gently pull upwards on the A-Pillar trim and it will release from the dashboard.
Step 8
With the A-Pillar trim removed, we will feed the power cable into the headliner, and down the A-Pillar alongside the existing loom, and cable tie into position.
Ensure the power cable does not cross the airbag.
Step 9
We will now hard wire the dash cam and Power Magic Pro. For RHD vehicles, follow the next few steps to remove the glovebox. LHD vehicles can simply remove the coin tray next to the drivers knee. To do this simply squeeze the sides of the tray and it should drop down.
Firstly release the glovebox dampener by sliding it out from the glovebox lid.
Step 10
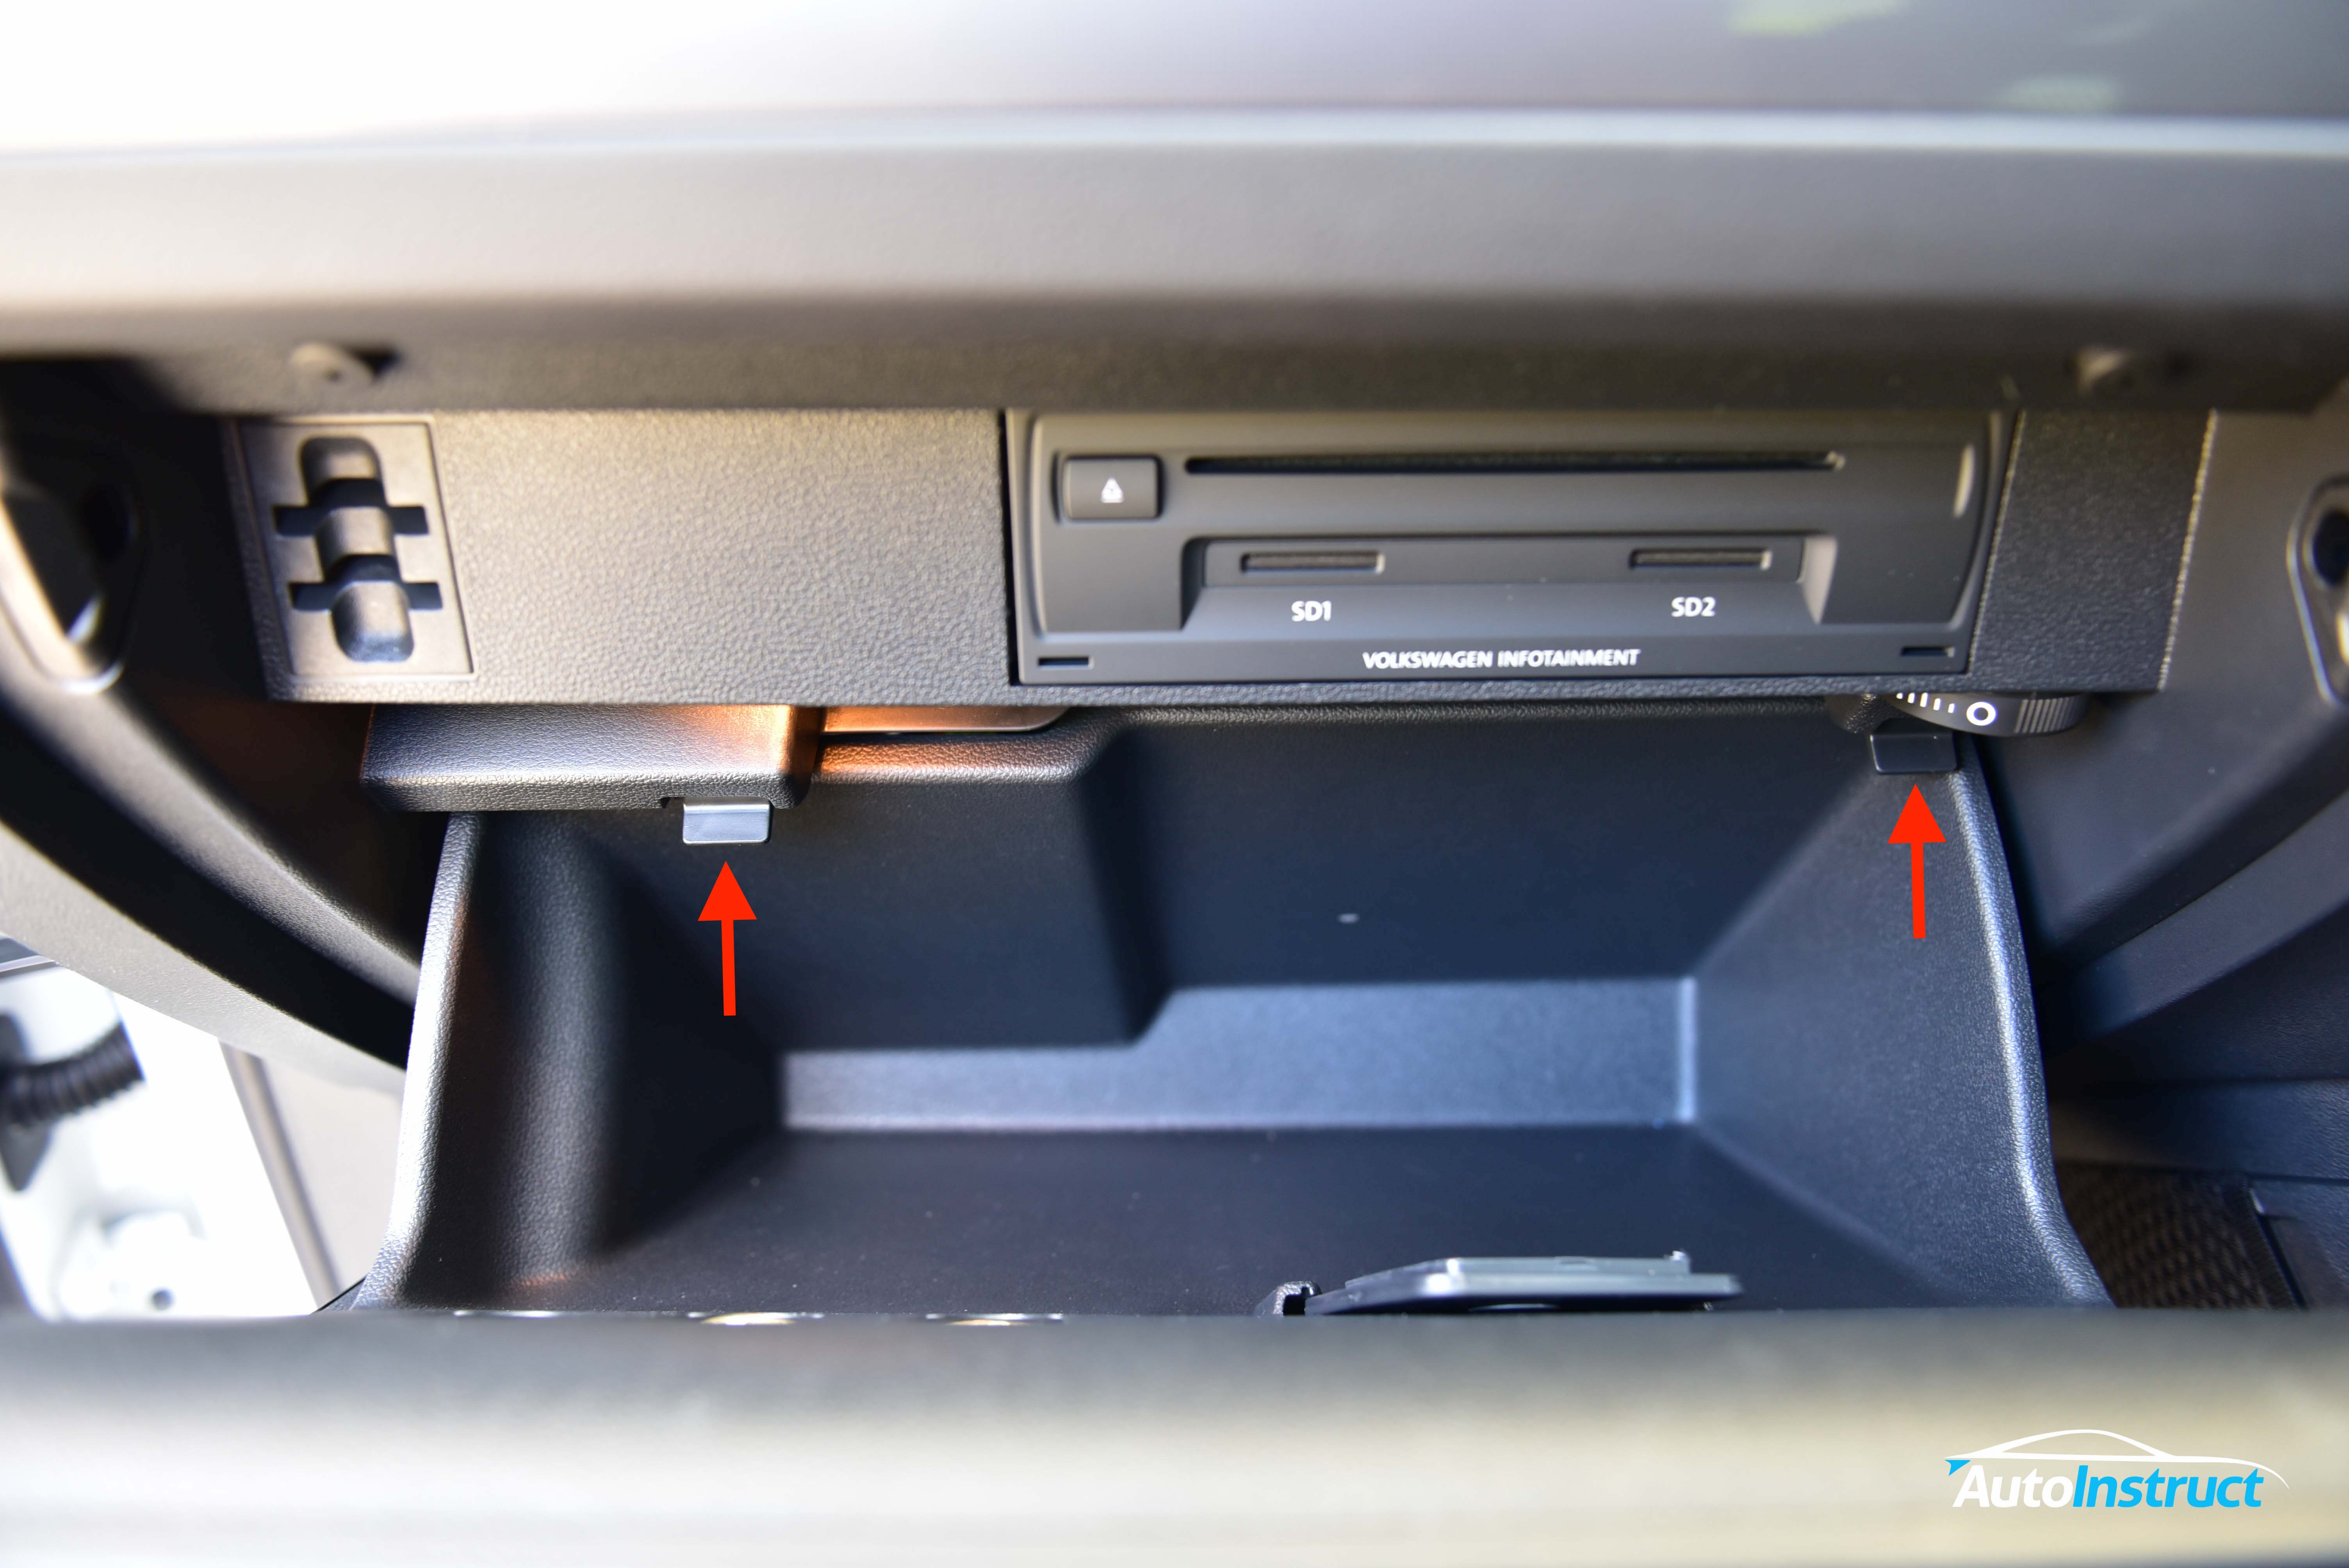
To completely lower the glovebox, push upwards on the release tabs and gently lower to the floor.
Step 11
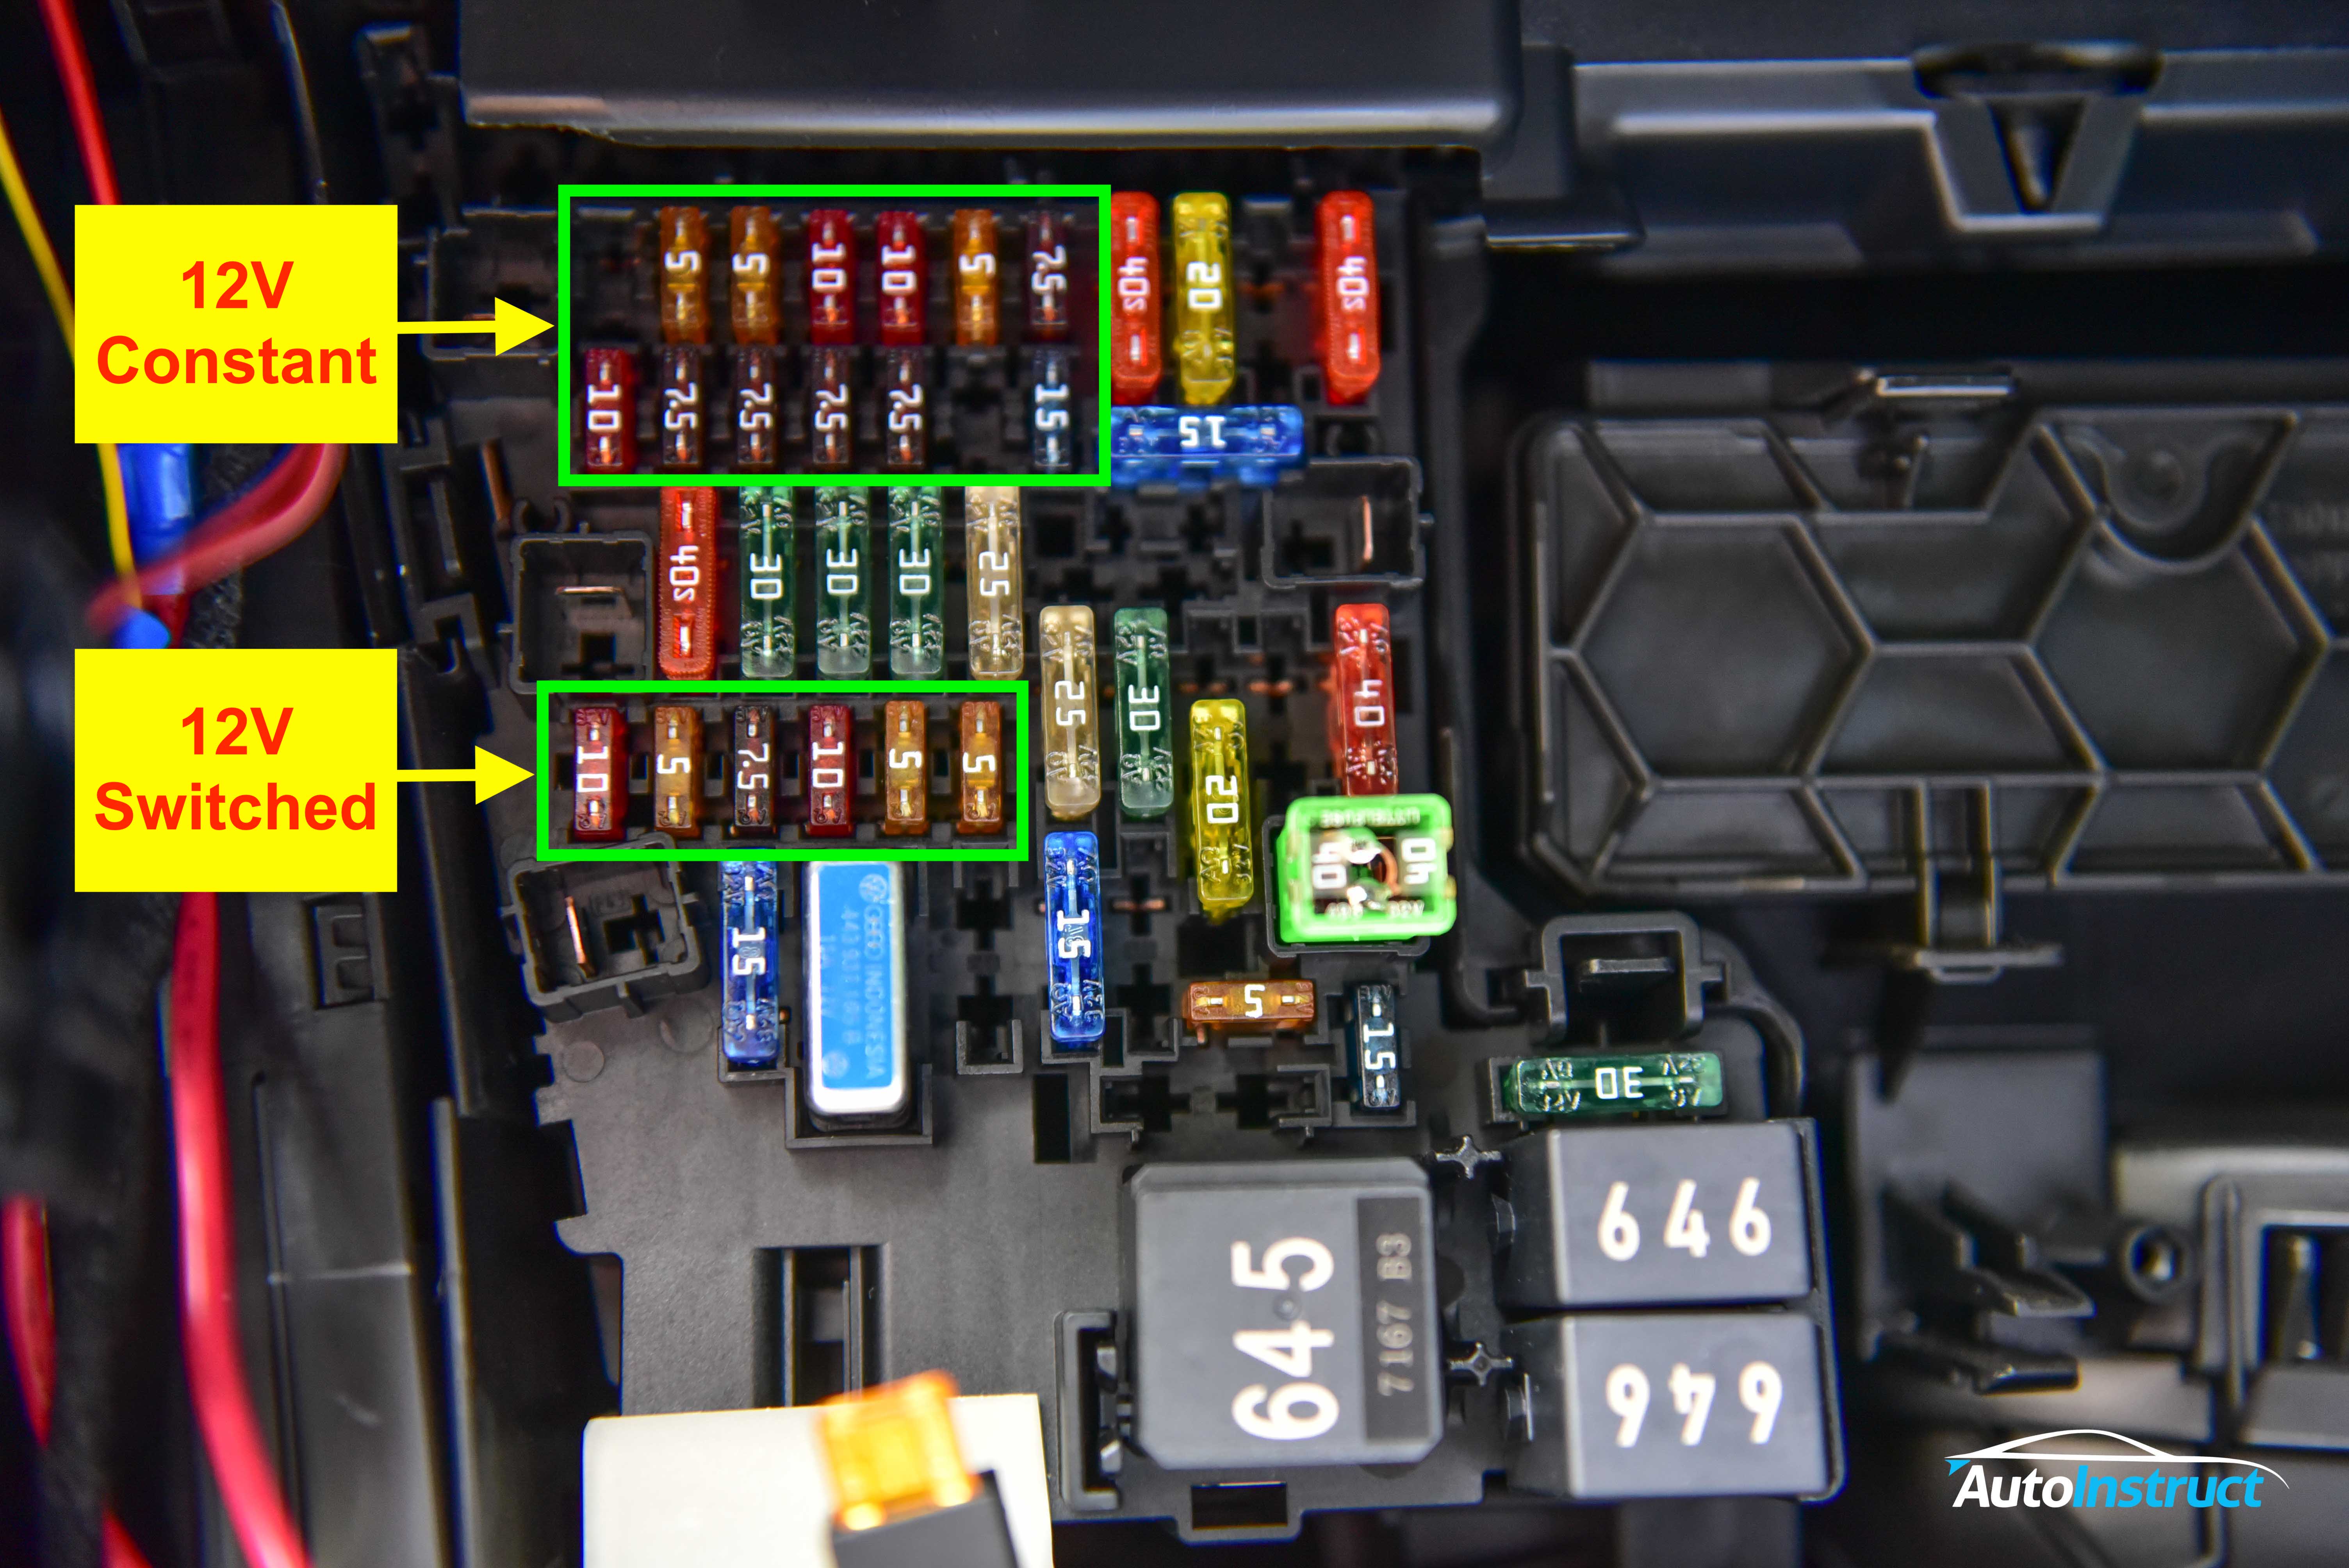
This image will show you the fuse locations required to access constant and switched power for the Power Magic Pro.
Step 12
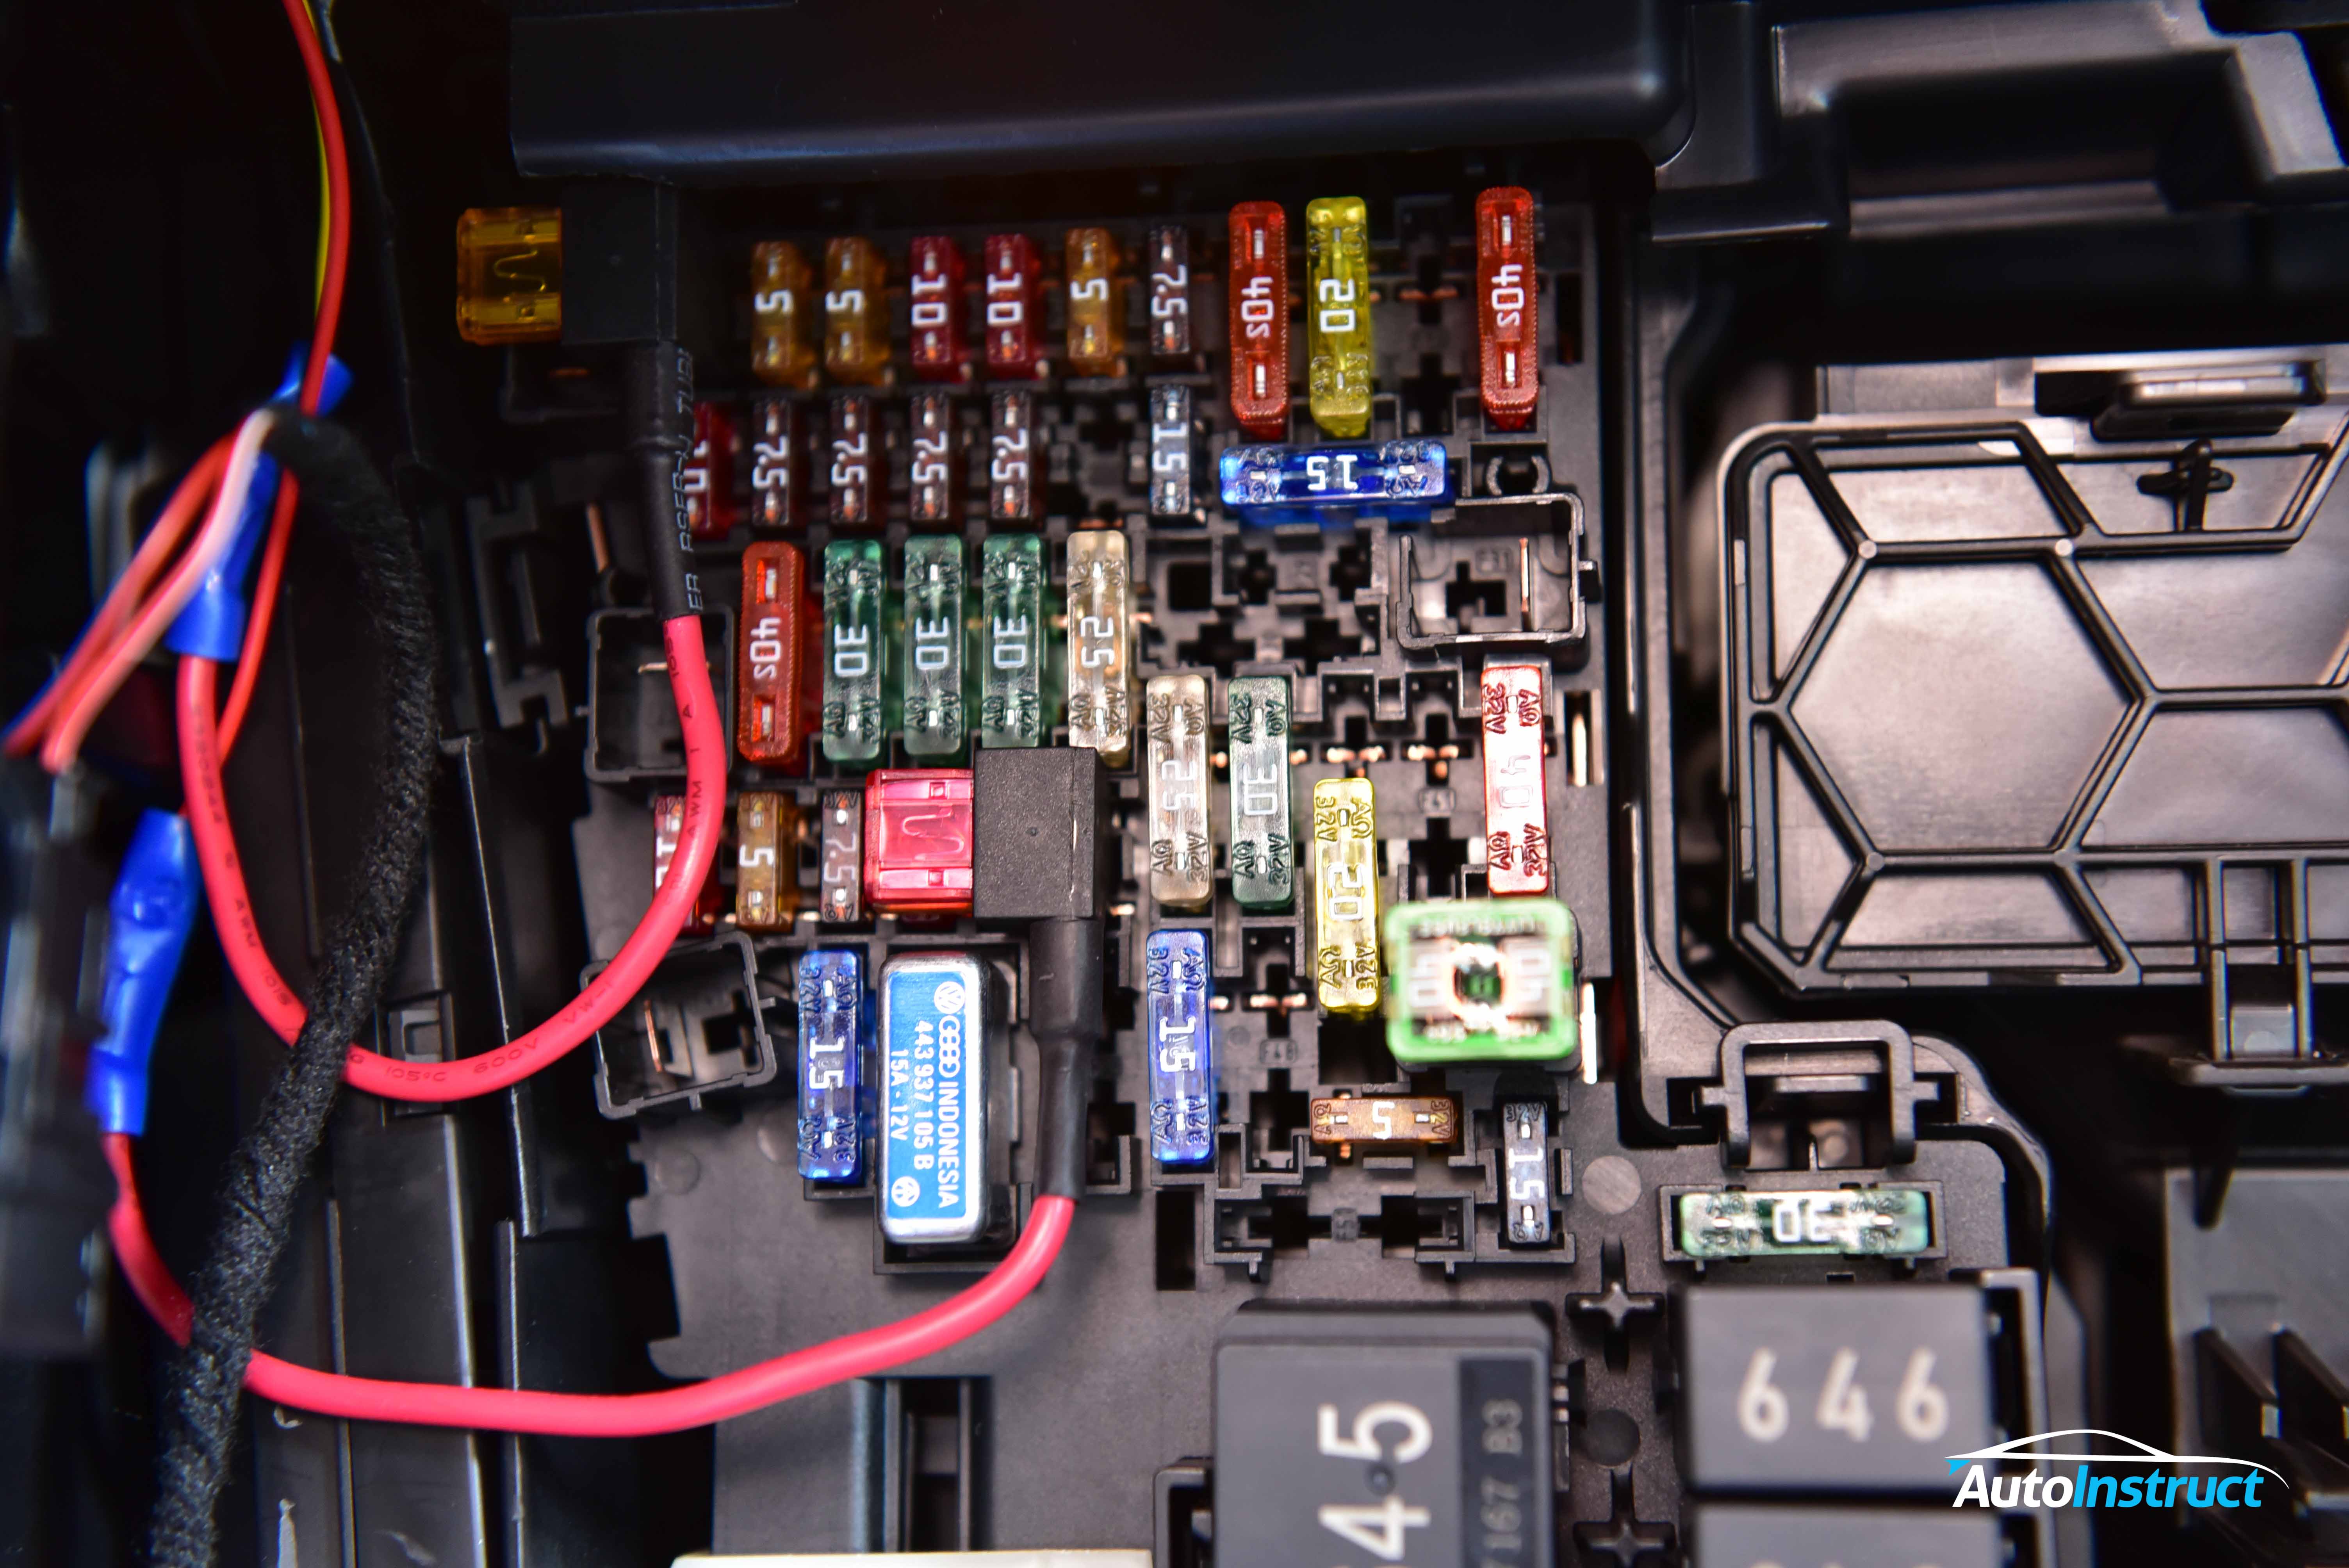
As pictured we’ve used fuse taps to make the connection, which saves the need to splice factory wiring.
Join the switched and constant fuse taps to the Power Magic Pro (PMP), and connect the PMP to the dash cam.
Step 13
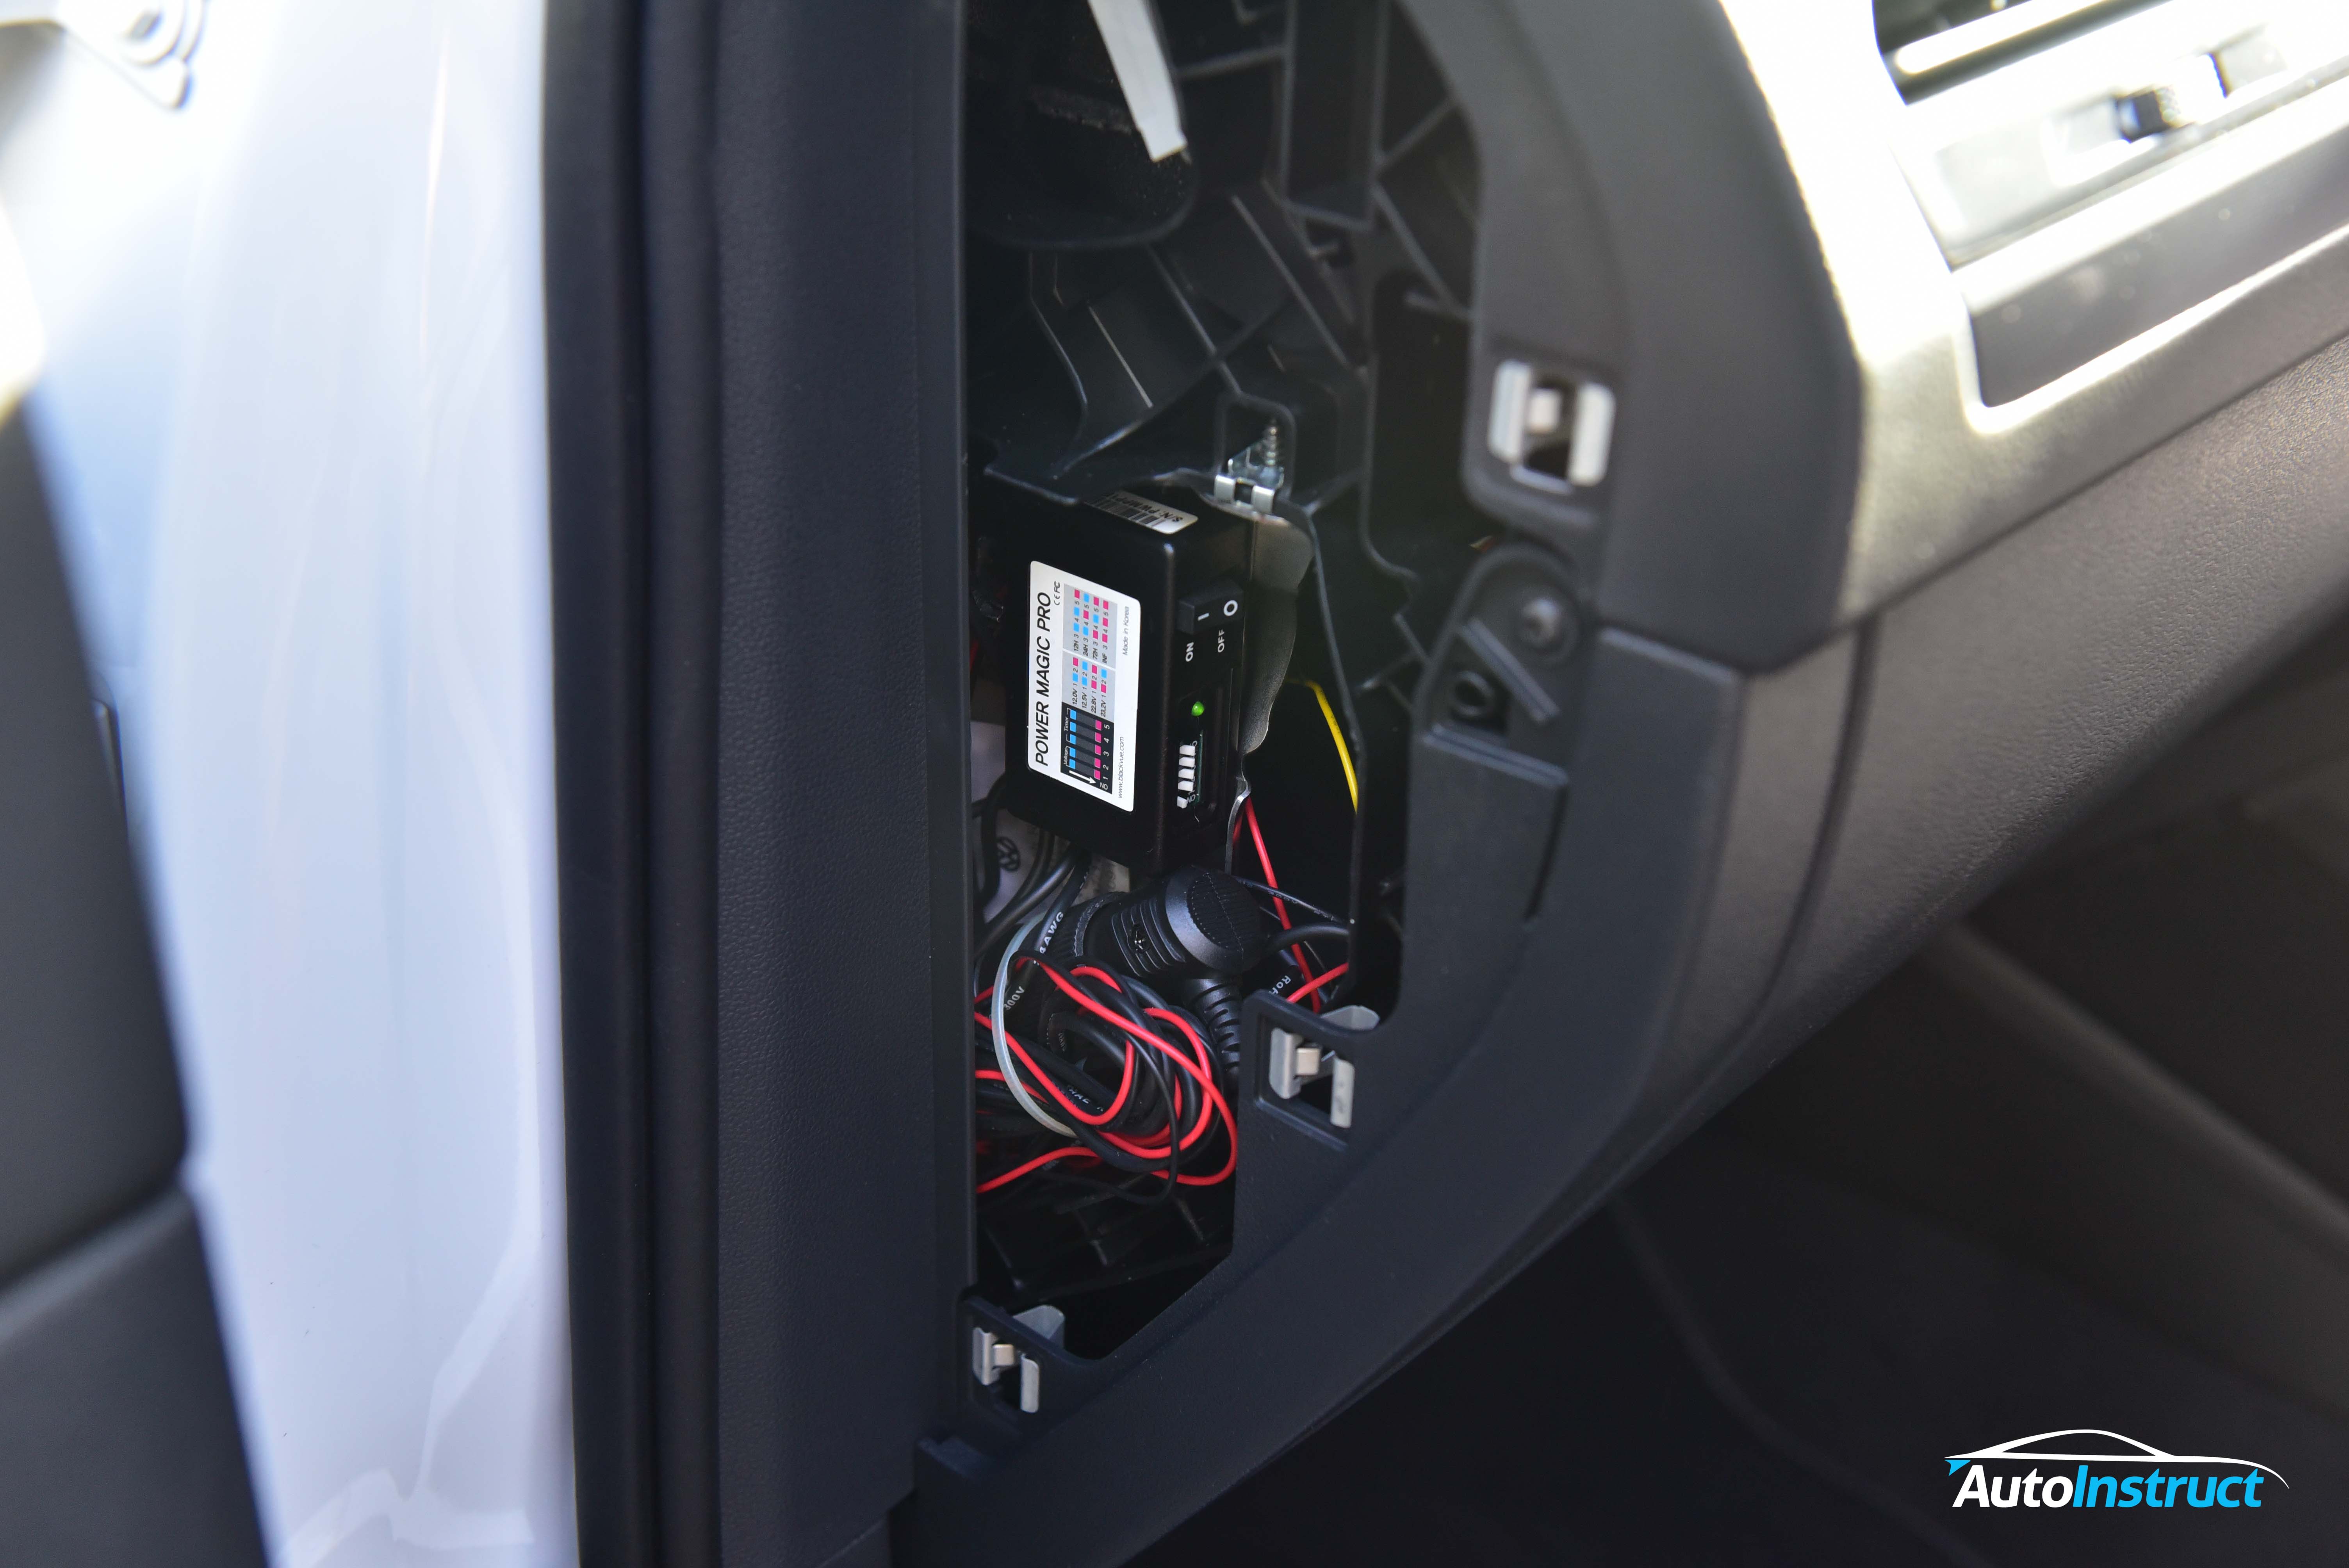
We will mount the Power Magic Pro behind the side trim, where there is plenty of space.
There is also a convenient earthing location as shown.
Step 14
Mount the Power Magic Pro in position, and neaten any loose cabling. Finalise the setup by selecting your voltage and timer settings on the PMP.
Step 15
Re-Installation
All trims re-install with ease by simply clipping into position, The A-Pillar however, is slightly harder.
Firstly you need remove the clip which stayed attached to the vehicle. Once removed, reset the clip by reinstalling into the A-Pillar.
Step 16
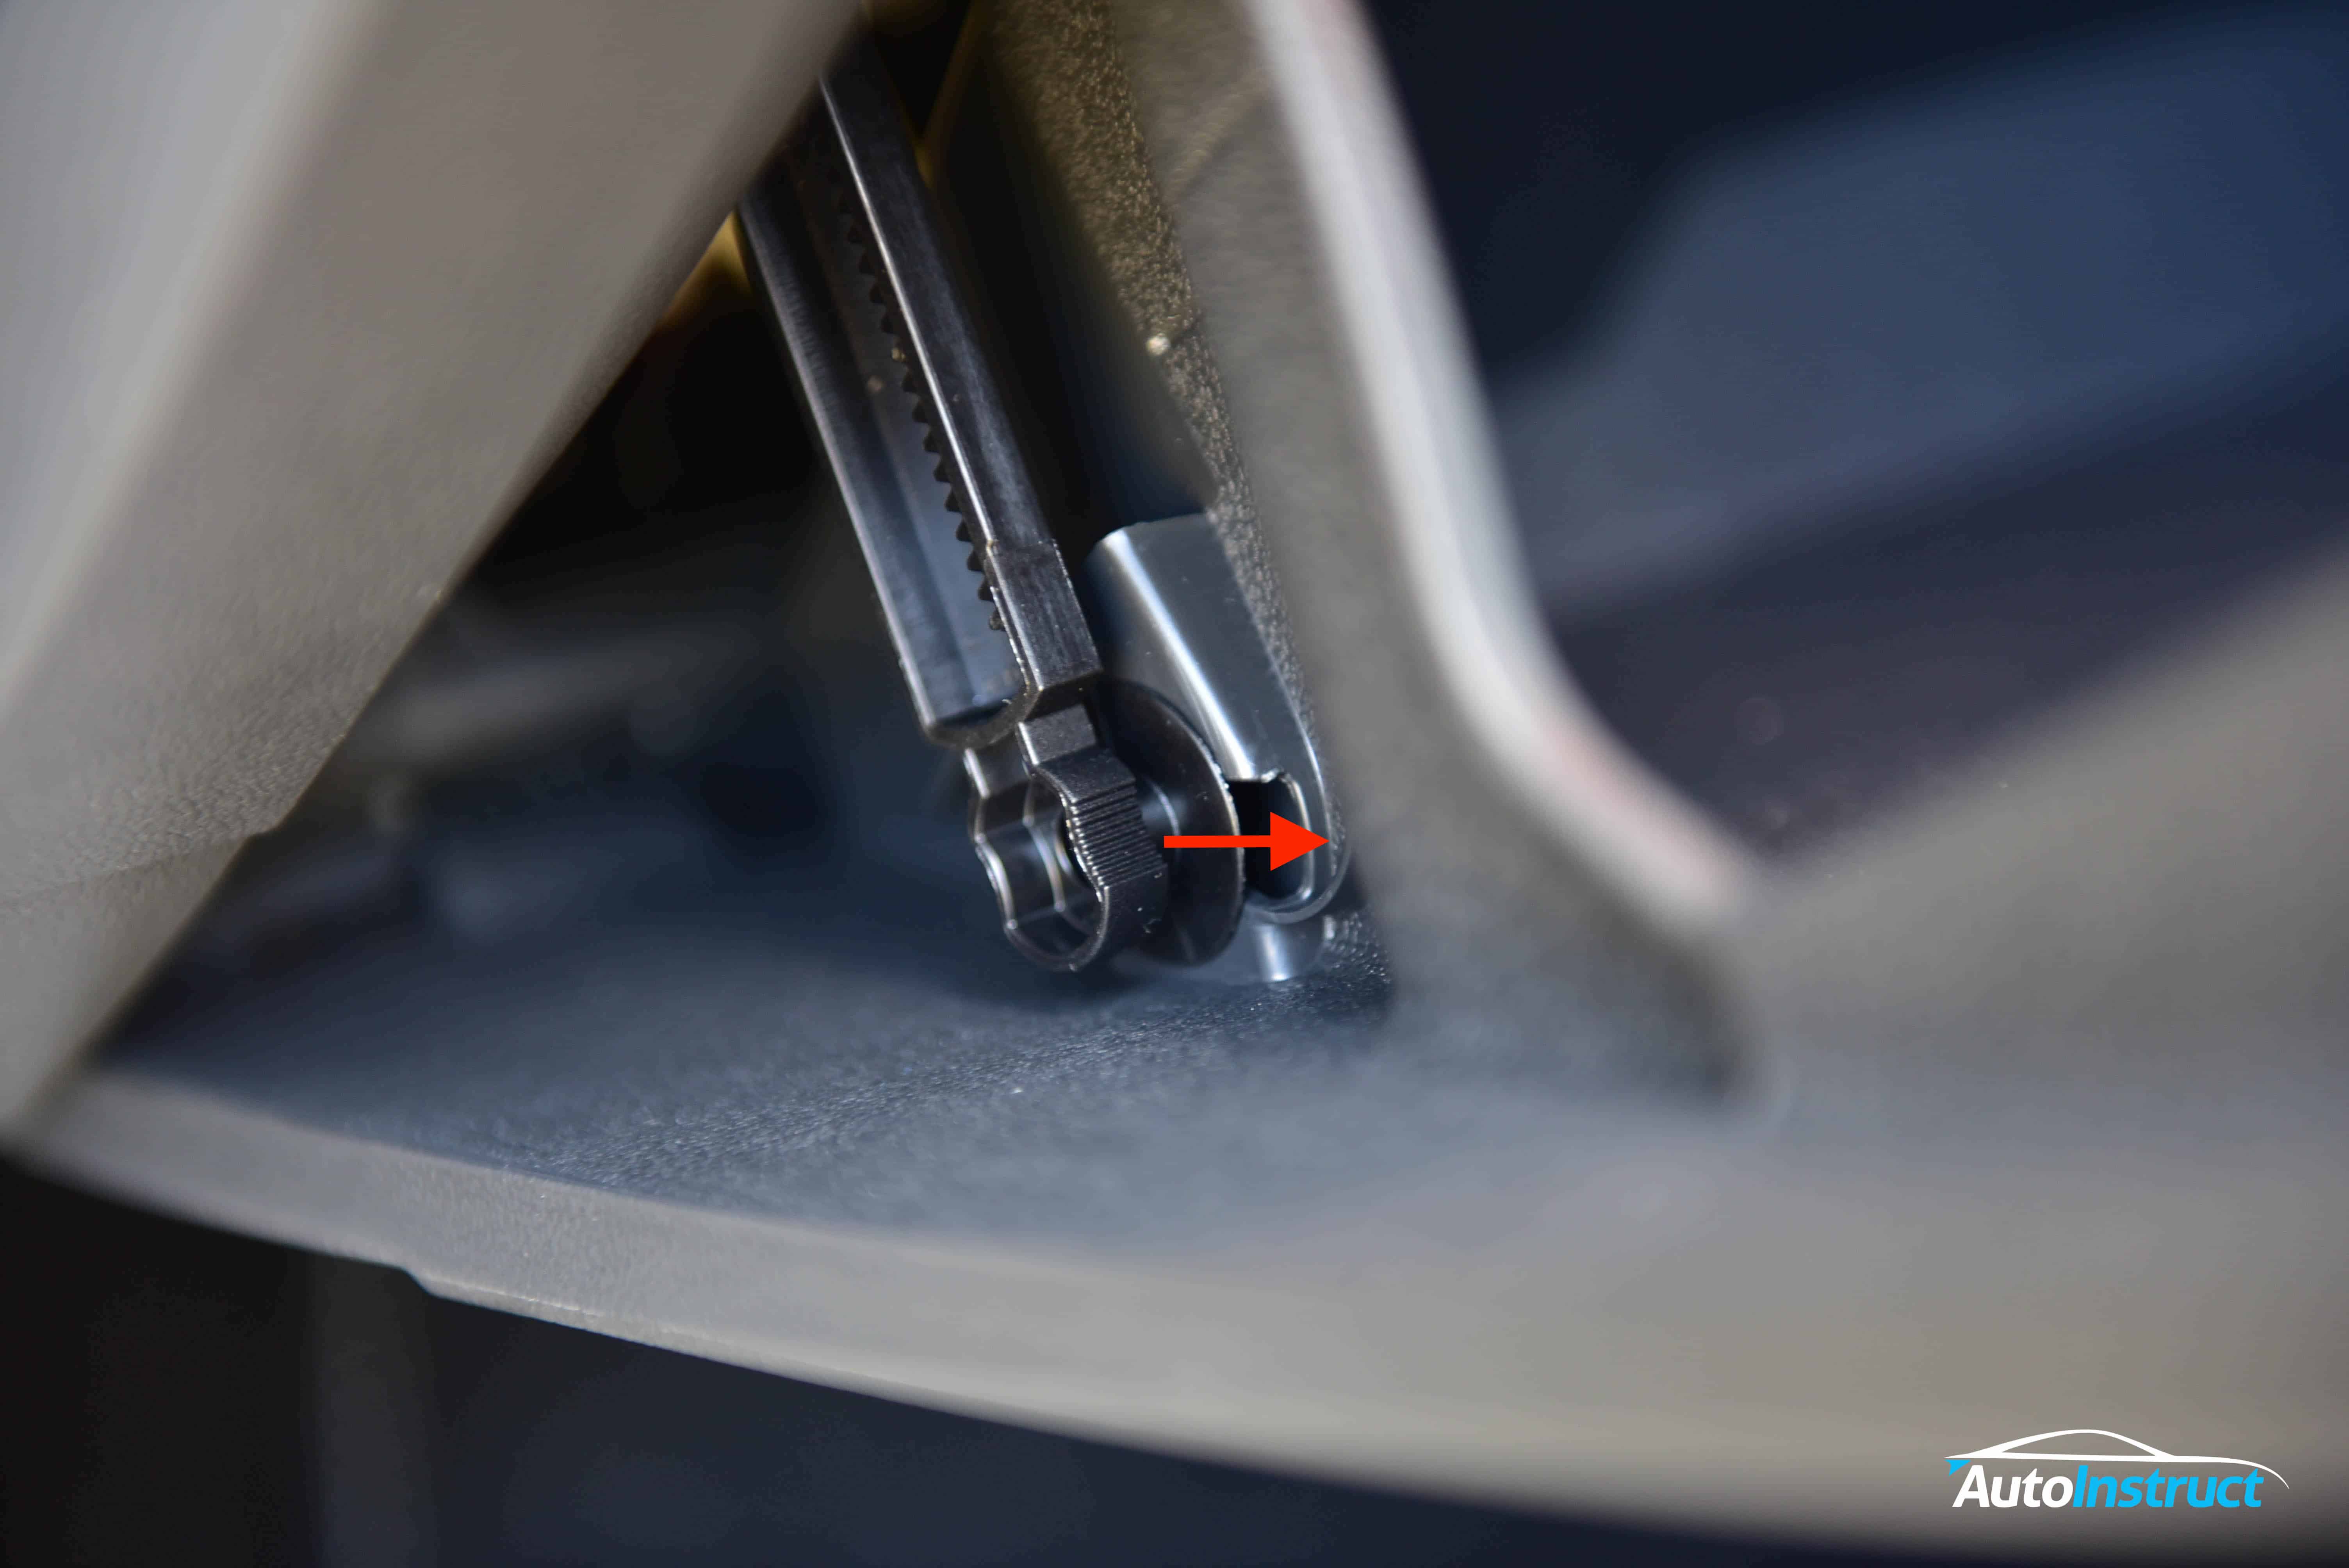
Next, the A-Pillar needs to be slid into the dashboard slot as shown. Lastly, gently clip into position and firmly push the trim behind the rubber door seal.
Step 17
Well done! You’ve now successfully installed a dashcam in you MK2 Volkswagen Tiguan
Did you find this guide helpful? Consider sharing it to help other car enthusiasts
I got it done but used two separate cameras and put a DR450 on the taildoor.
I routed the power wires along the floor under door trims and into the boot and up the rear left quarter I used a little tab behind the taillight for an earth point and ran the power wire up and through the wiggle connector into the tail door
To get top panel off the door you hold it at the bottom by glass and pull it away from glass and it pops off. To get the flexi connector apart on the top of the BODY you put a fine screwdriver down the end away from tubing and gently push it inward and the little tab will pop up and release it I then put a wire down from the taildoor and pulled the cable through into the door (with difficulty as loom is pretty tight in there)
I found your pics a bit confusing especially on how to remove top clip.
Your pic shows a left right movement when it actually has to be slid upward in a longer slot to get it out of the trim
I found I couldnt reach it to pull it up even with a long pair of pliers so I used a trim tool under(as in below) and in behind the airbag and just pushed it upward parallel to the A pillar and it just popped out of the trim
This was really helpful in showing how the A-Pillar trim is removed, as a note, my 2019 Tiguan SE (LHD, US) had the first two clips as captured, not just the first.
I found it easiest to use an angled trim tool to hold the trim back from the windshield side, then use a straight trim tool from the dash side, behind the airbag, to pop the clip out of the trim, viewing it all through the windshield from the outside.


This Post Has 5 Comments
Do you have a guide on how to wire in the rear camera please. Just unsure how to get wire through headlining and into tailgate
Best we can offer is the MK7 tutorial, which should be somewhat similar: https://www.autoinstruct.com.au/manufacturer/volkswagen/mk7-golf/mk7-golf-dash-cam-install/
I got it done but used two separate cameras and put a DR450 on the taildoor.
I routed the power wires along the floor under door trims and into the boot and up the rear left quarter I used a little tab behind the taillight for an earth point and ran the power wire up and through the wiggle connector into the tail door
To get top panel off the door you hold it at the bottom by glass and pull it away from glass and it pops off. To get the flexi connector apart on the top of the BODY you put a fine screwdriver down the end away from tubing and gently push it inward and the little tab will pop up and release it I then put a wire down from the taildoor and pulled the cable through into the door (with difficulty as loom is pretty tight in there)
I found your pics a bit confusing especially on how to remove top clip.
Your pic shows a left right movement when it actually has to be slid upward in a longer slot to get it out of the trim
I found I couldnt reach it to pull it up even with a long pair of pliers so I used a trim tool under(as in below) and in behind the airbag and just pushed it upward parallel to the A pillar and it just popped out of the trim
This was really helpful in showing how the A-Pillar trim is removed, as a note, my 2019 Tiguan SE (LHD, US) had the first two clips as captured, not just the first.
I found it easiest to use an angled trim tool to hold the trim back from the windshield side, then use a straight trim tool from the dash side, behind the airbag, to pop the clip out of the trim, viewing it all through the windshield from the outside.