The concept of installing a dash cam can seem quite daunting, however it is actually relatively simple with some basic tools and electrical knowledge. In the tutorial below AutoInstruct will show you how to install a front and rear dash cam in your vehicle.
For this tutorial we’re using a MK7 Golf R, and the dash cam is a Blackvue DR650S-2CH with a Power Magic Pro. For LHD models the process is very similar, please see below for more information.
Work at your own risk. This work is inherently dangerous and must only be carried out by a qualified mechanic. AutoInstruct will not be held responsible for damage to your vehicle or personal injury / death as a result of the information we provide.
Step 1
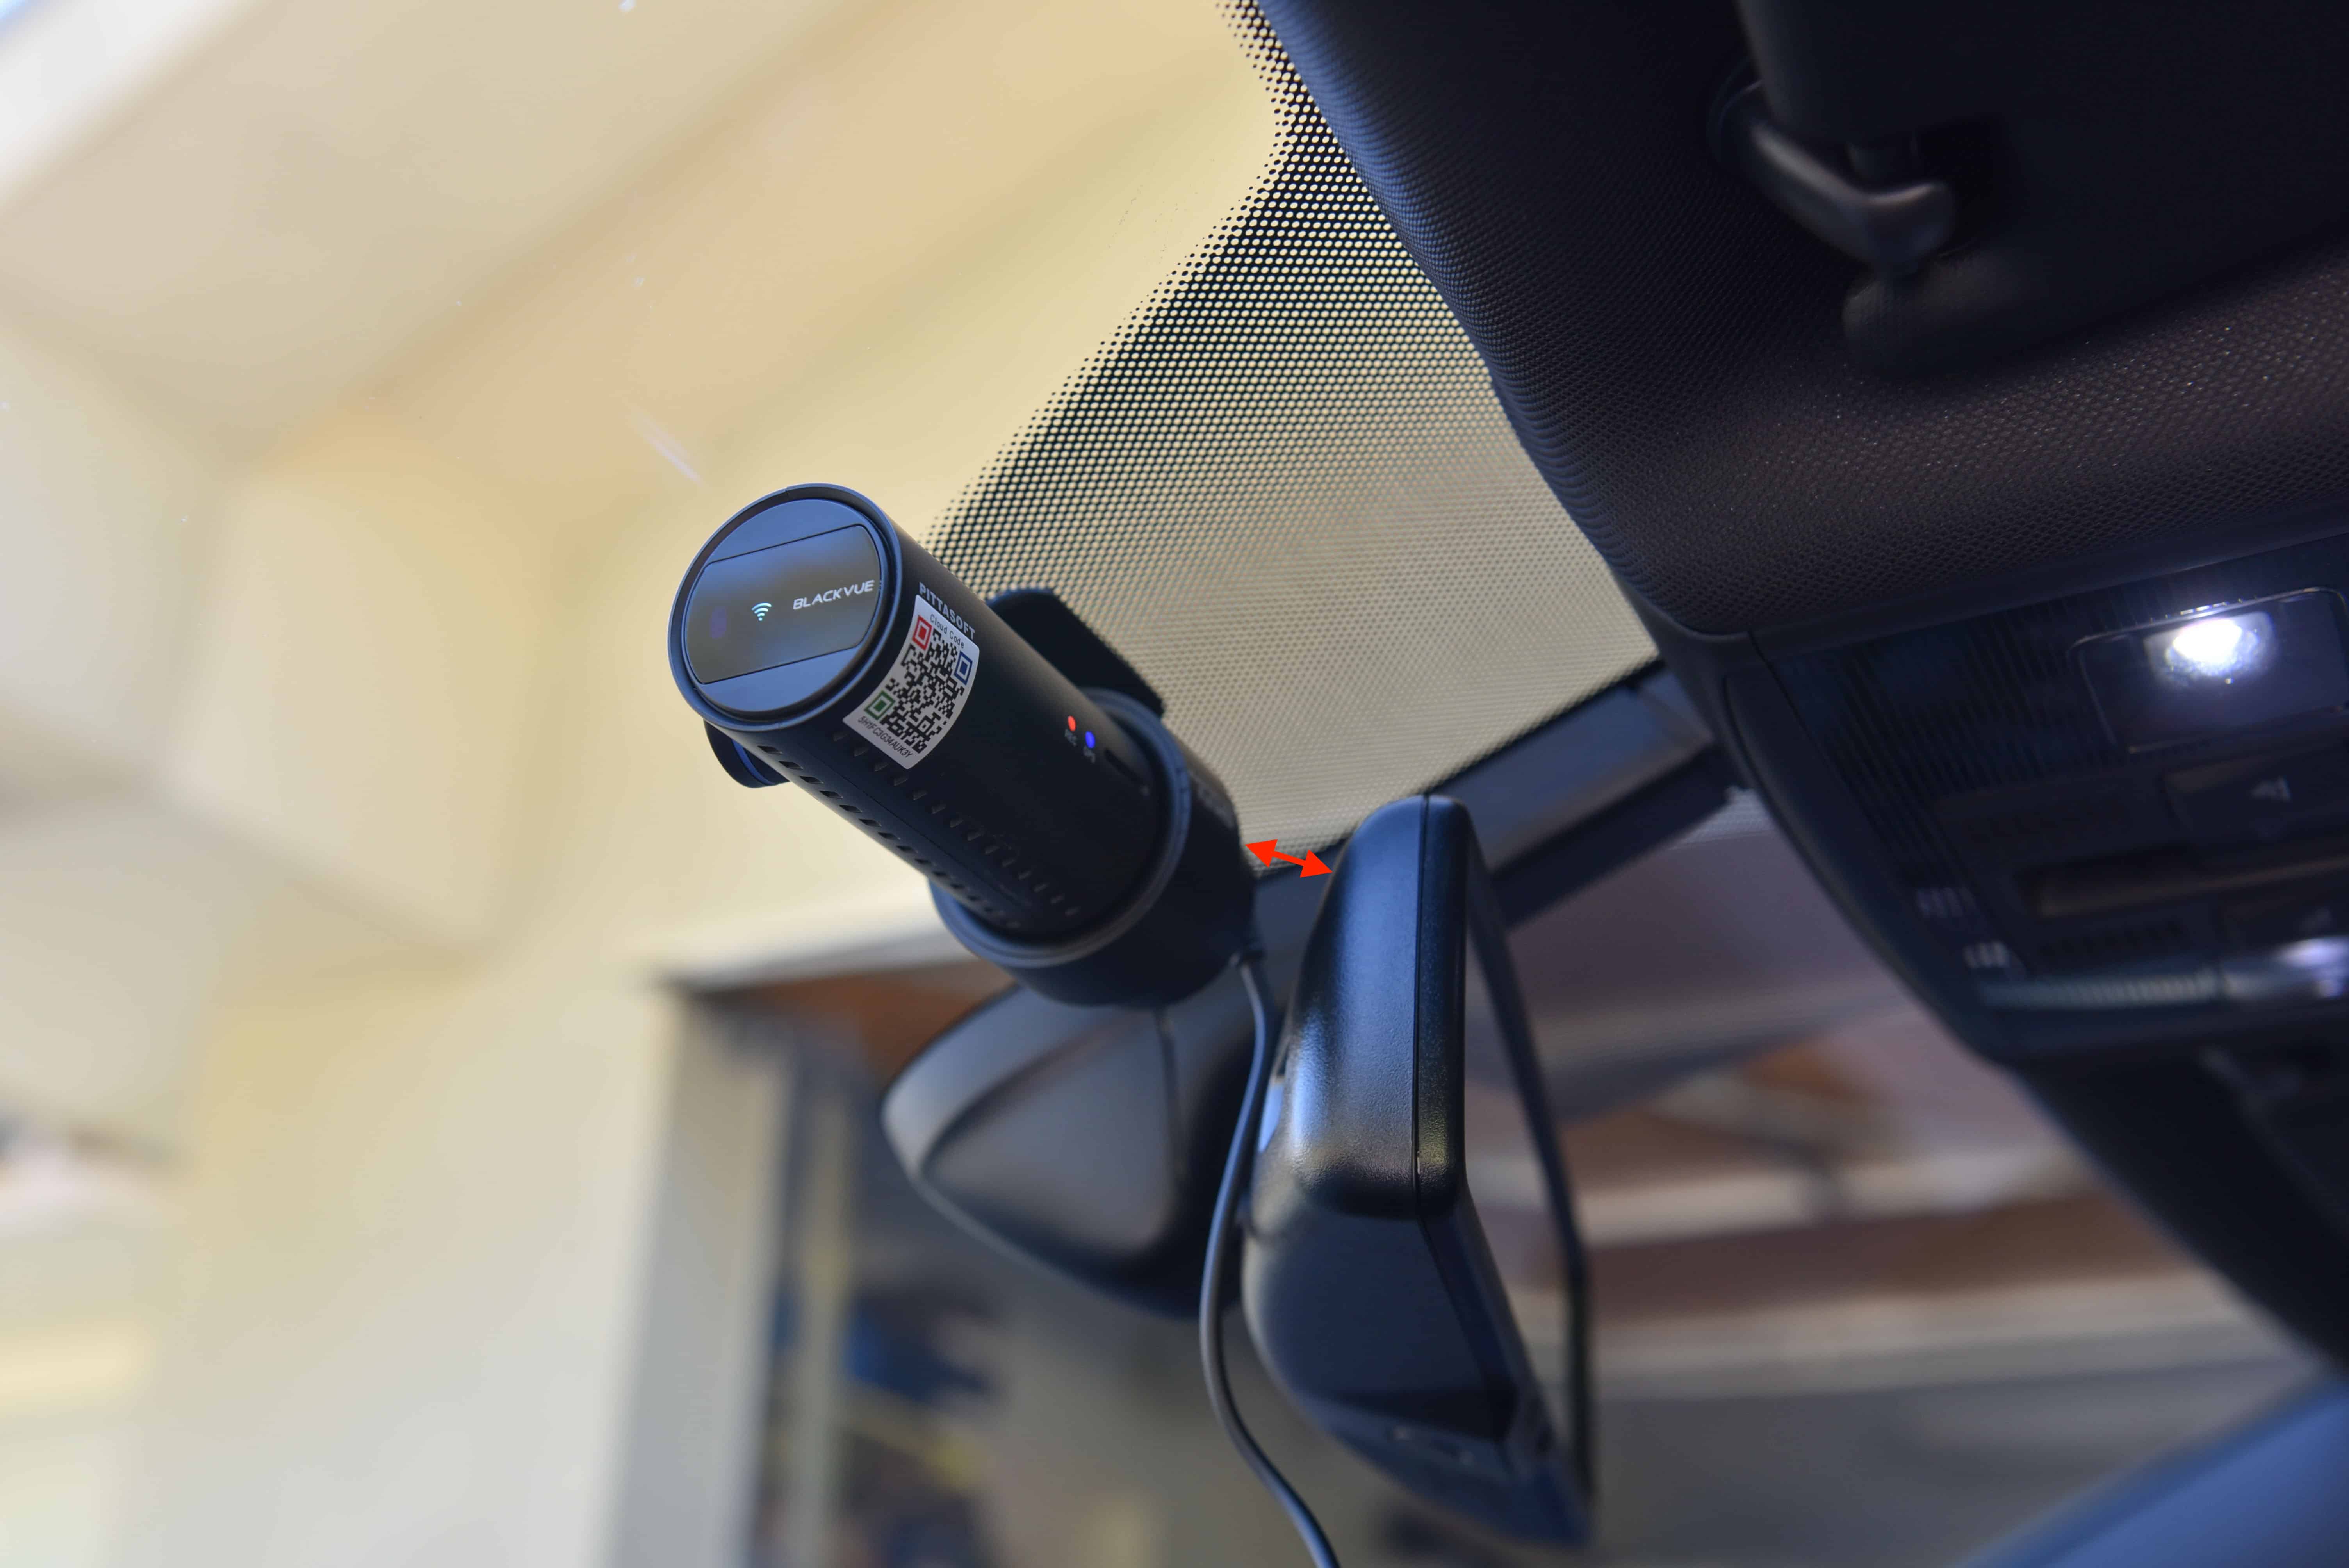
First we need to choose a suitable mounting location on the front windshield. Power on the camera using the cigarette lighter and check the footage to ensure you are happy with the position. Being a Right Hand Drive (RHD) vehicle we’ve chose to mount the camera behind the left side of the rear view mirror, therefore hiding the camera from the driver’s field of view.
Ensure you leave adequate space between the camera and mirror to allow for movement in the mirror. Once the spot is chosen, stick the camera to the windshield.
Step 2
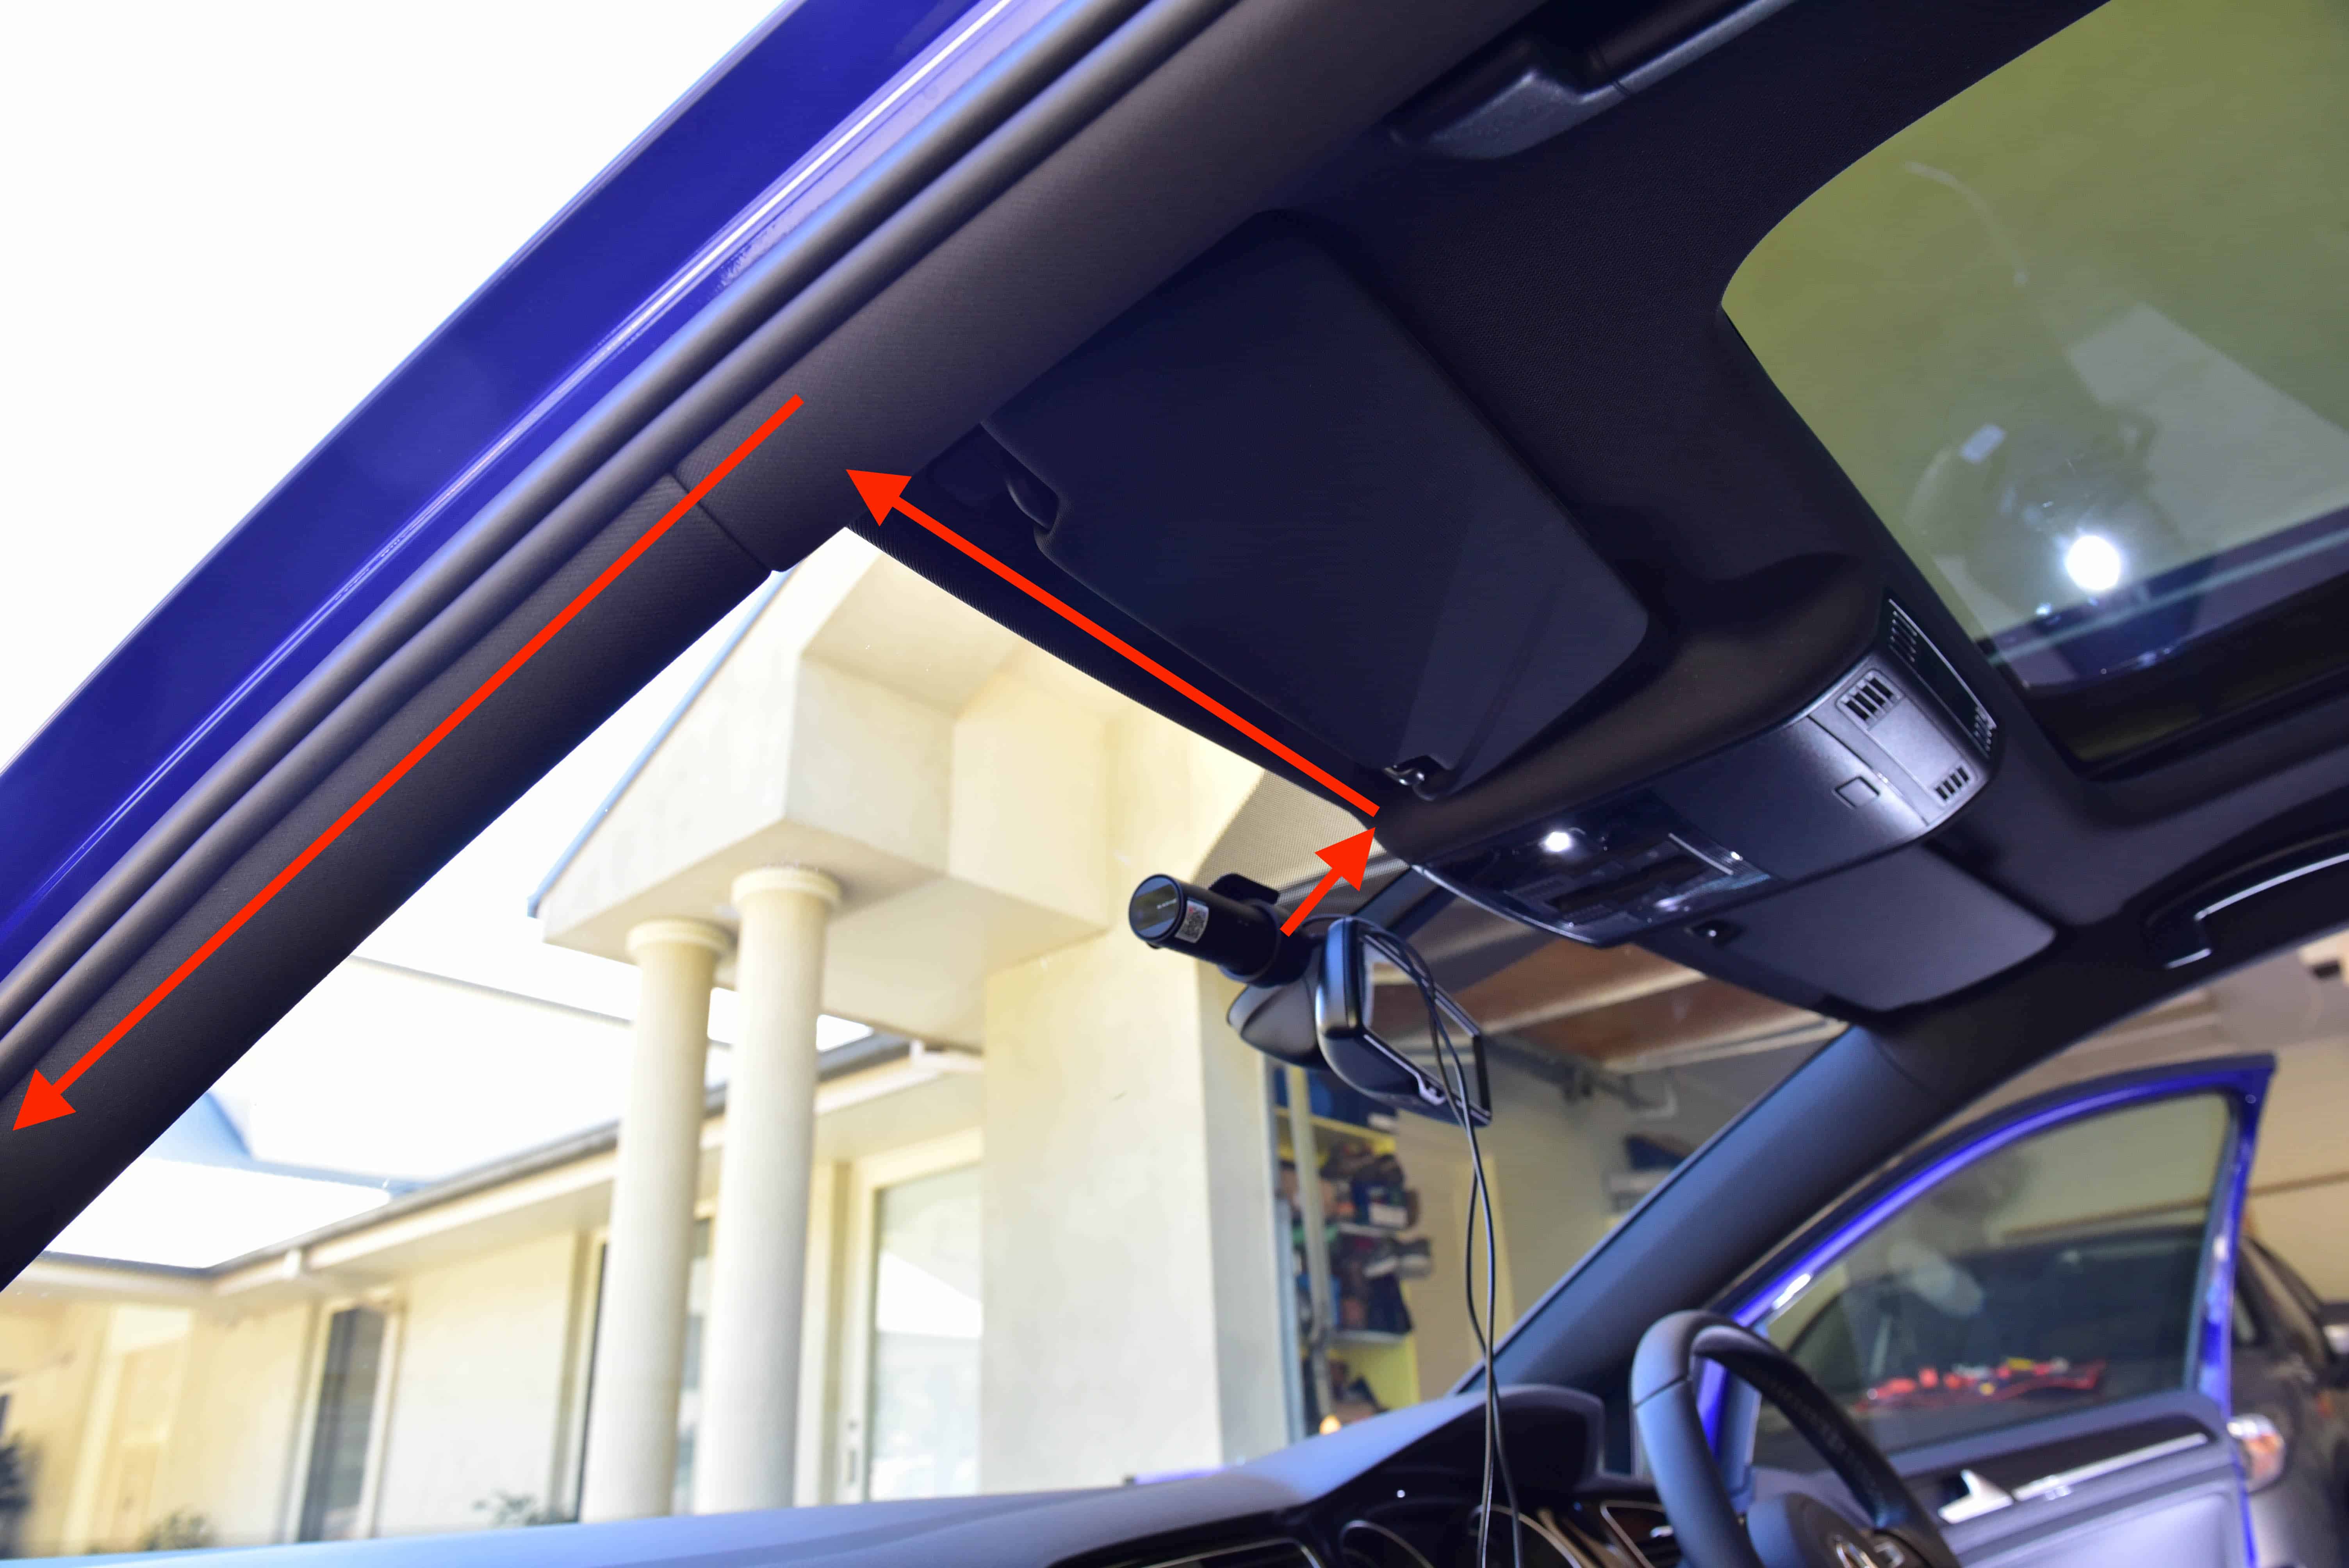
We will run the power cable in the direction shown, leading to the fuse box behind the glovebox.
For Left Hand Drive (LHD) models, this fuse box is located behind the driver’s knee coin tray.
Step 3
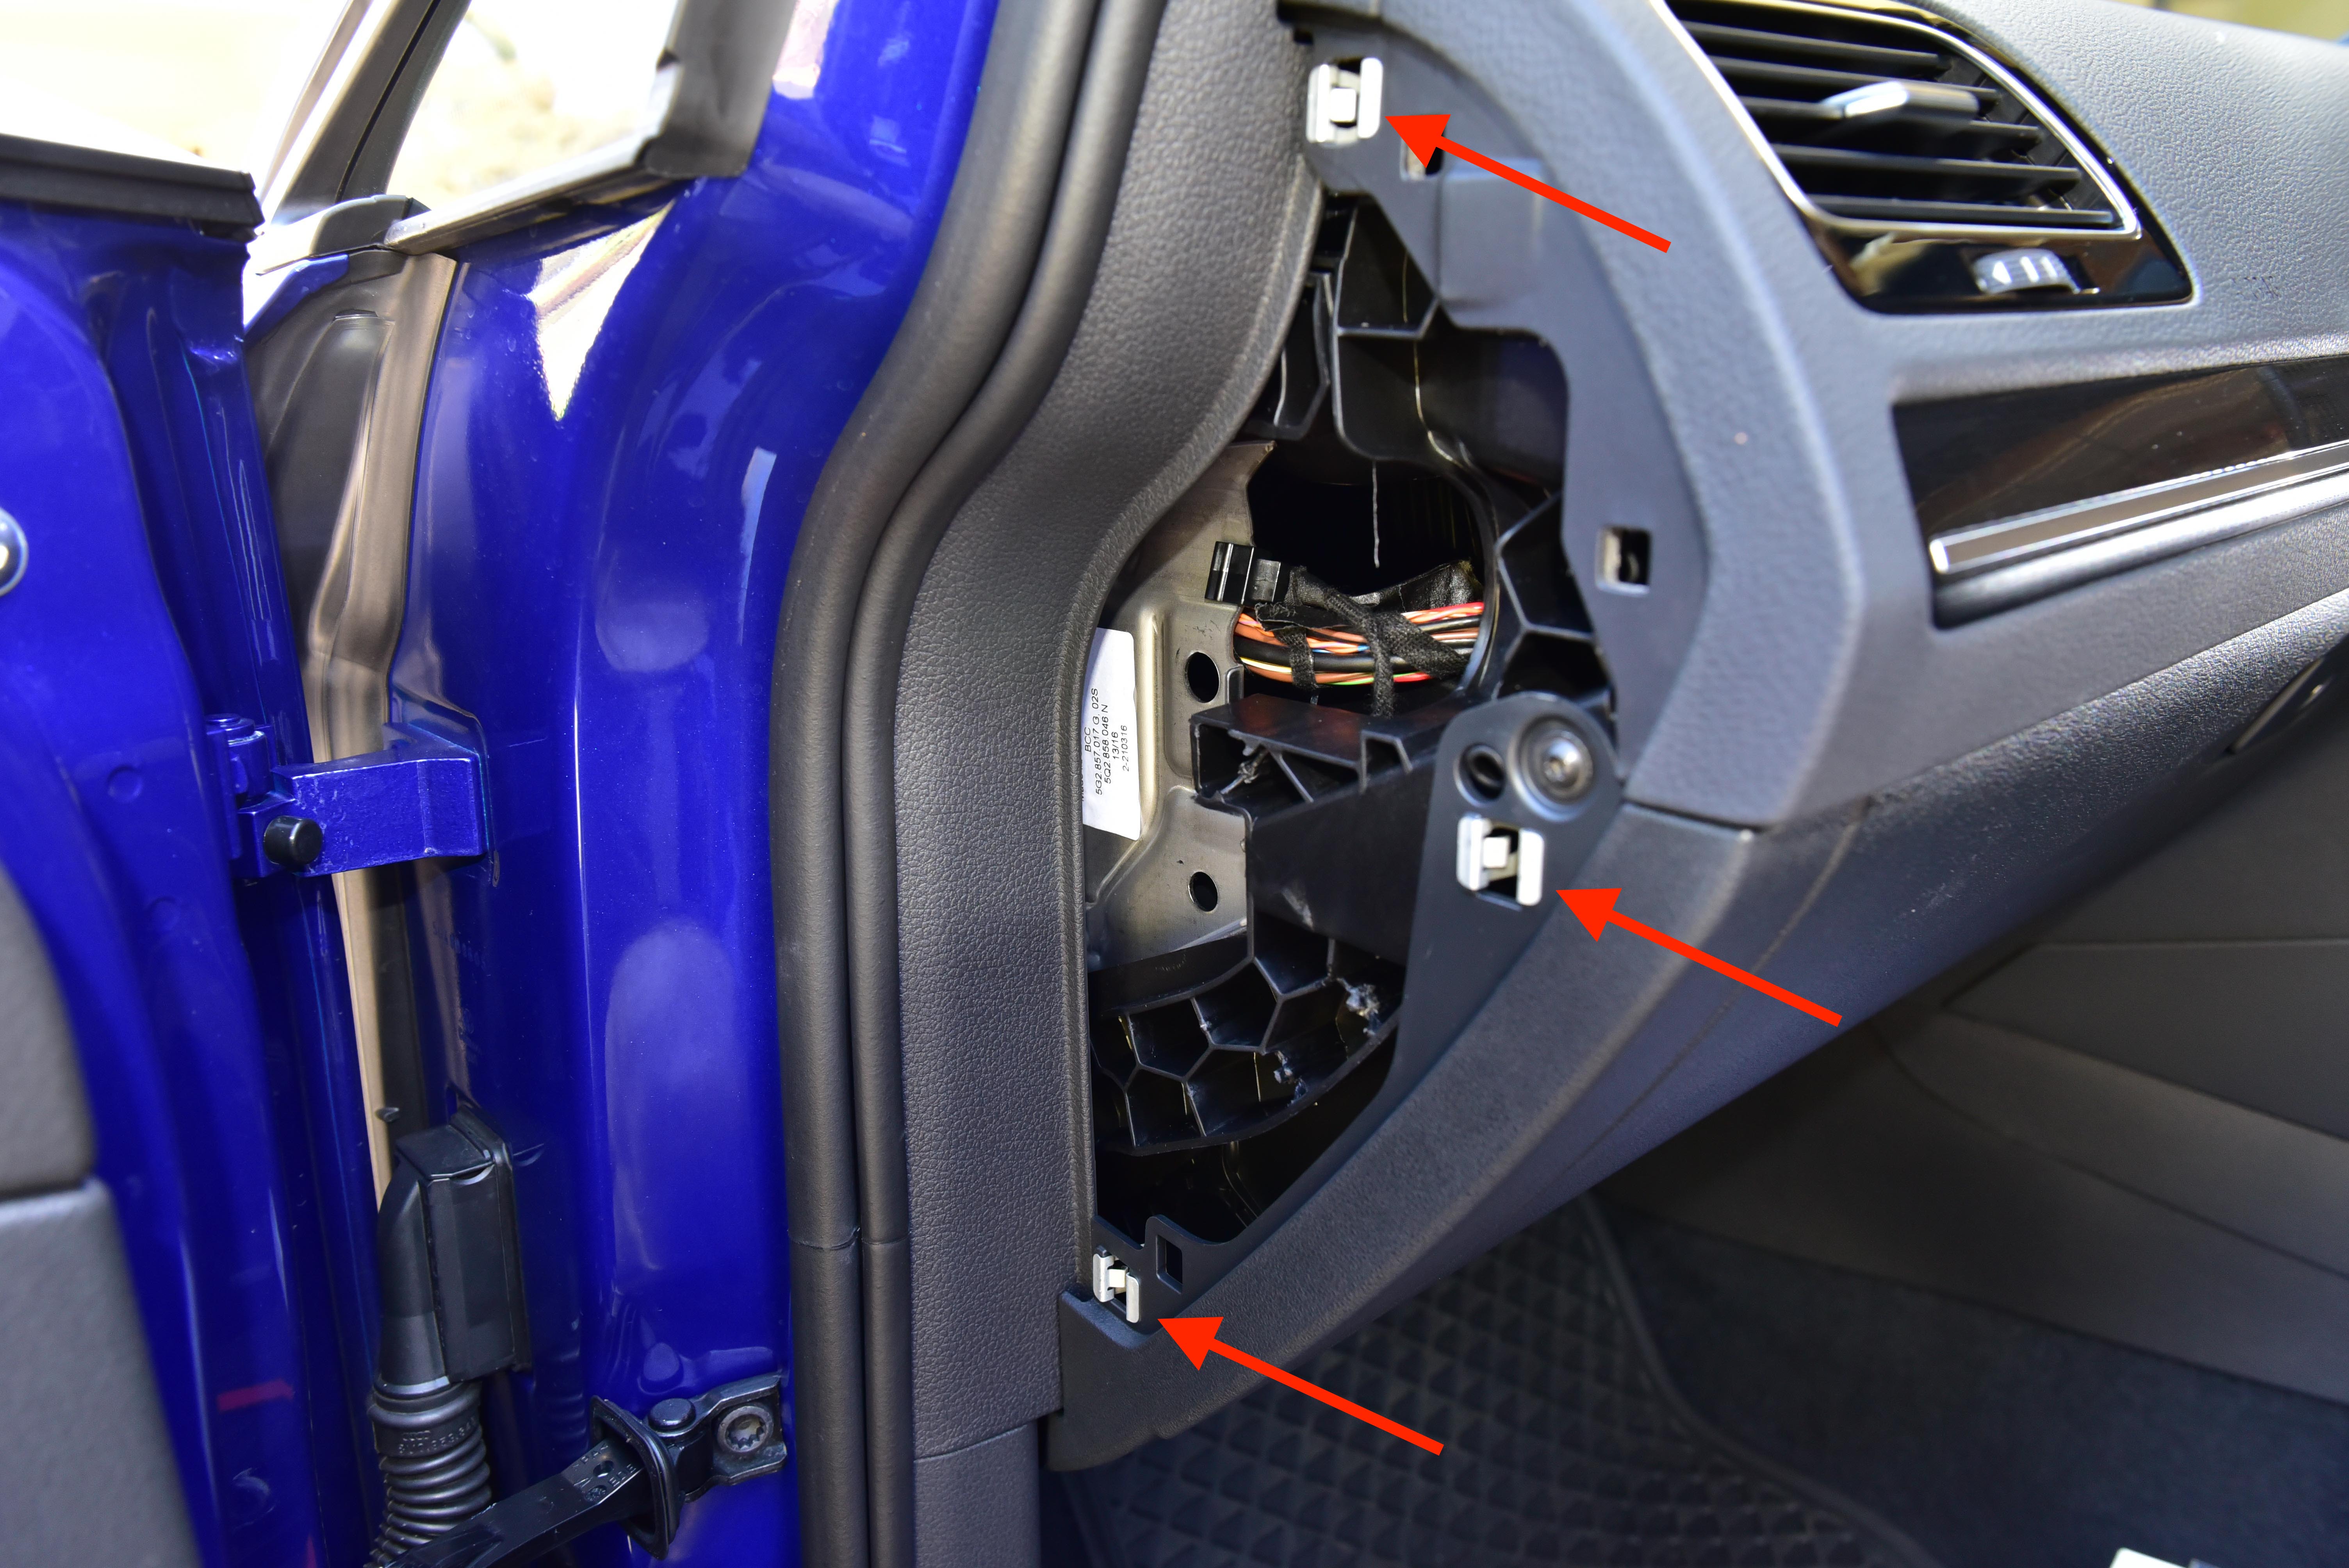
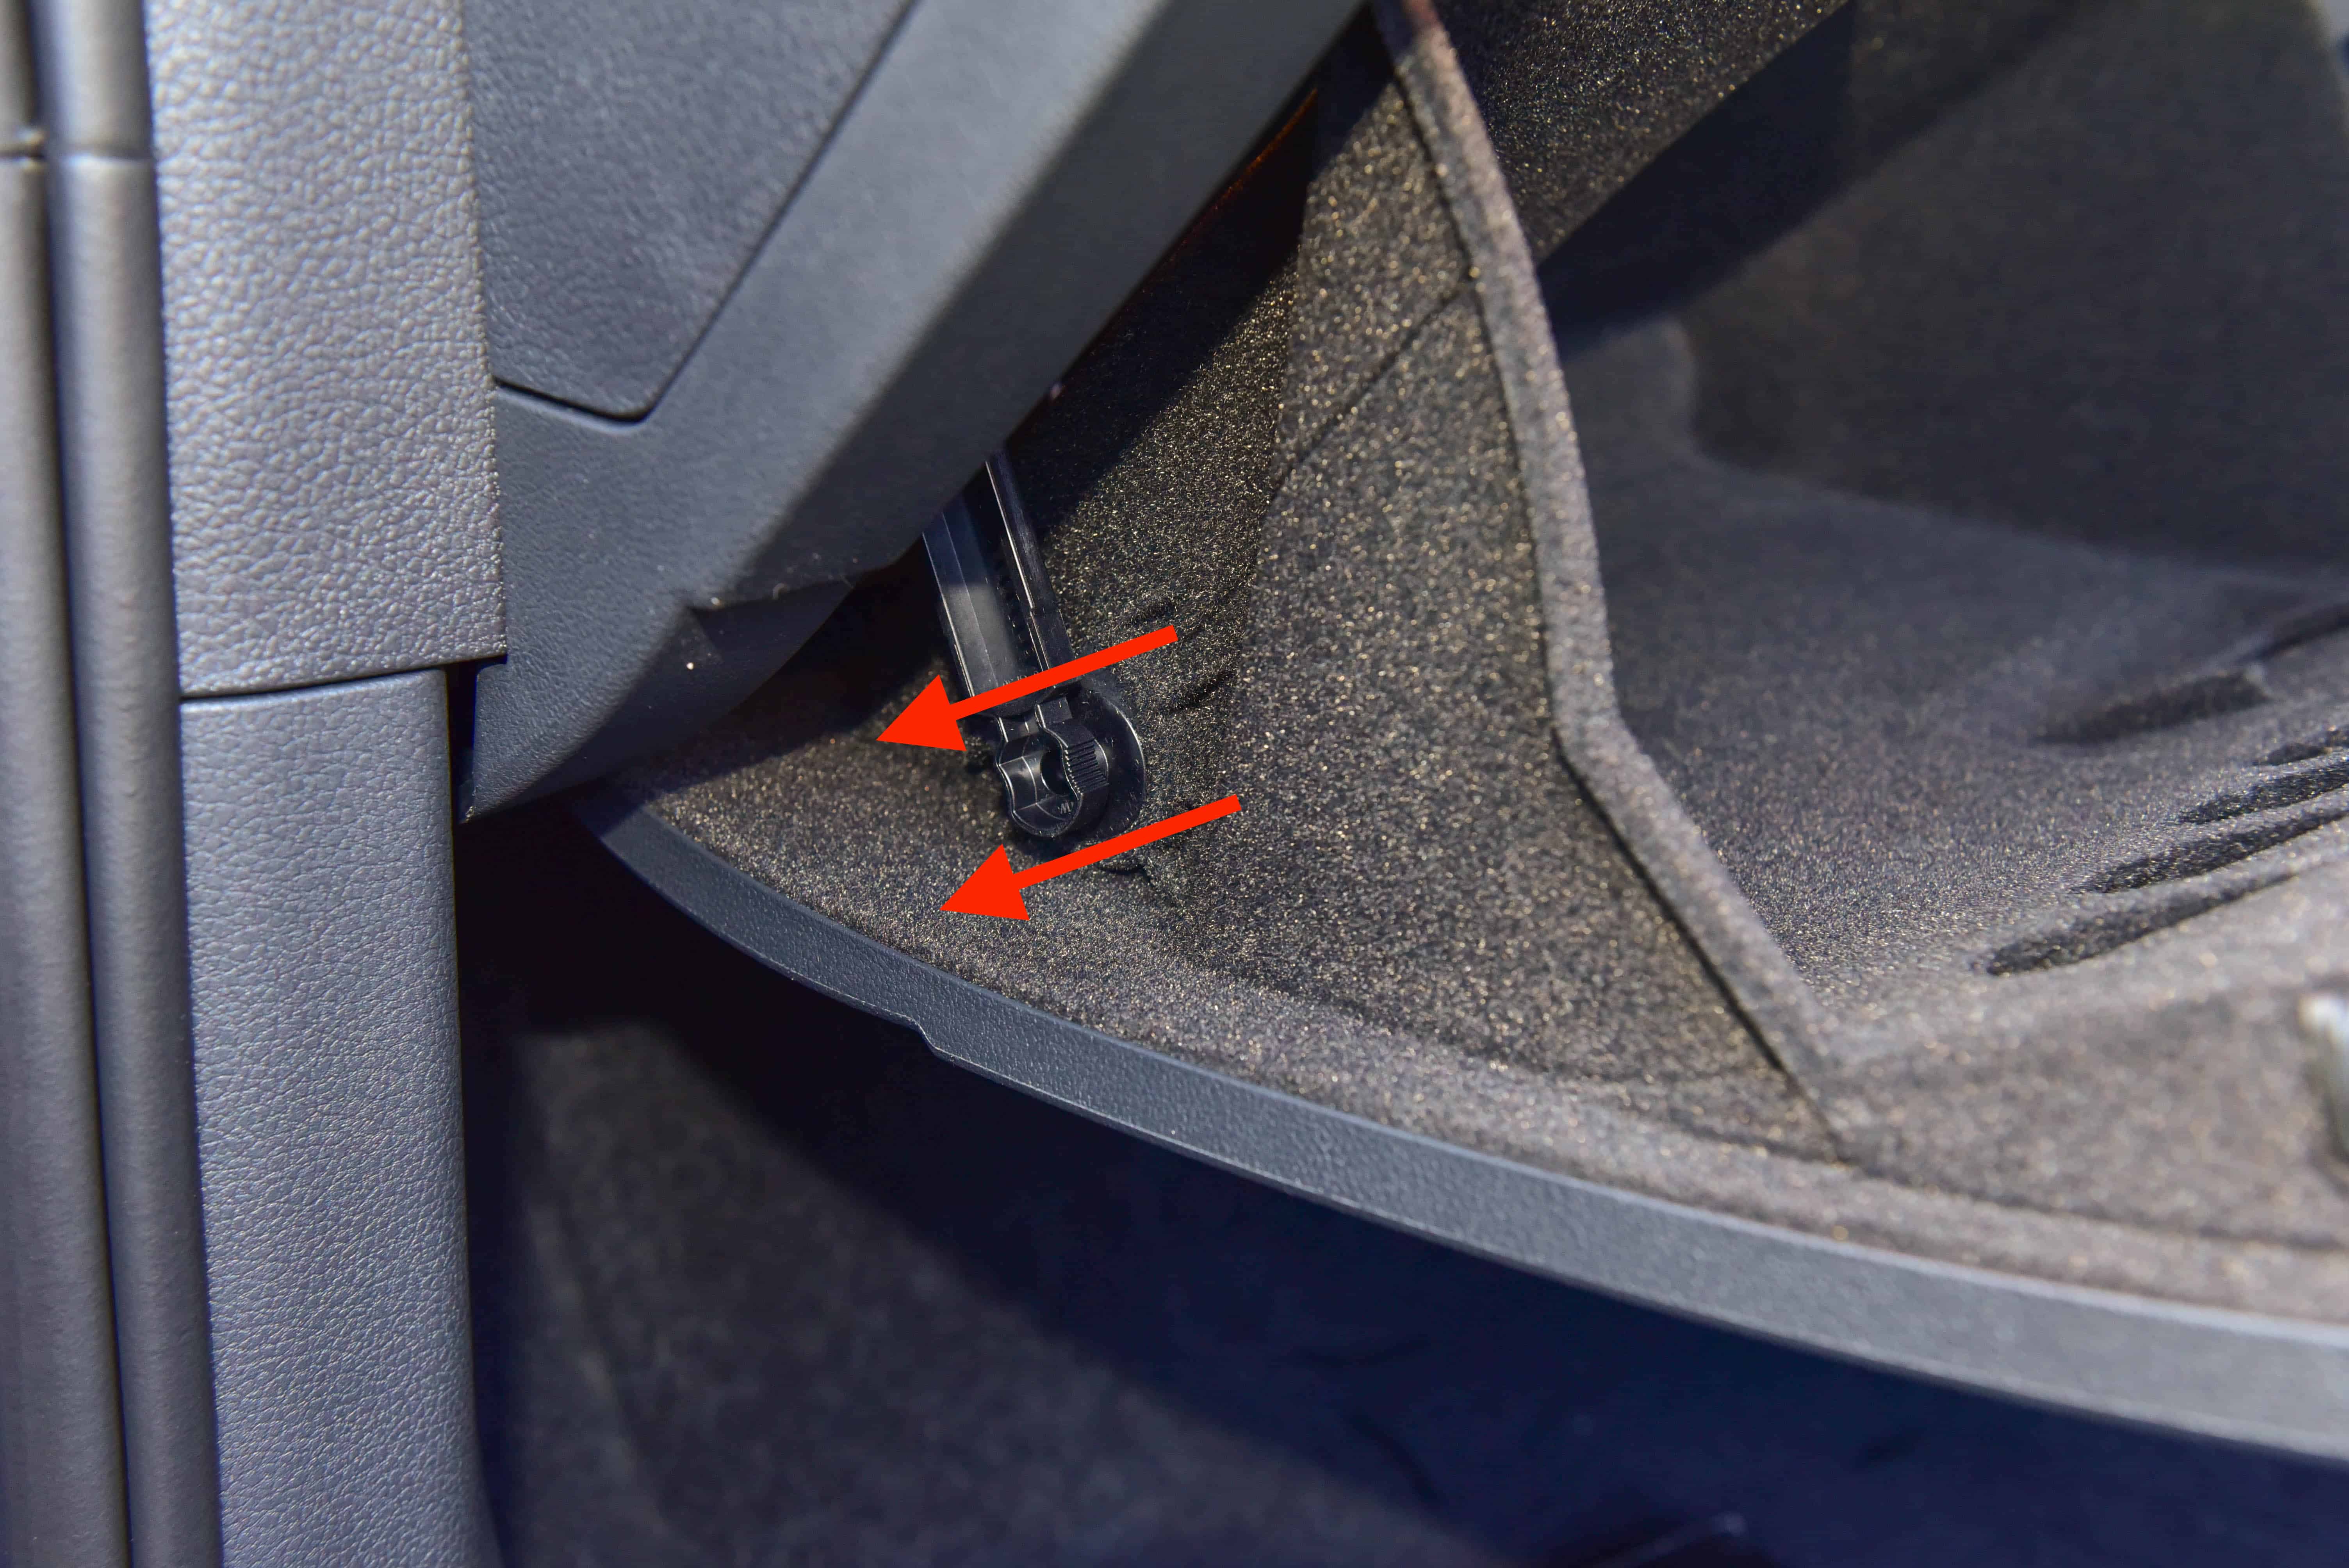
Using a trim removal tool gently remove the side cover of the glove box. There are three clips holding this in place as pictured.
Step 4
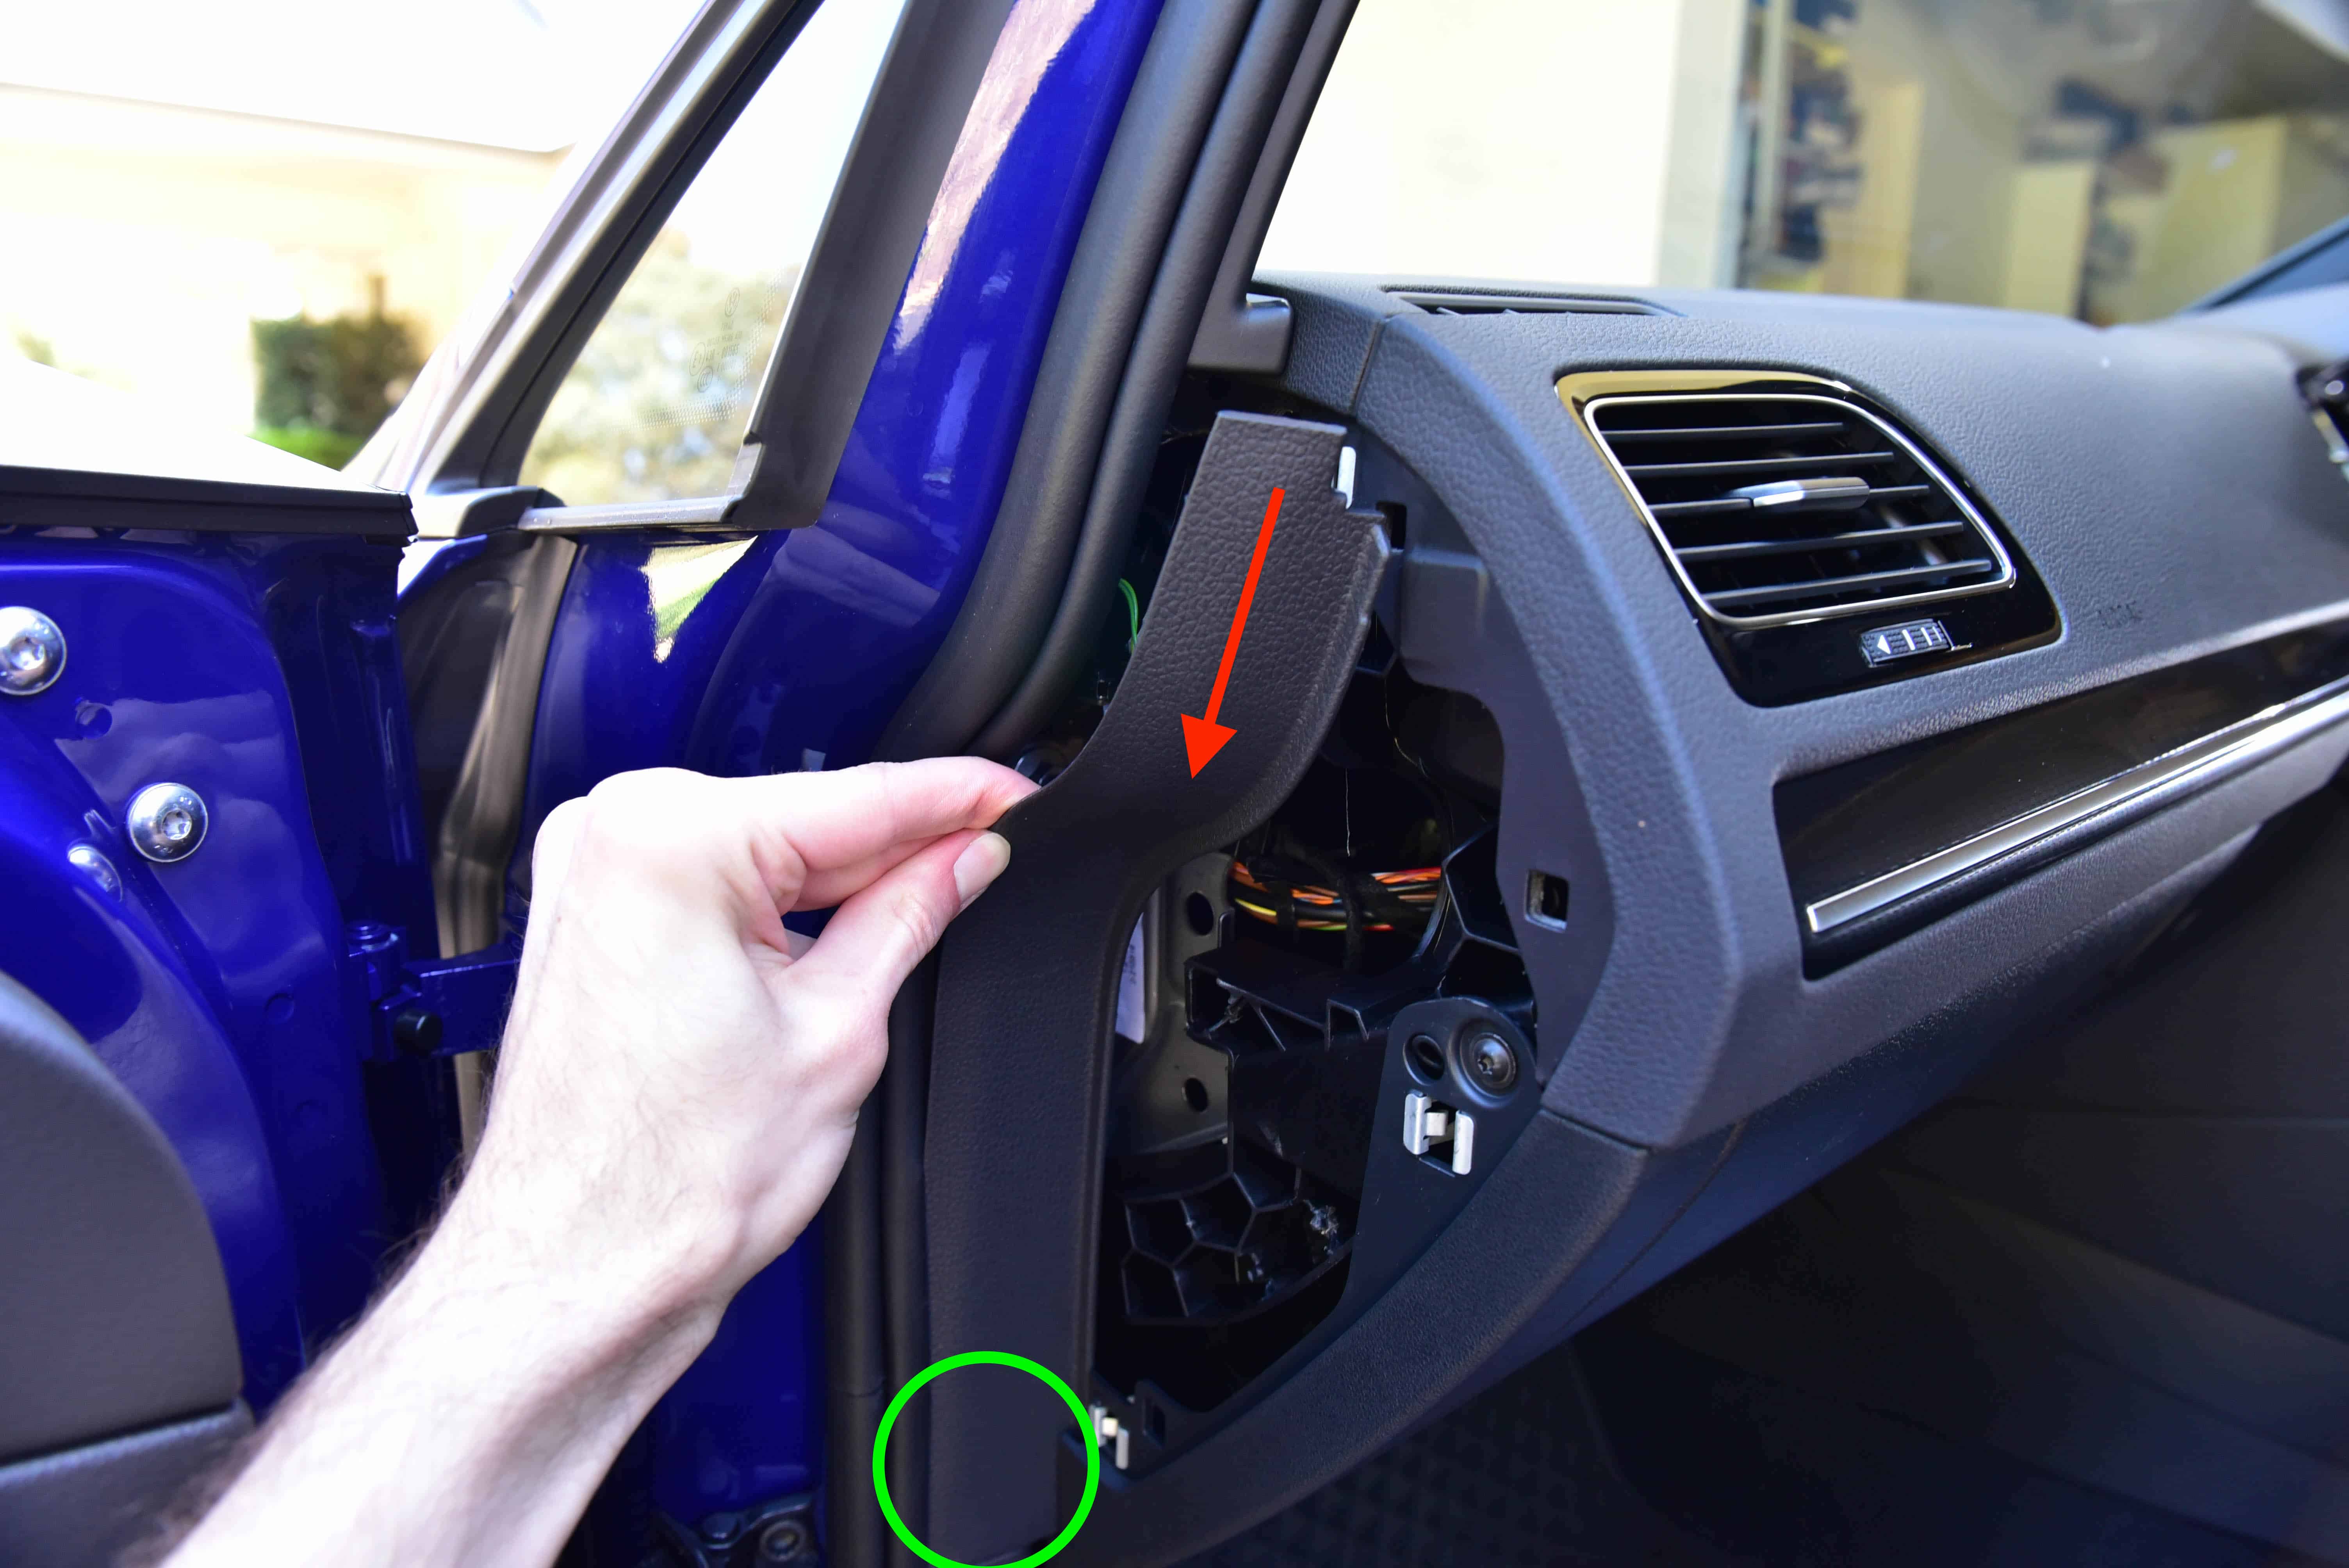
Remove the vertical spear which runs alongside the door seal. Release the clip circled in Green then pull downwards to release the spear from the dashboard.
Step 5
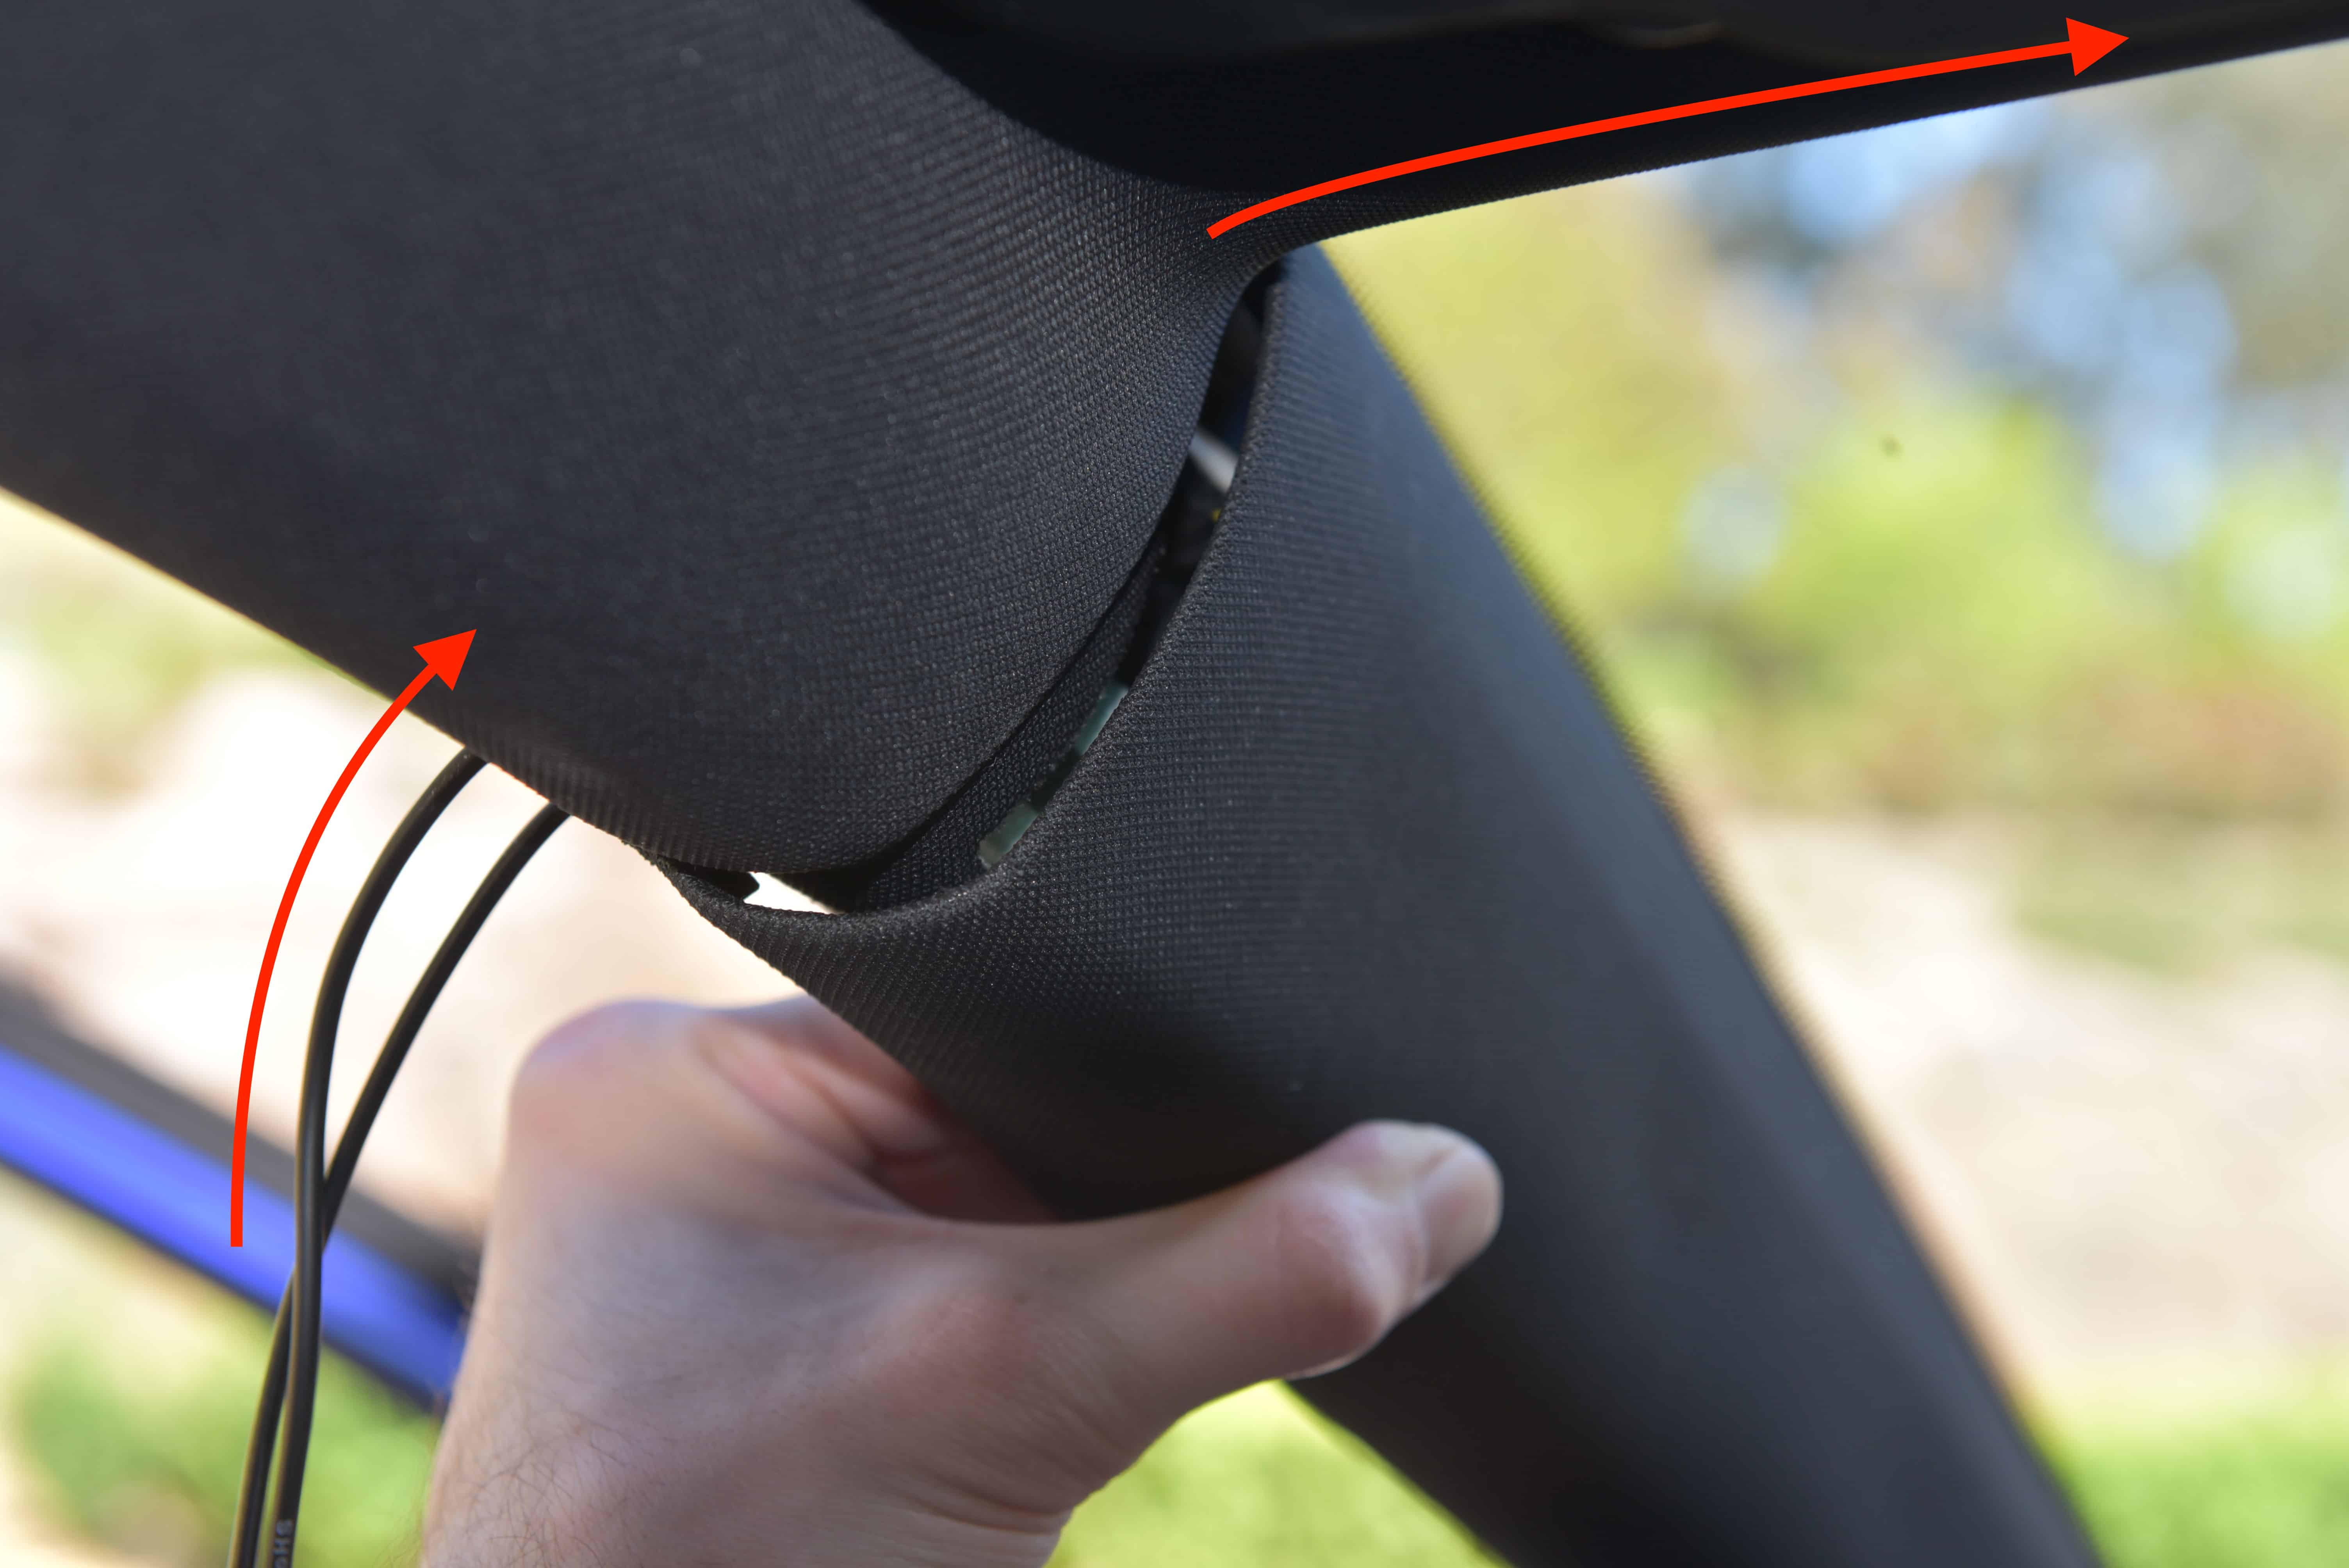
When feeding the cables we need to ensure we do not obsecure the airbag in the event of a deployment. Essentially this means we never run the cables between the airbag and vehicle occupants.
As a result, the first step is feeding behind the airbag in the A-Pillar. Grasp the pillar near the window seal and gently pull down to make a small gap. Then feed the cables in the direction shown, ensuring you are feeding behind the airbag.
You can then feed the cables along the top of the windshield and into the roof lining. The cables will sit comfortably in place. Plug the cables into the camera and ensure there is adequate cable slack for adjustment. Neaten as required and push the A-Pillar firmly back into position.
Step 6
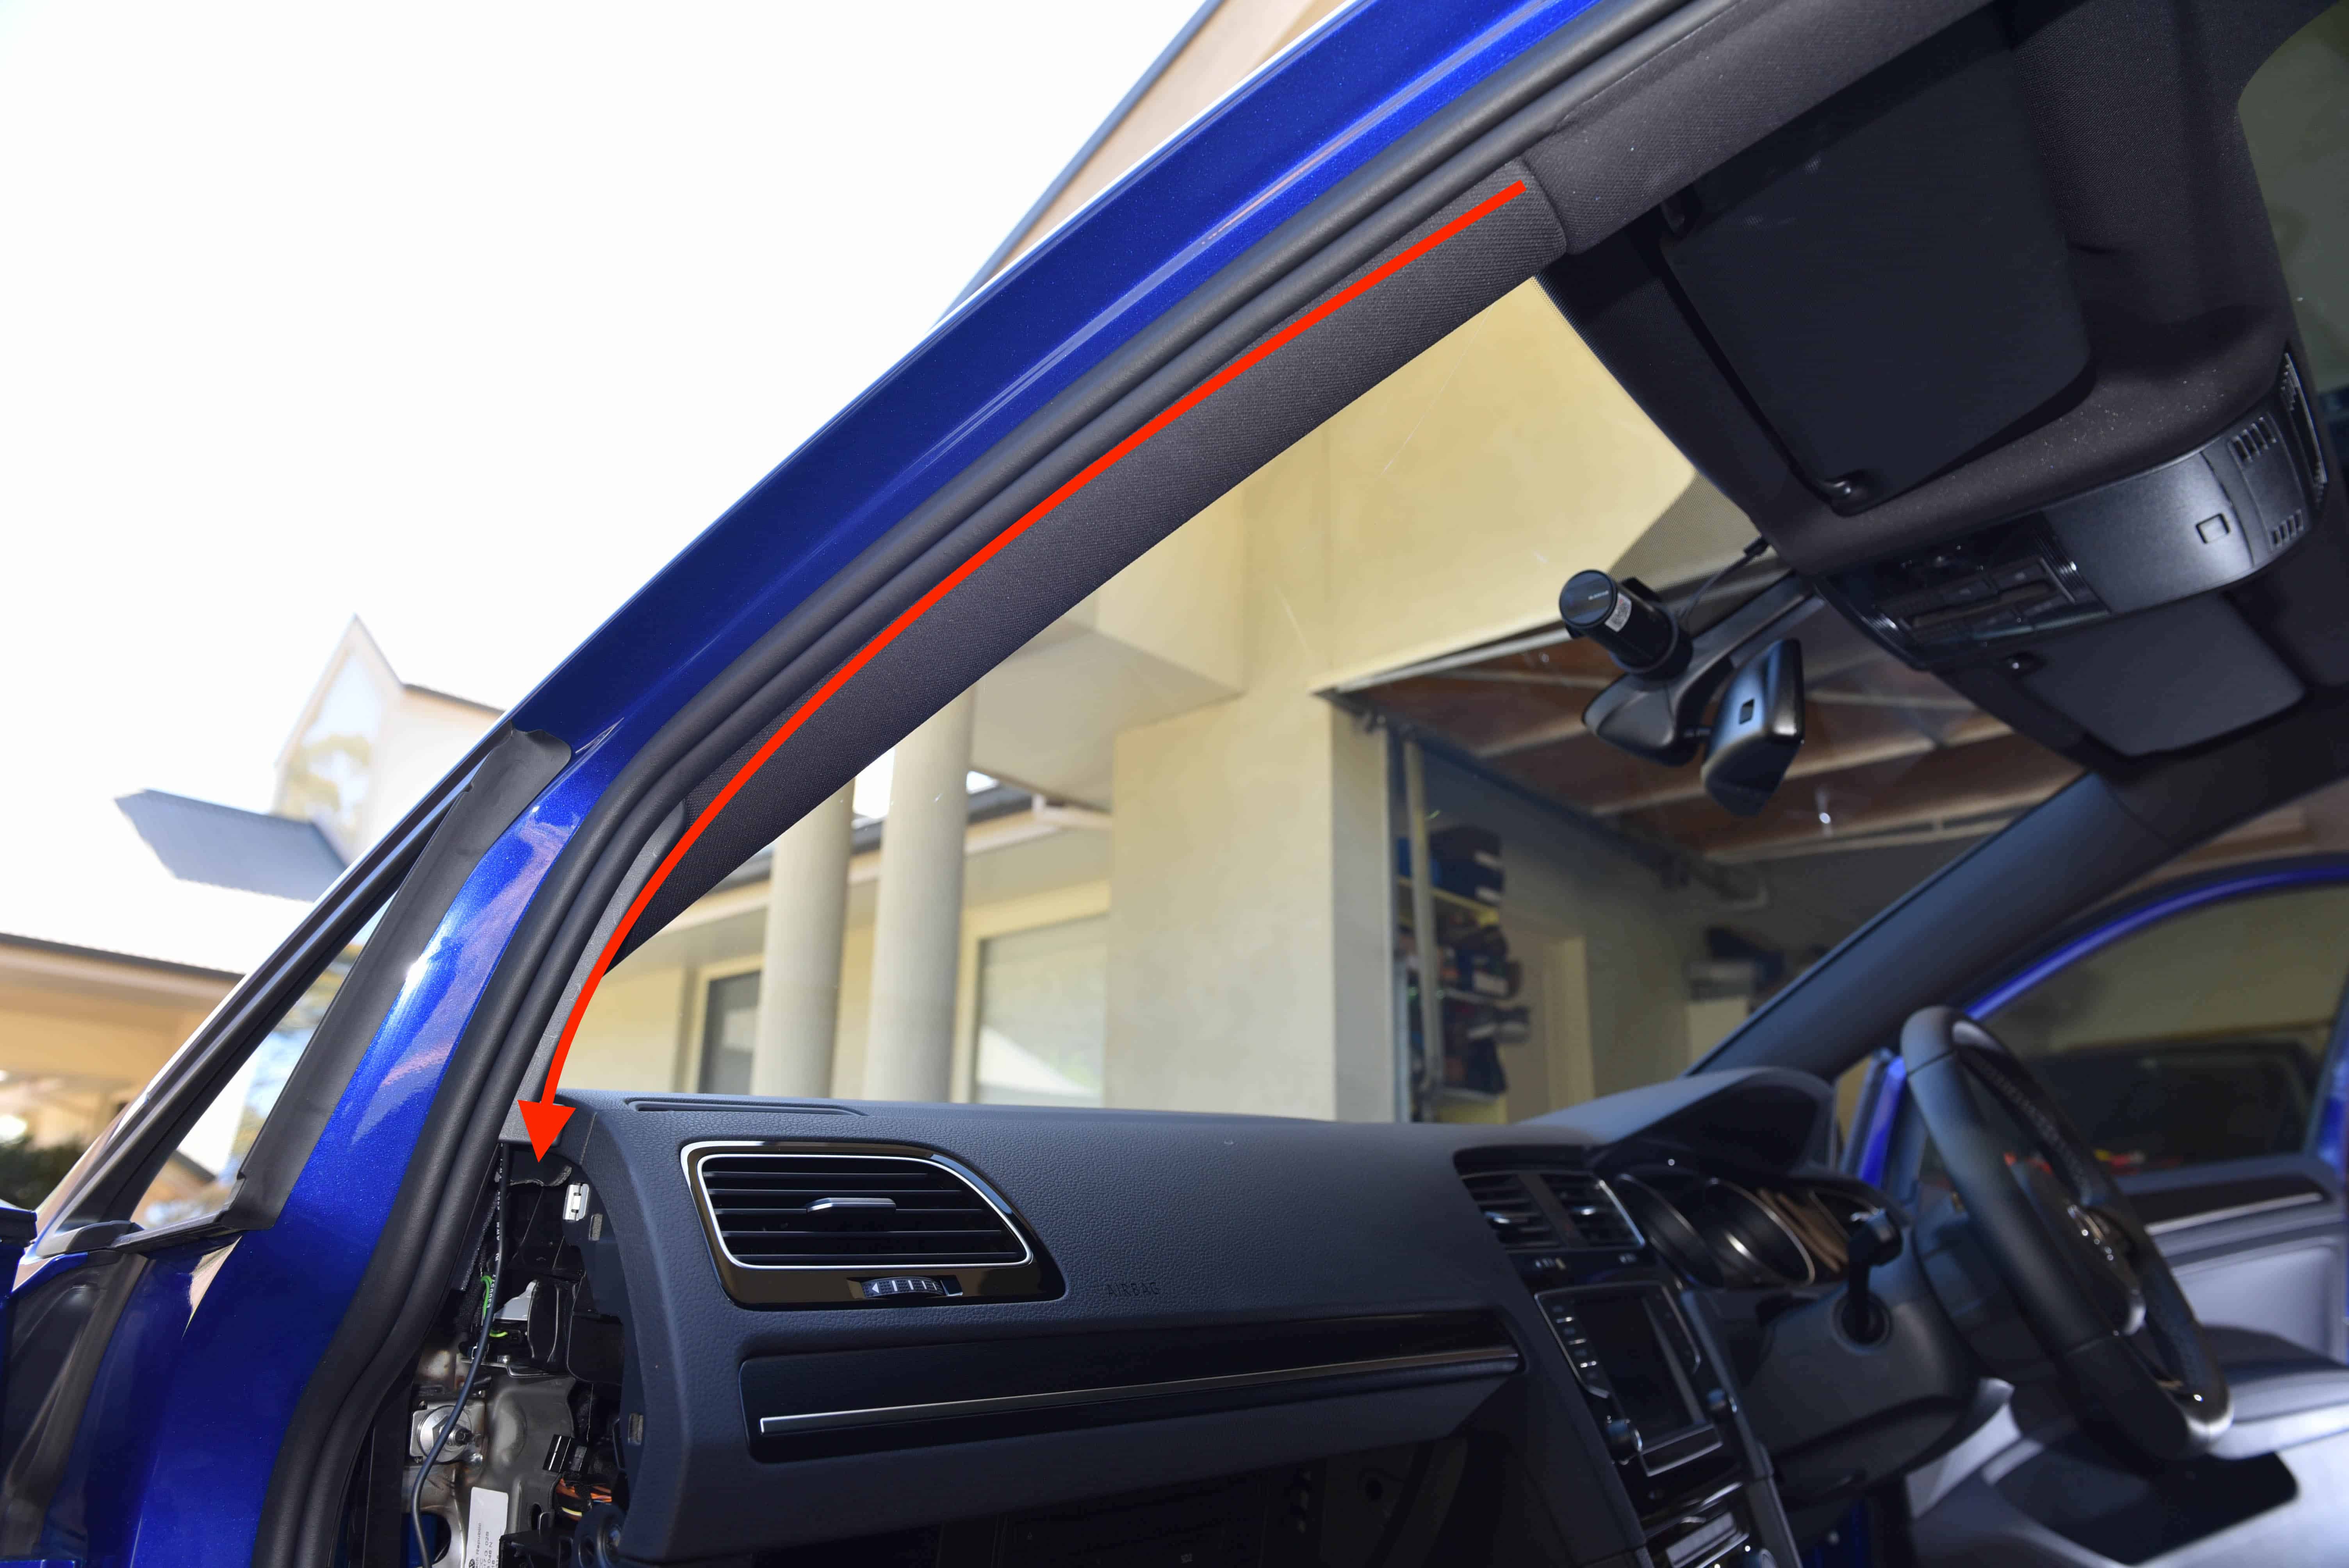
We will now split the direction of the power and rear camera cables. For the power cable simply pull back on the rubber seal and feed the wire down the A-Pillar and out the bottom where we previously removed the trim.
The rear camera cable will head towards the B-Pillar.
Step 7
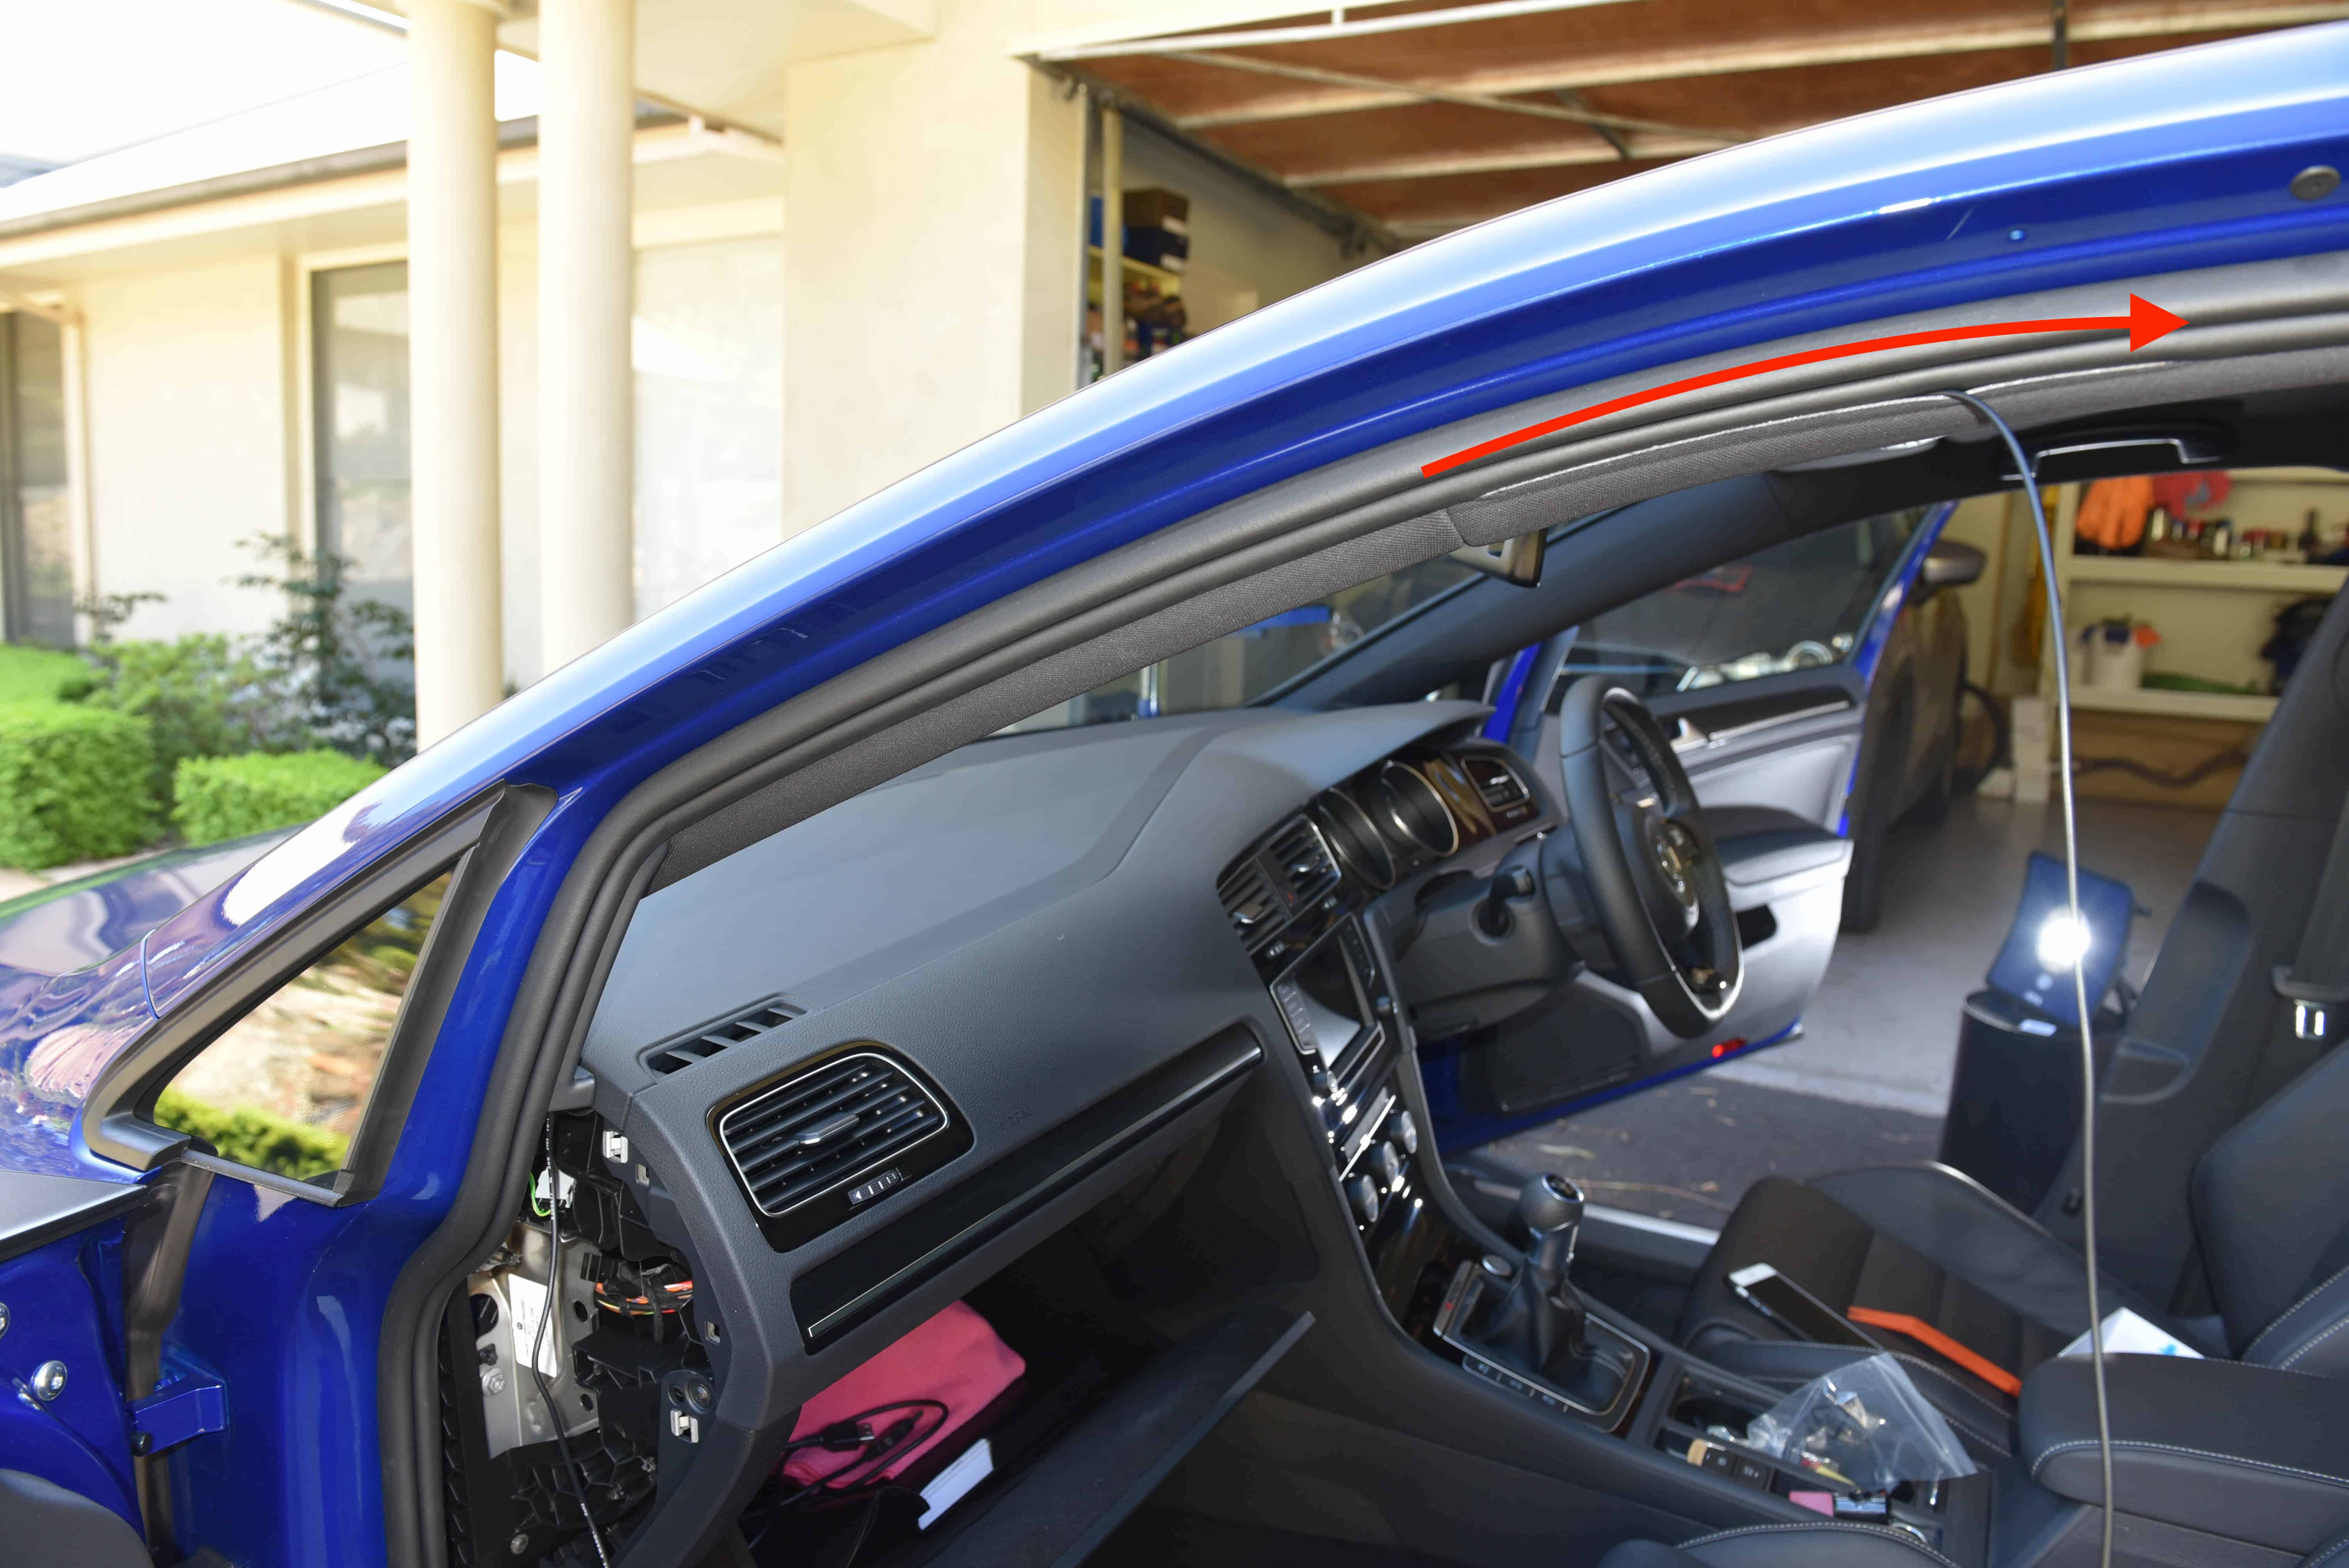
The rear camera cable will need to be run towards the B-Pillar.
Step 8
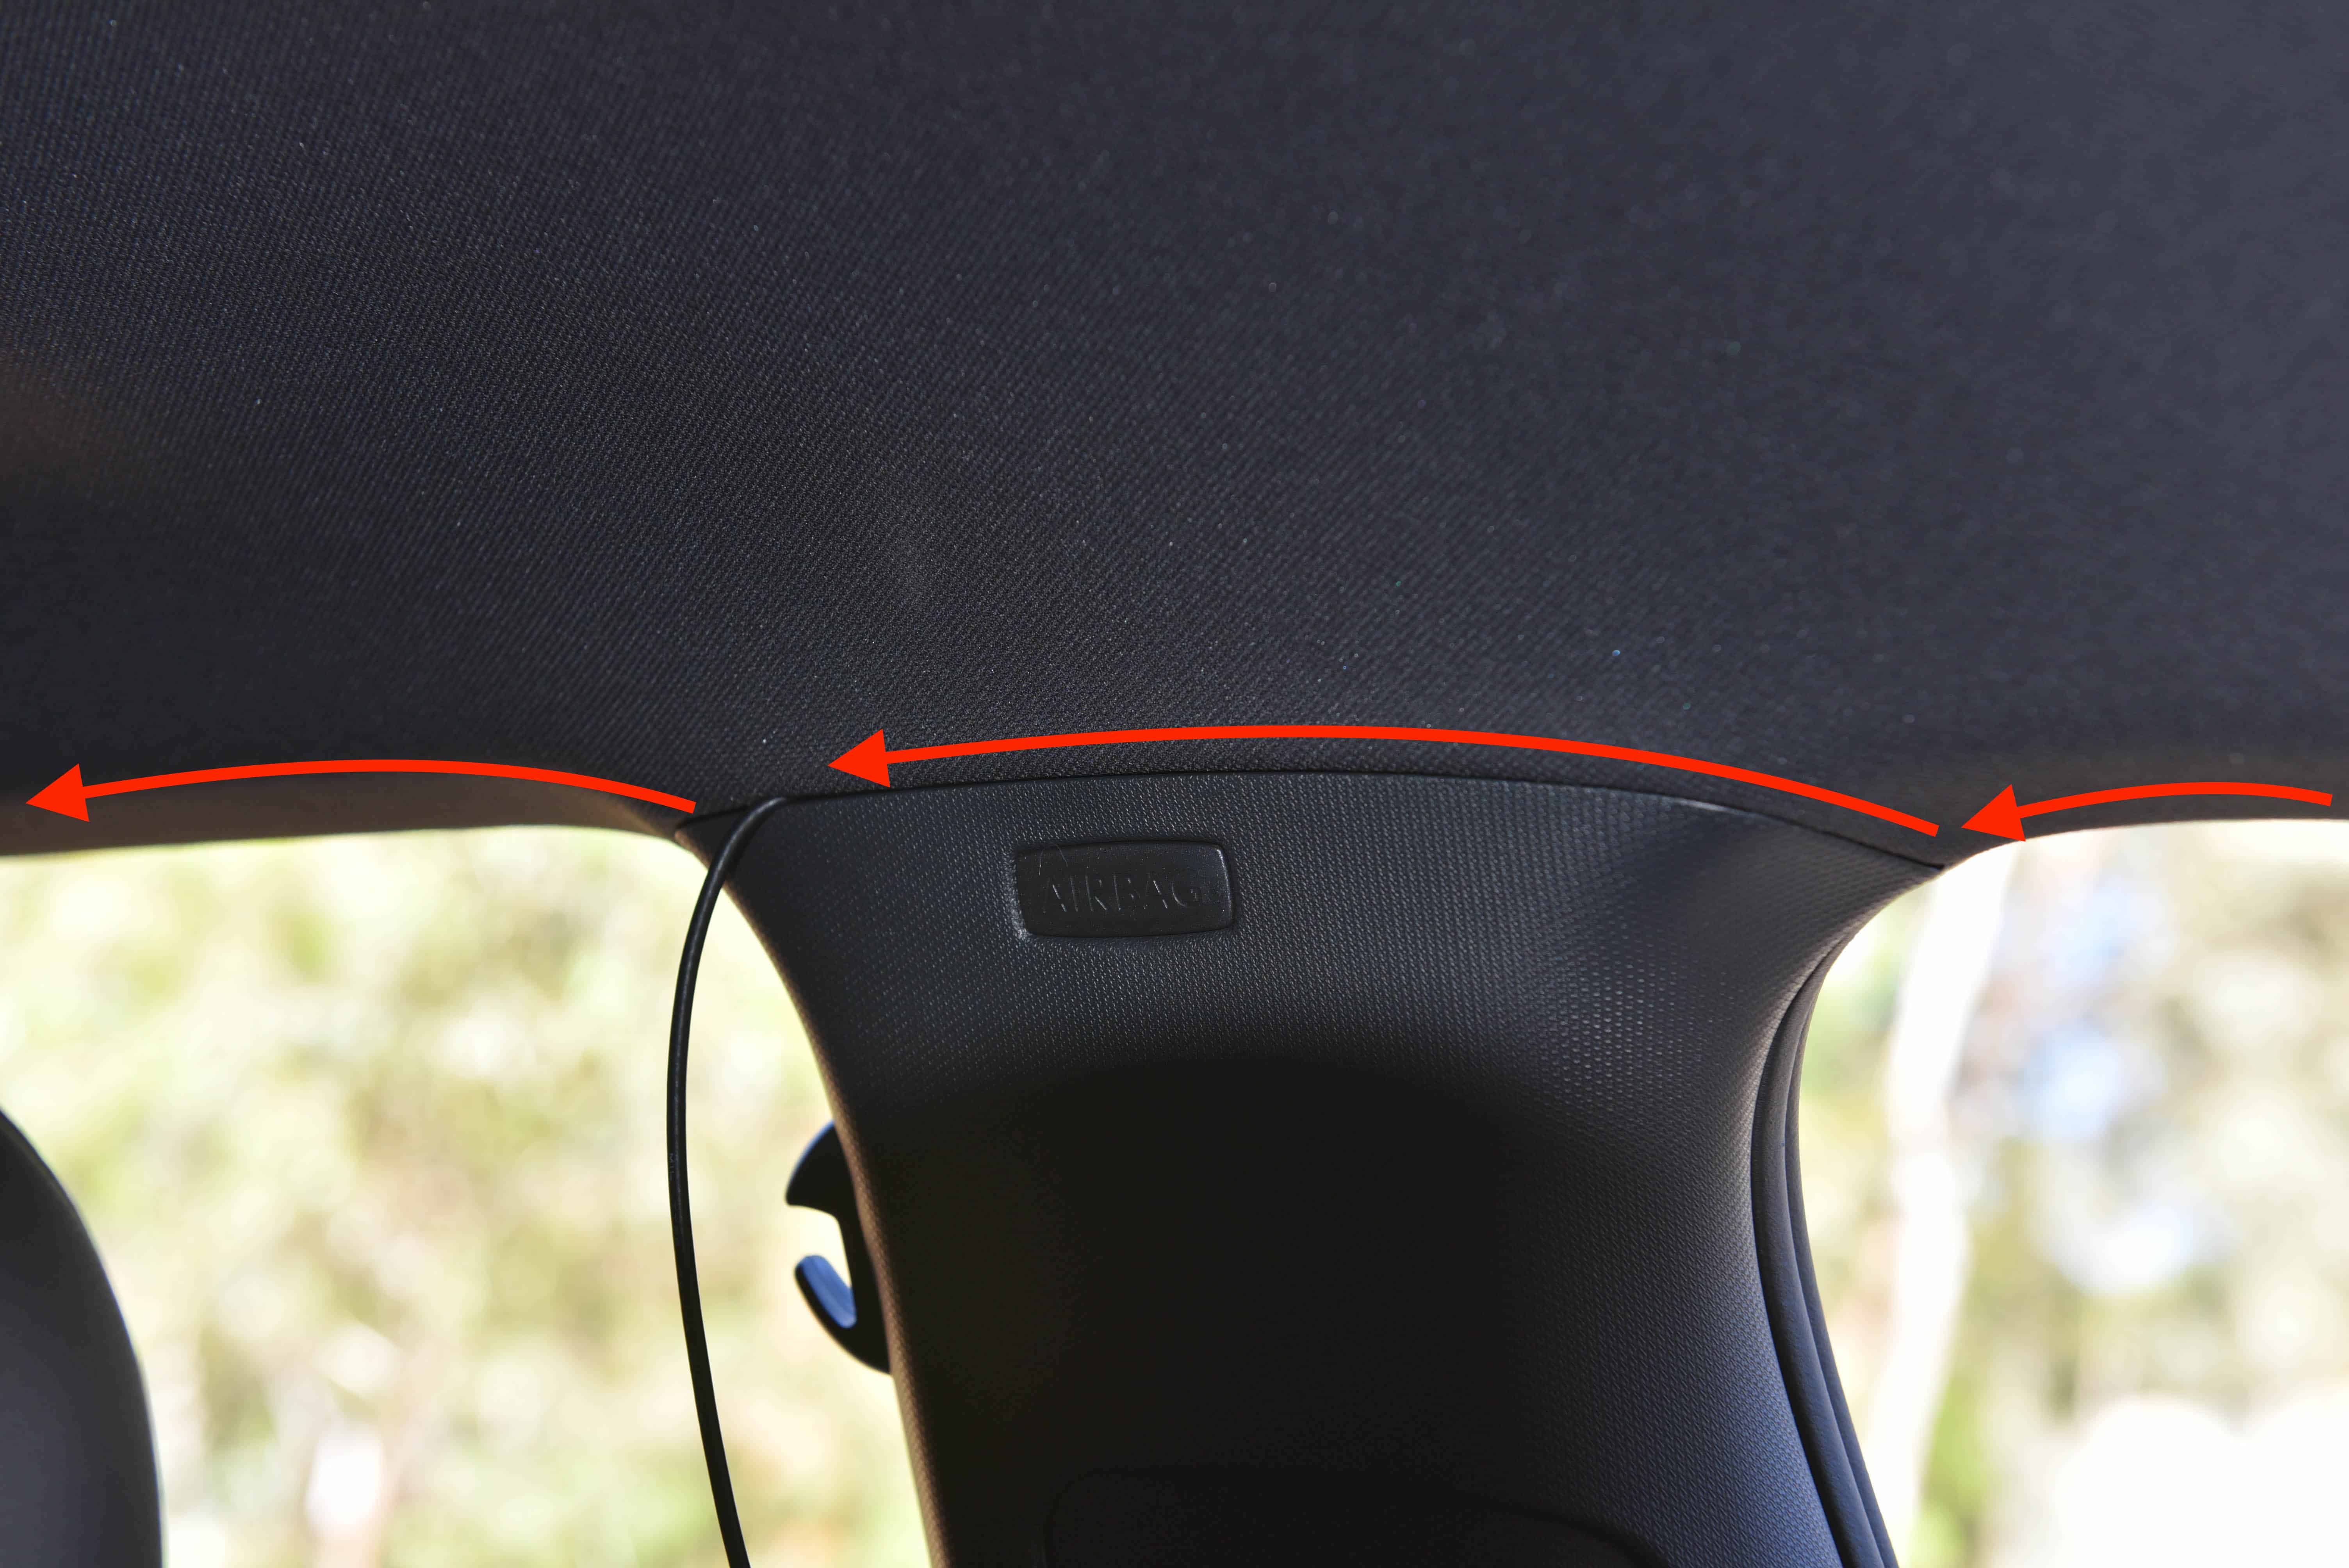
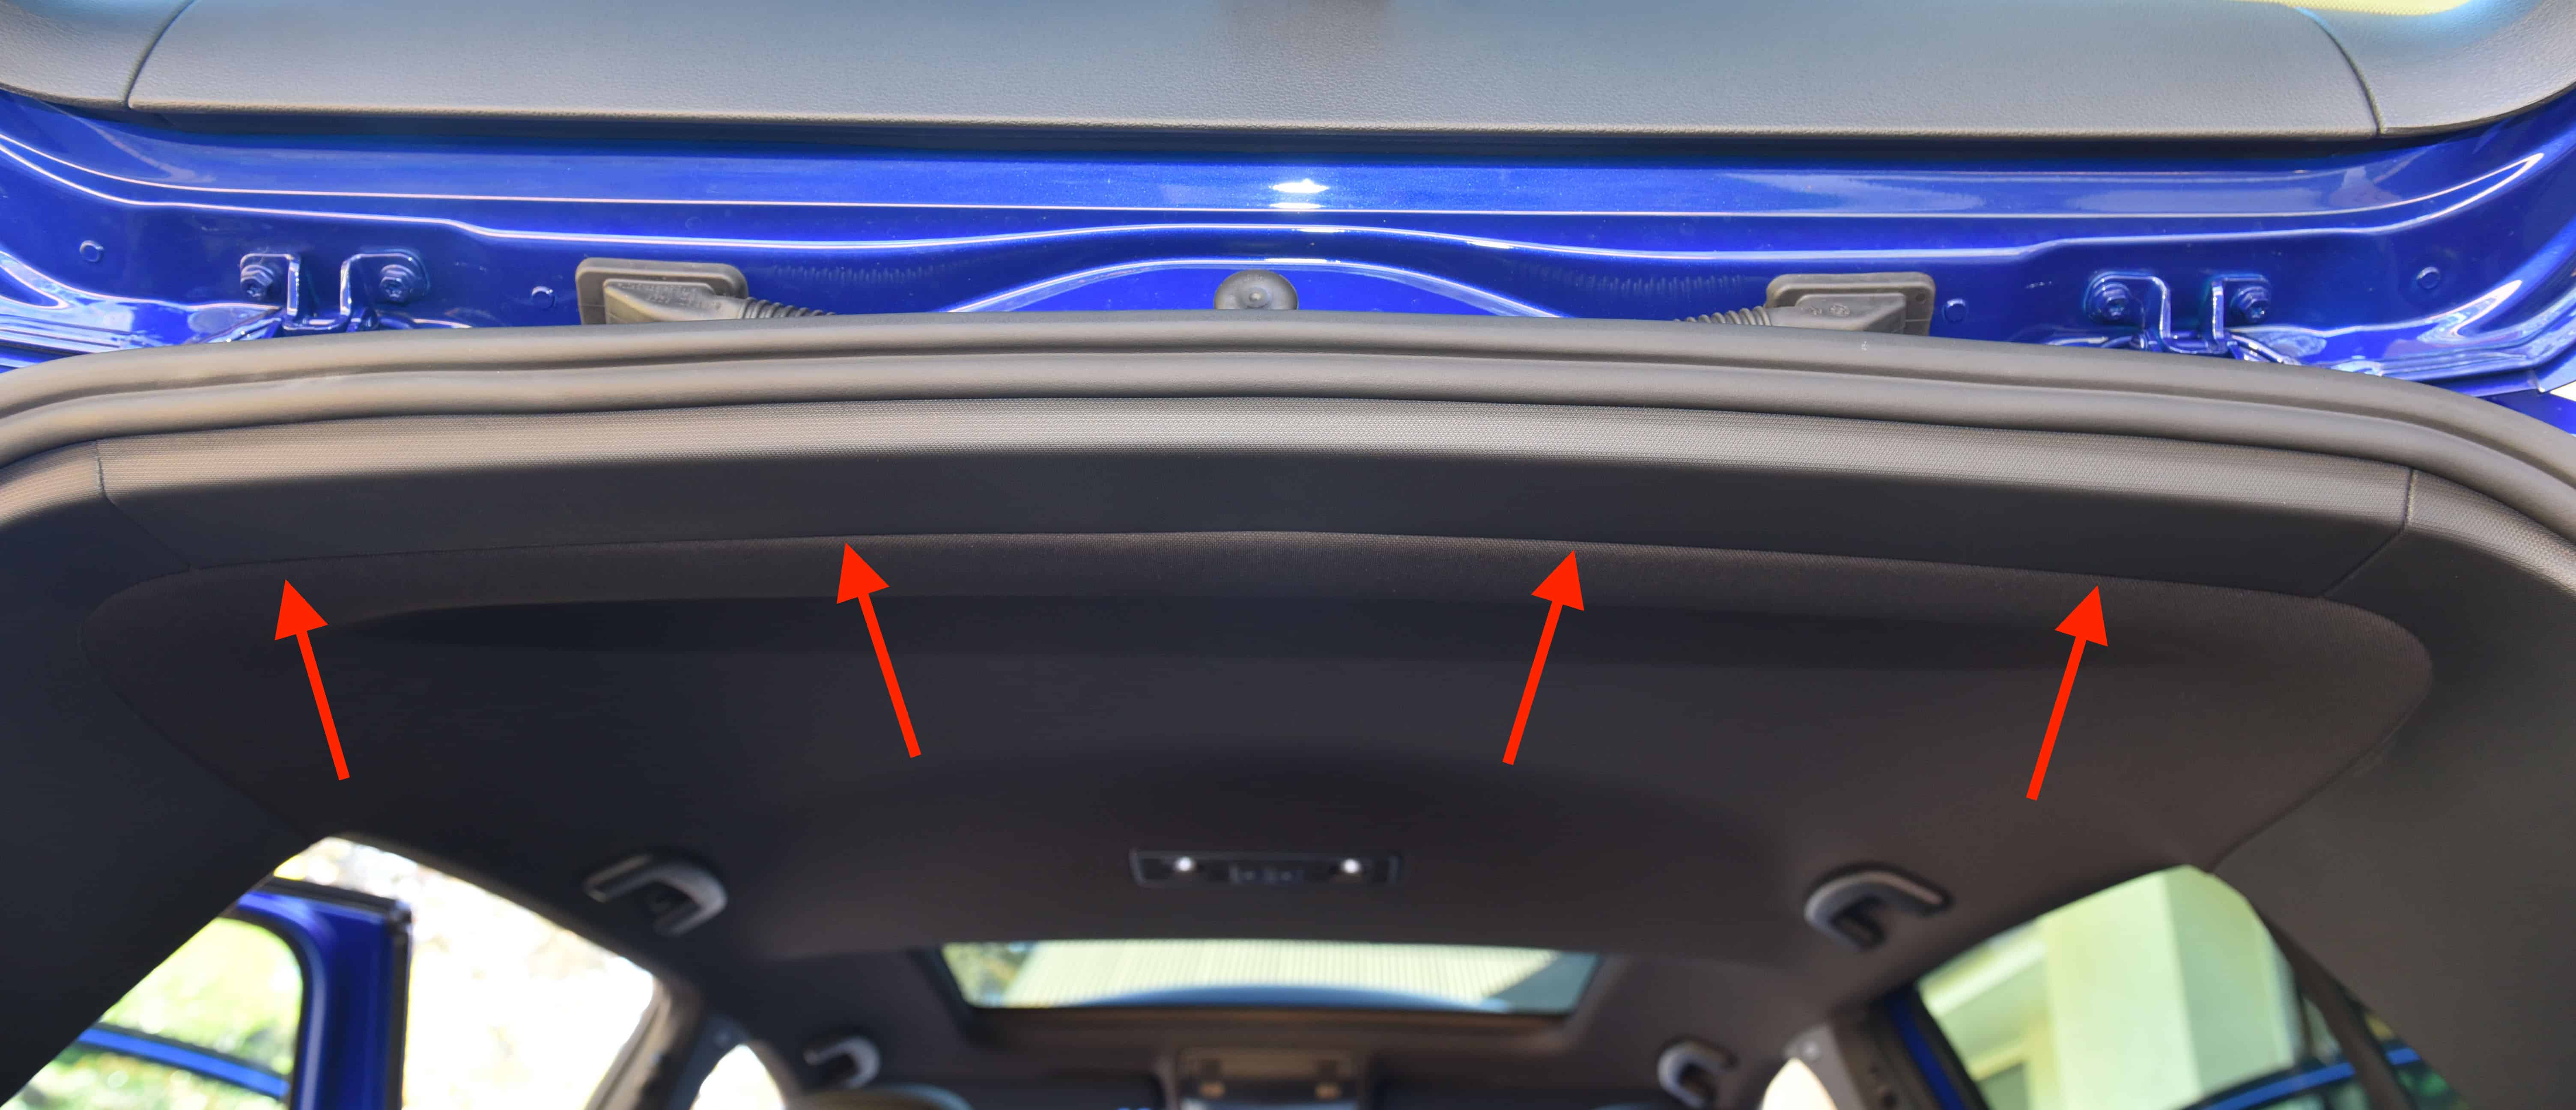
Continue feeding the rear cable along the window seal and across the B-Pillar. Once at the B-Pillar you can simply push upwards on the roof lining to create a gap. Drop the cable into this gap and then work your way along the rear door, again pulling back on the seal and feeding into the roof lining.
Step 9
Remove the rear roof lining trim to enable further cable feeding. Simply grasp where indicated and pull downwards.
Step 10
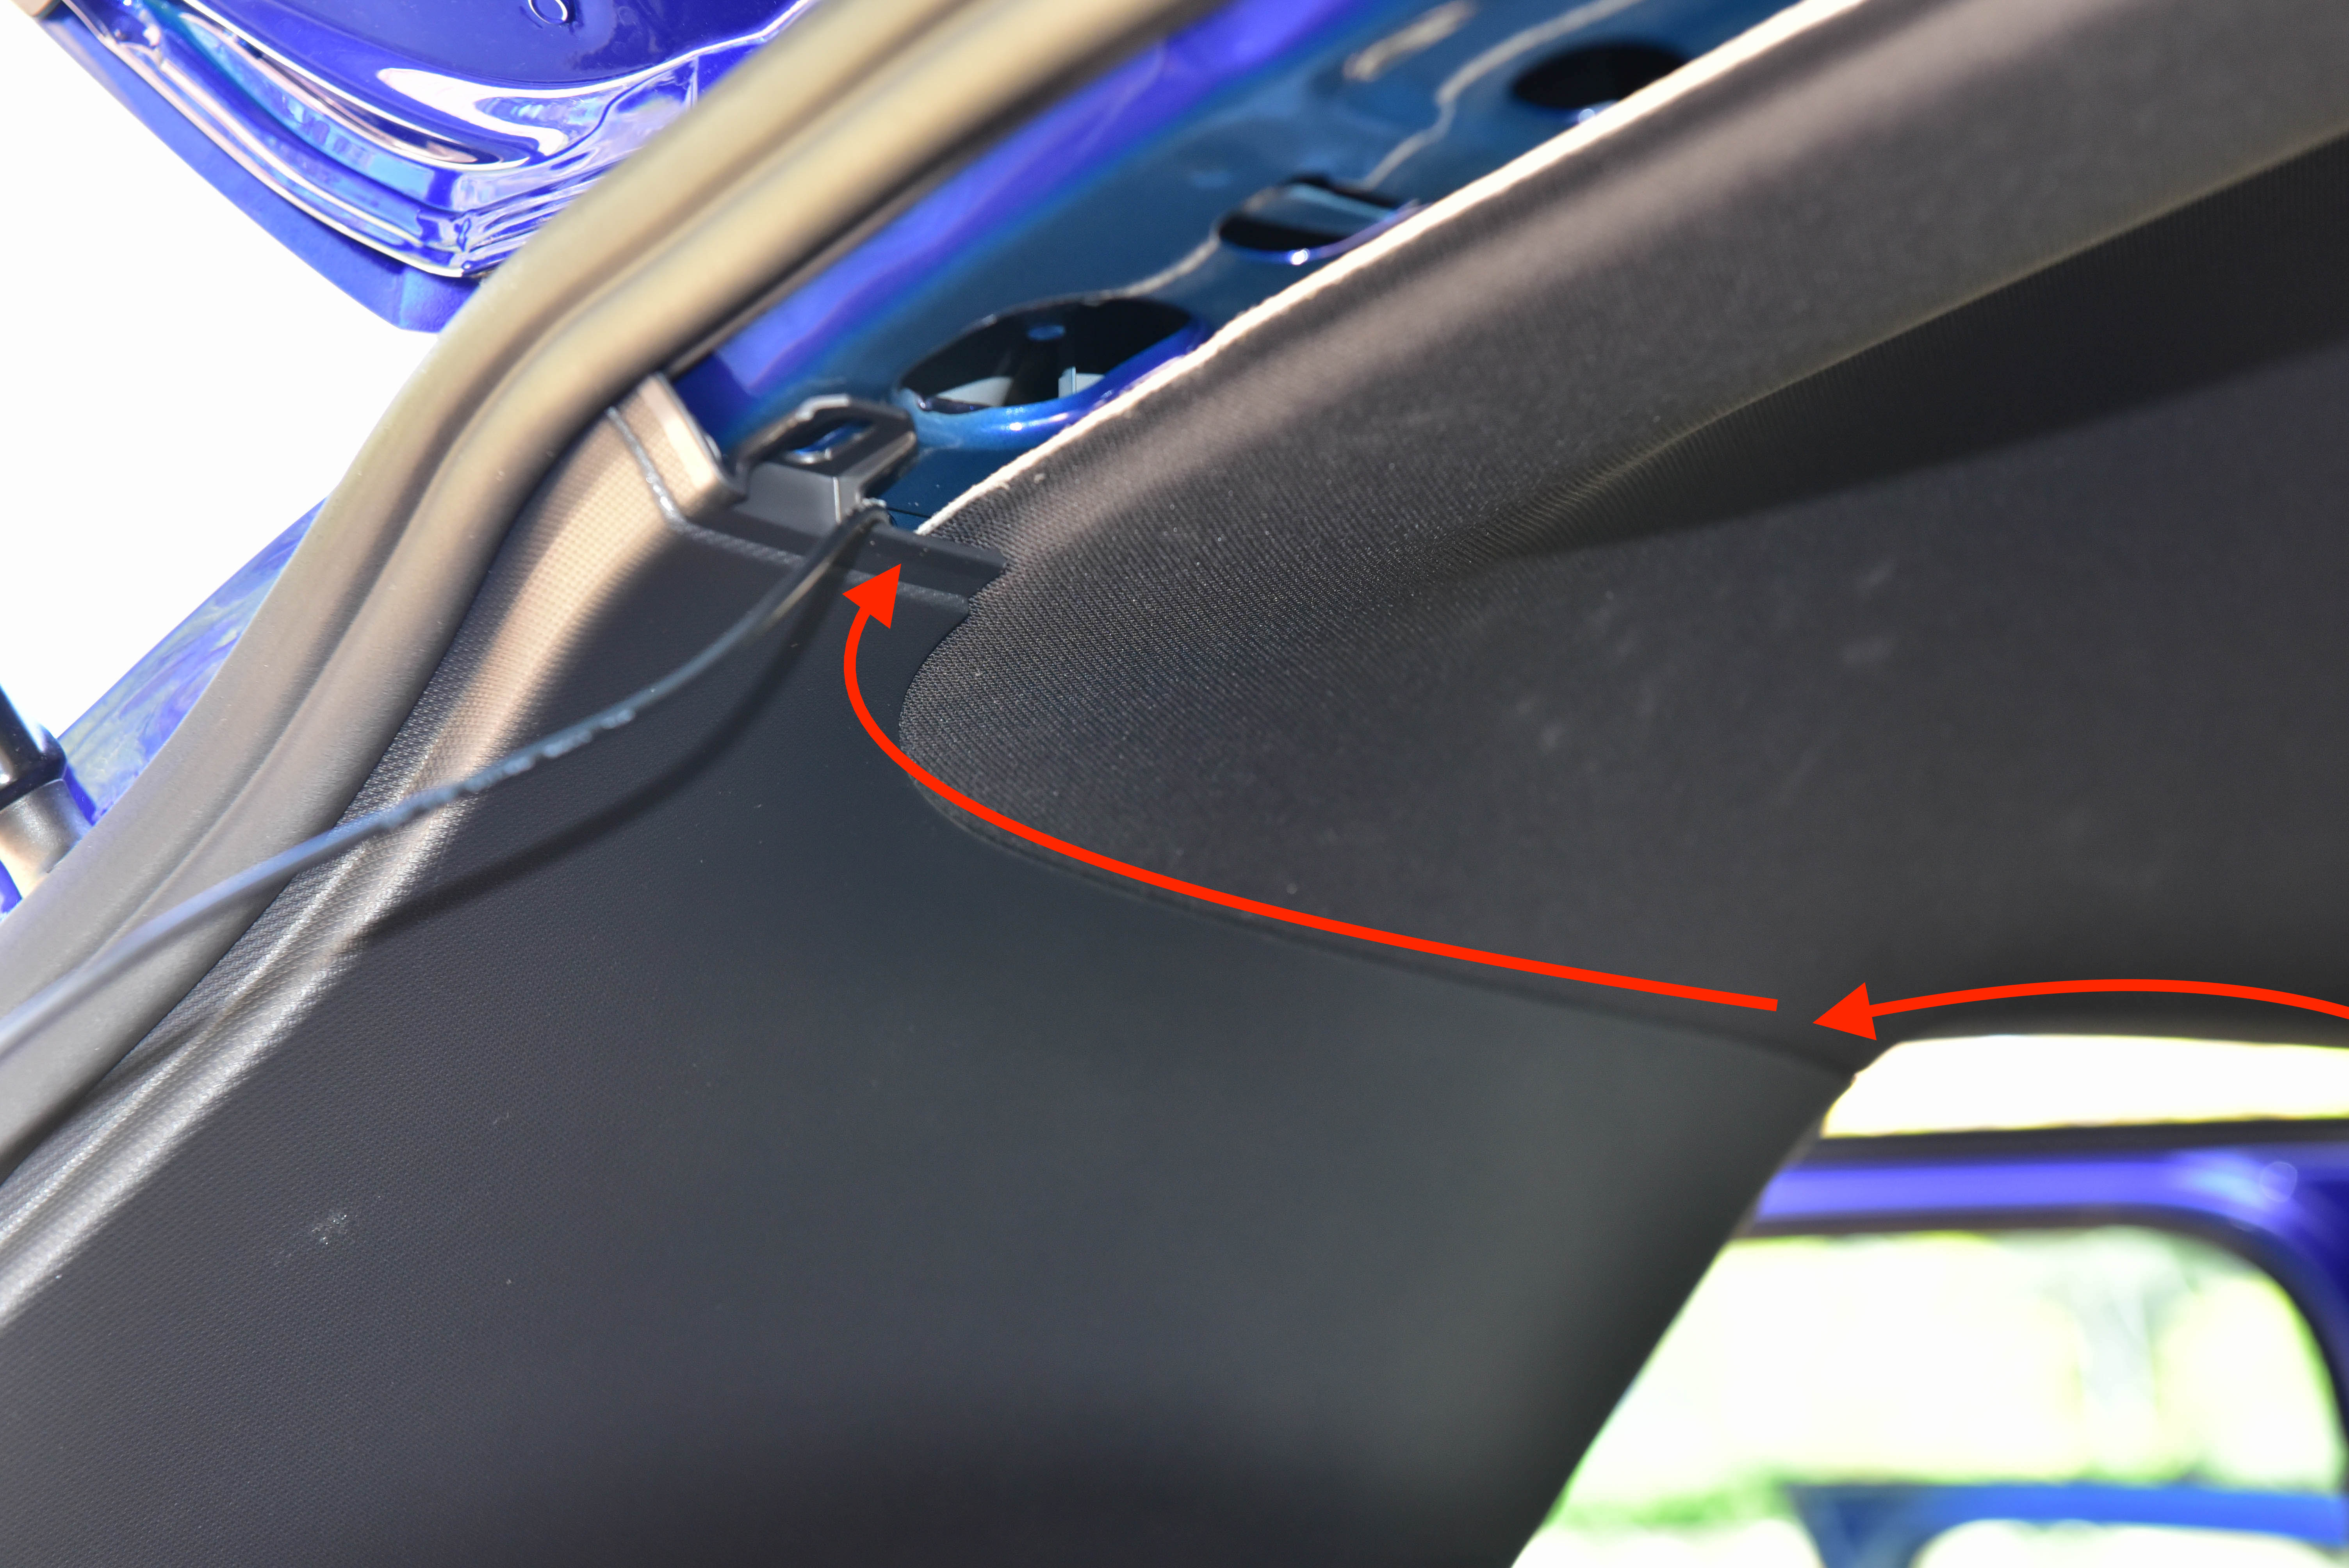
Run the cable behind the C-Pillar using the same method of pushing up on the roof lining. There is a plastic ‘lip’ on this pillar which you will need to overcome. The cable should drop into the boot as shown.
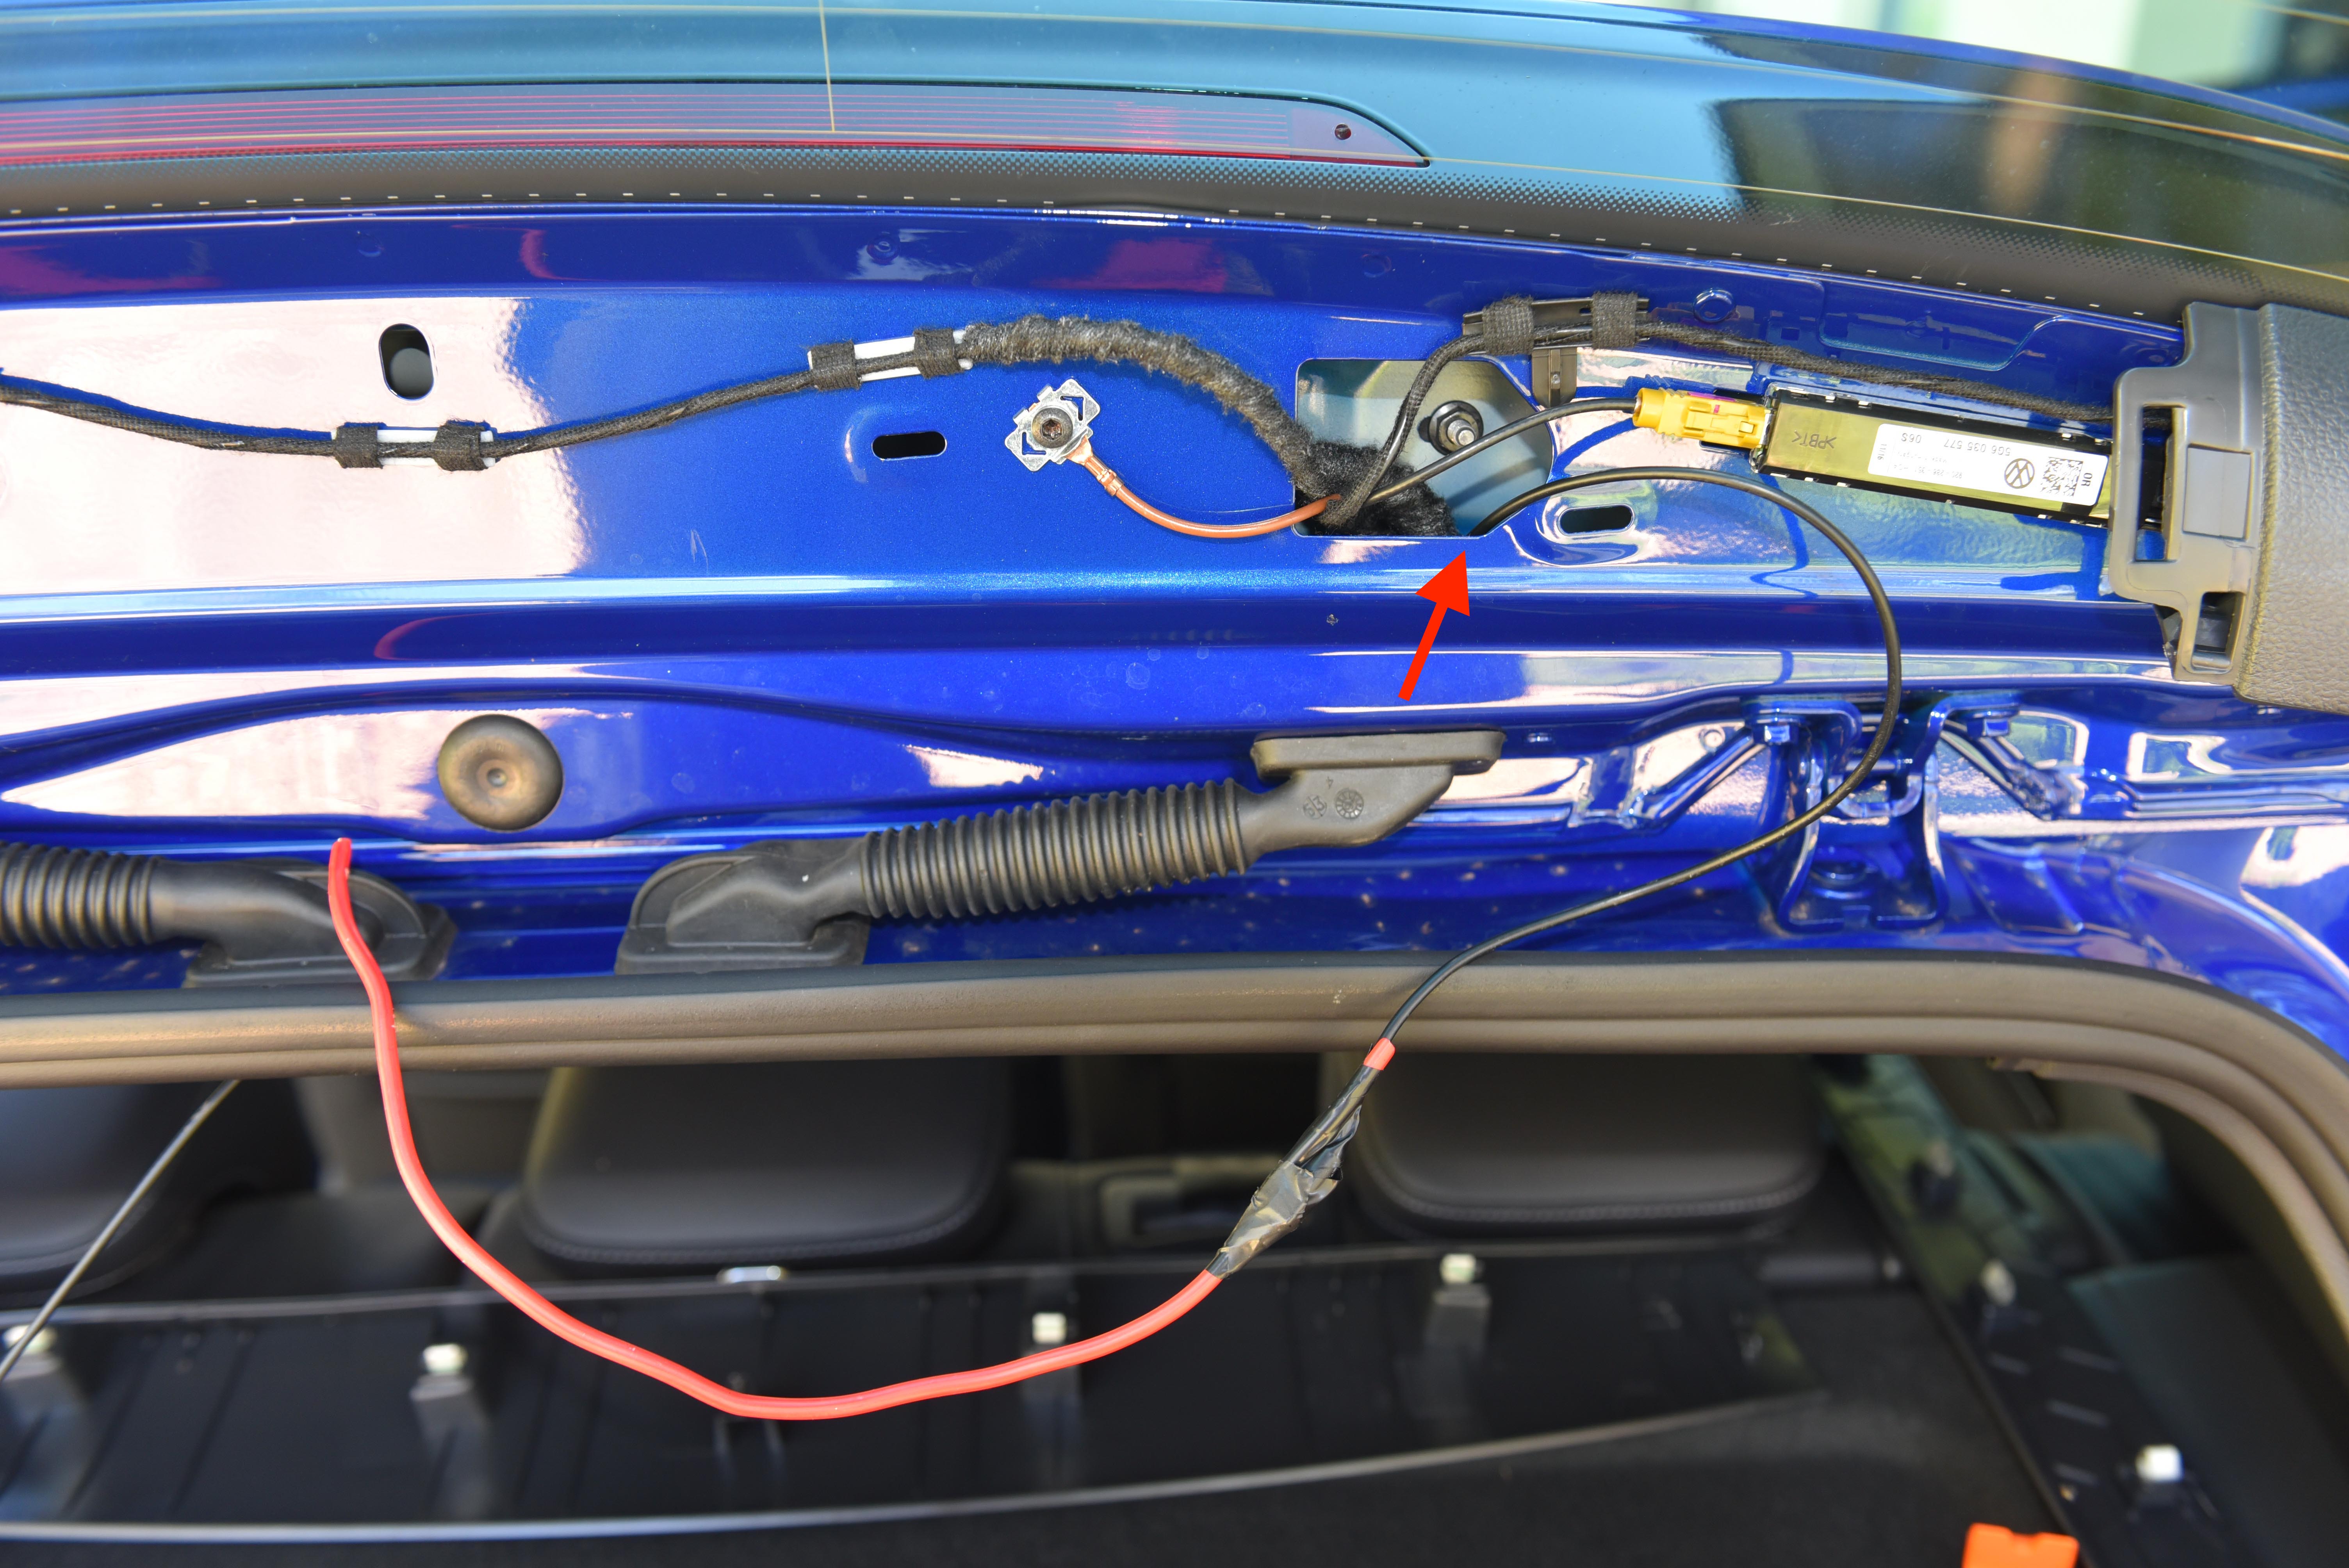
Step 11
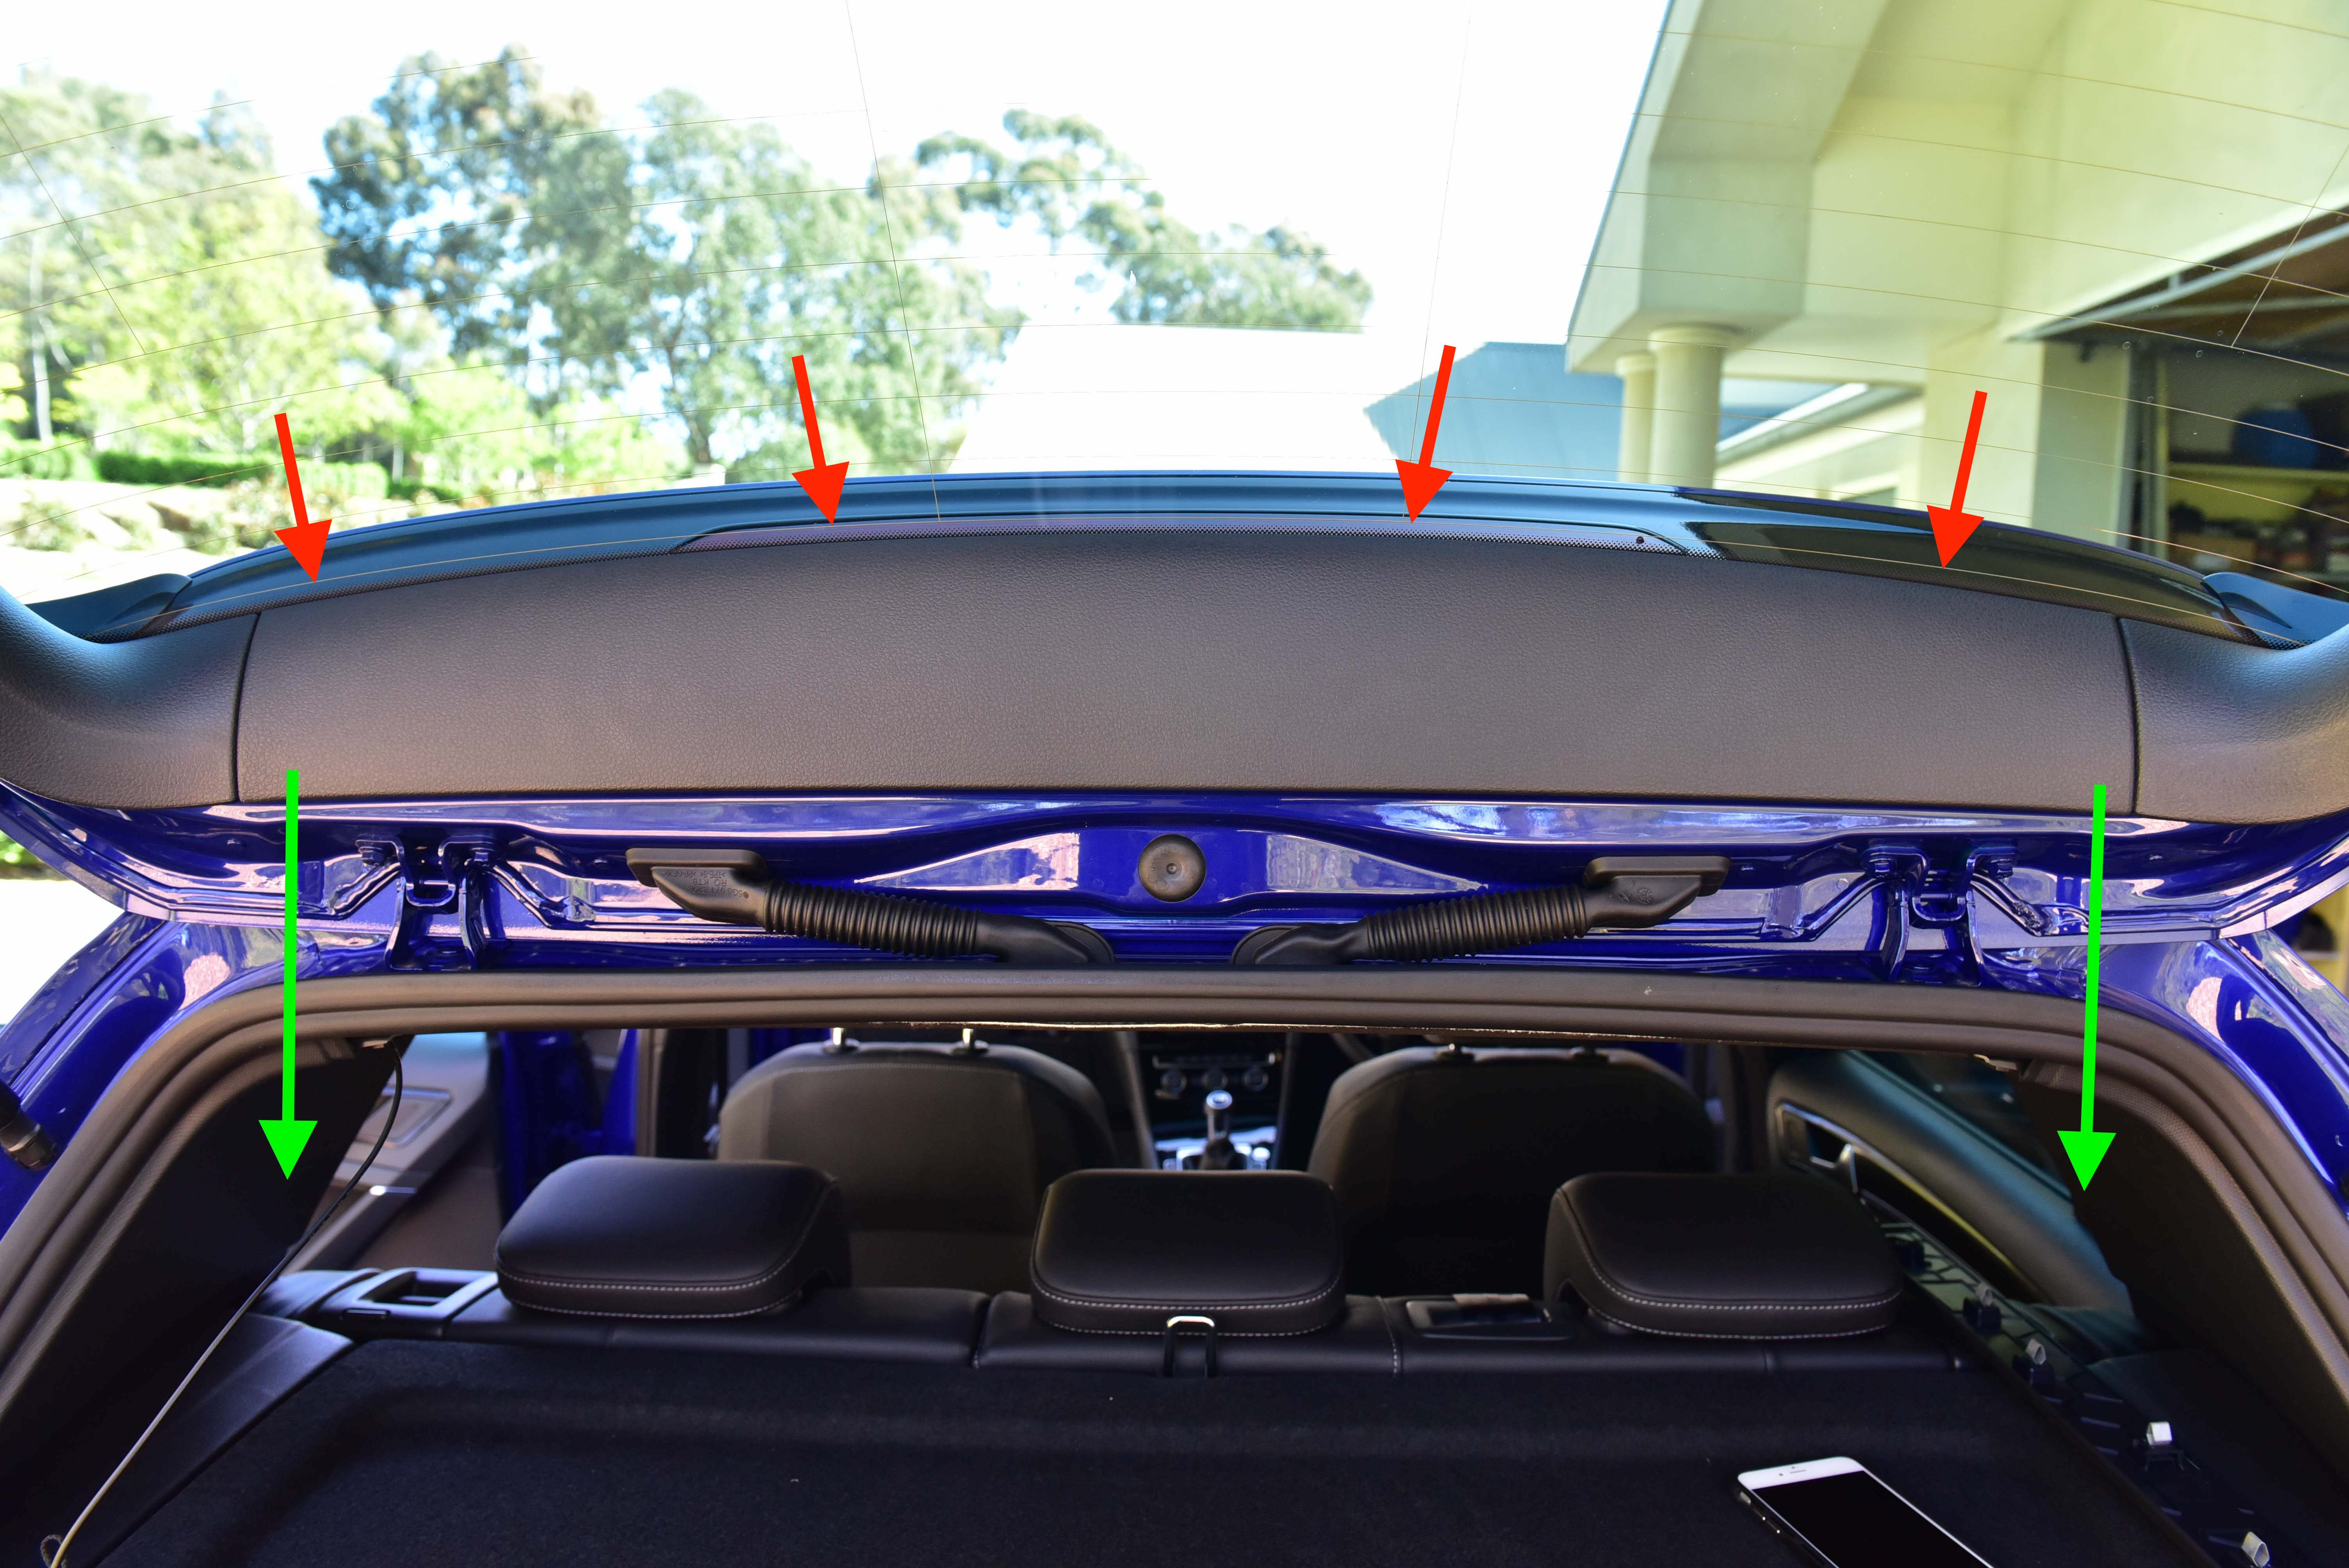
Next, remove the trim panel along the rear glass. This can be done by pulling down on the points indicated in red. Be gentle and pull downwards in the direction of the boot.
Step 12
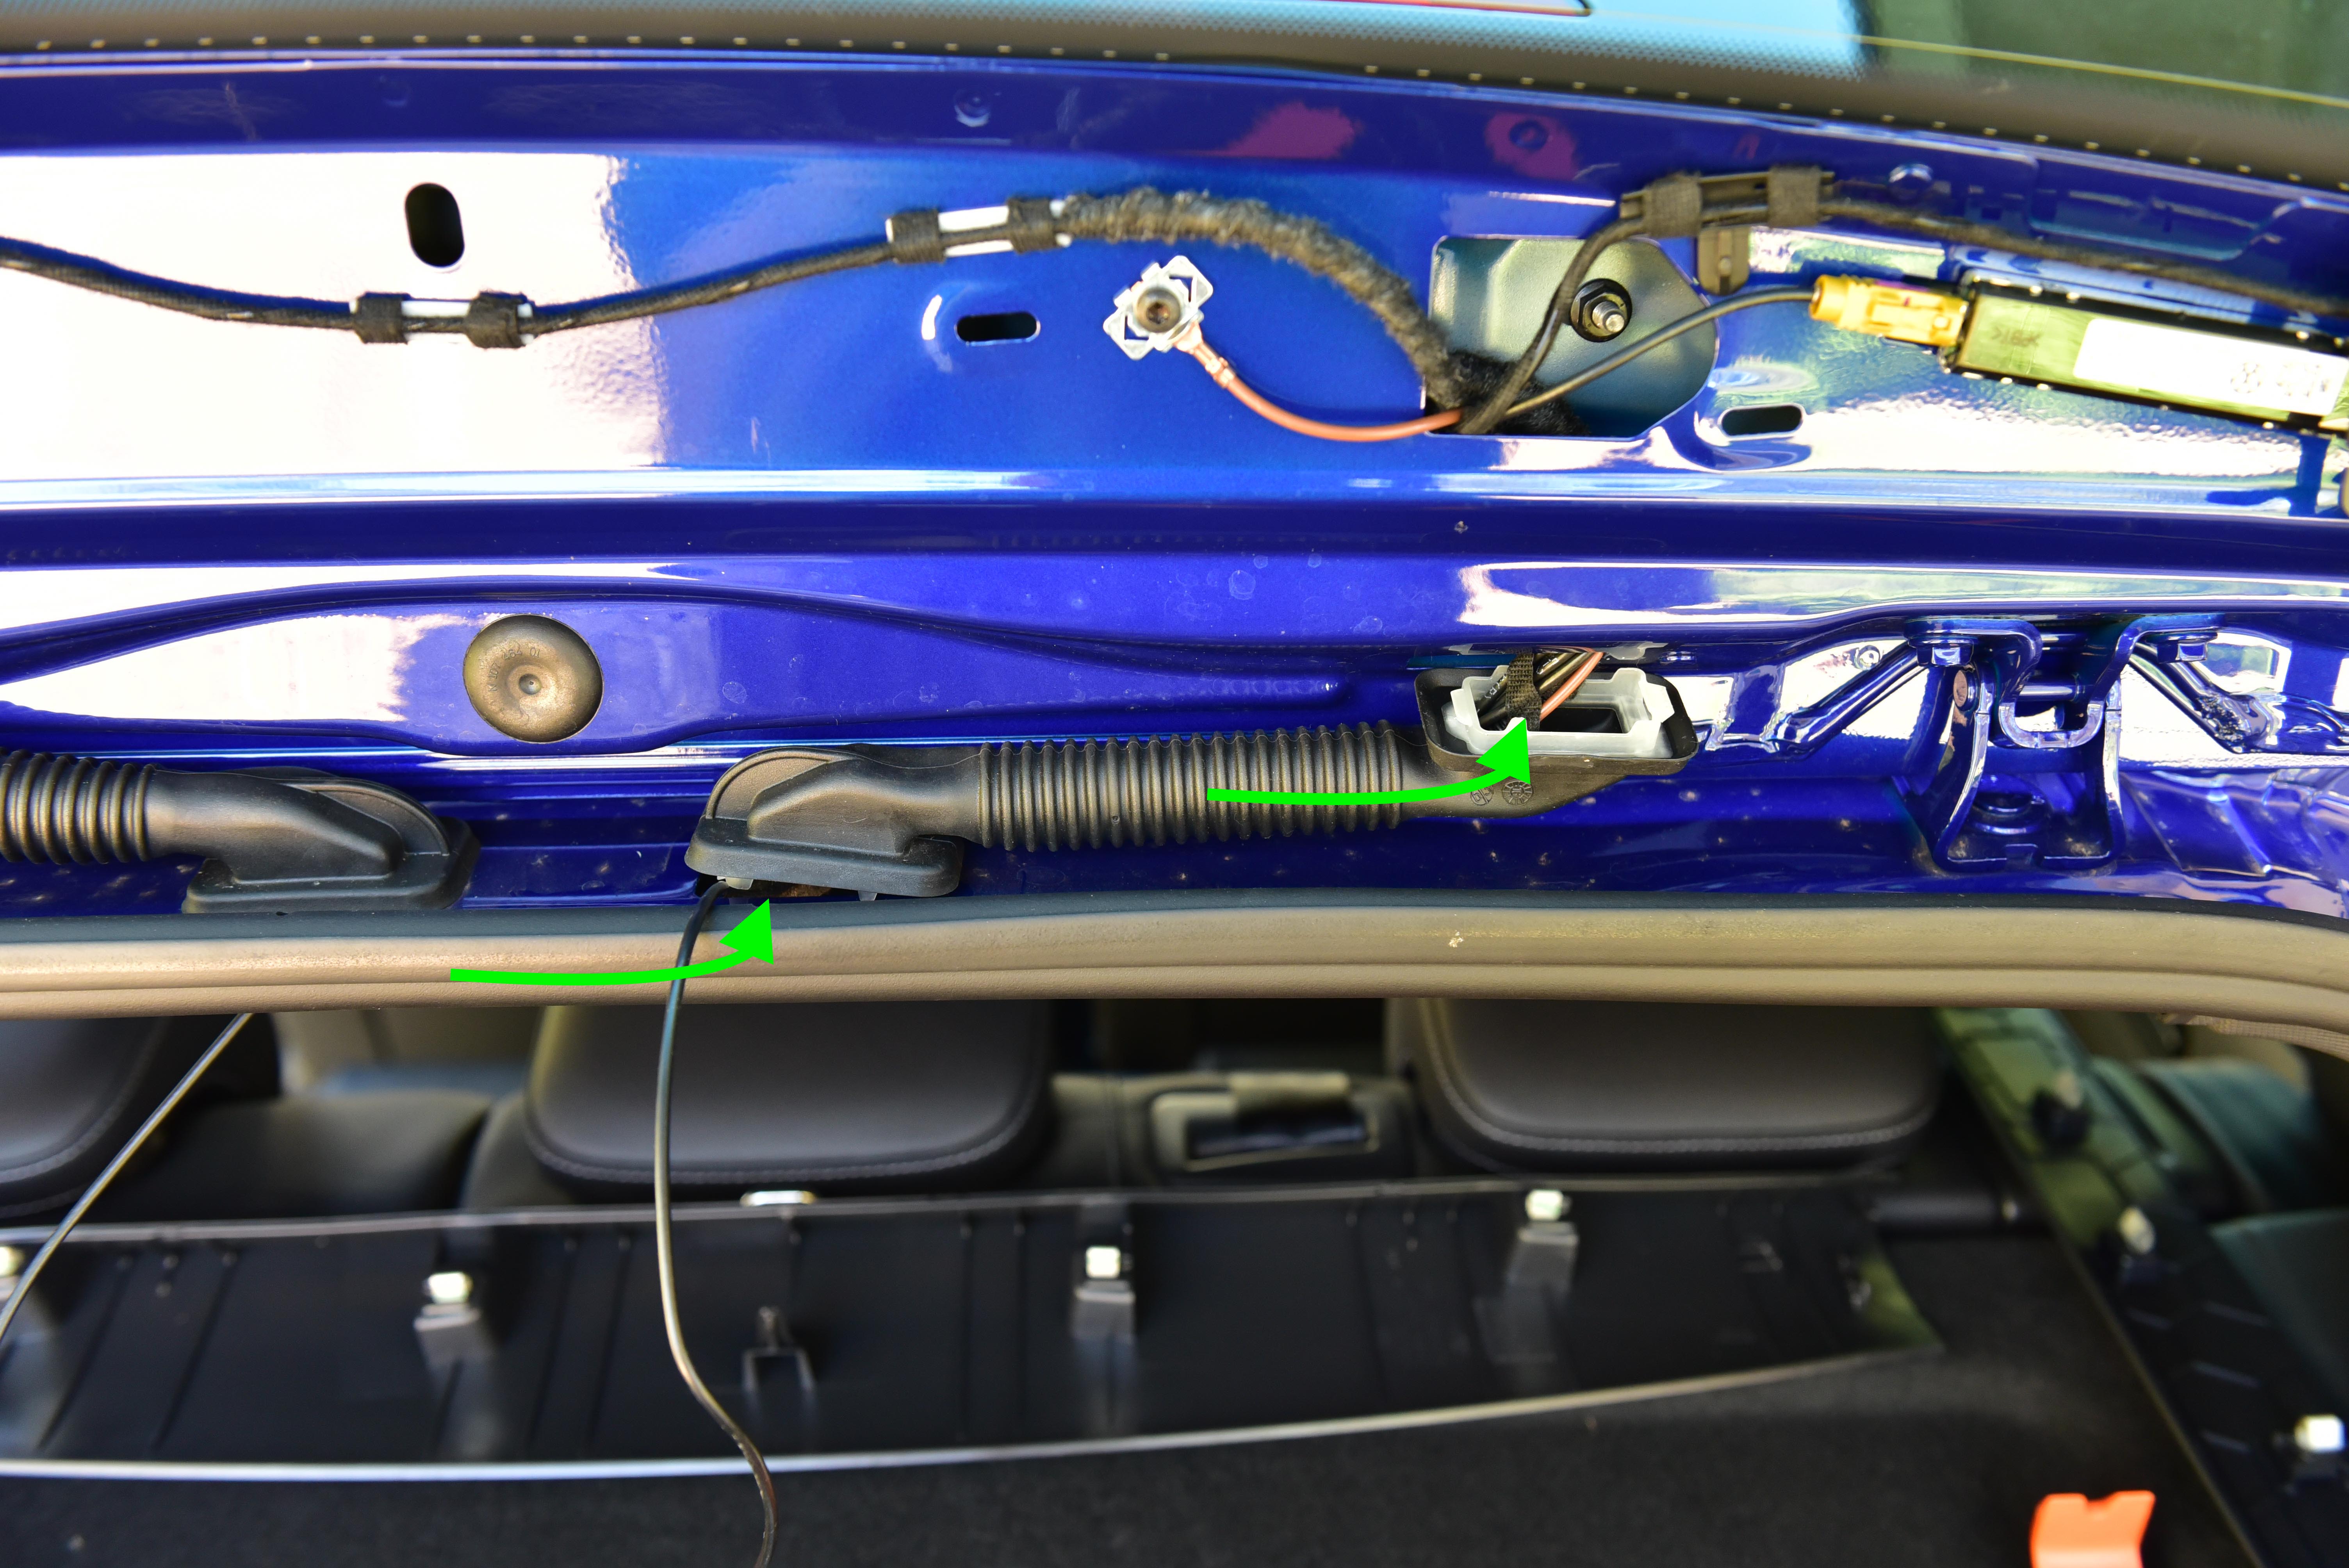
We now need to feed the wire through either rubber tube in the direction shown. Whilst you can leave the rubber tubes connected to the body, it can be easier to feed the cable if they’re released.
To release them, look from the underside / topside and gently push on the clip, one side holds it in place. Be gentle as these are prone to break.
Step 13
We fed the cable through the rubber tube by using a stiff piece of wire. Something like a modified clothes hanger works quite well, however be careful not to scratch your paint or glass.
Step 14
Cable tie any excess cabling and leave some cable hanging out into the boot. Refit the trim piece on the boot lid and stick the rear camera in place. Connect the cable and neaten. Your rear camera is now installed.
Step 15
We will now hard wire the dash cam and Power Magic Pro. For RHD vehicles, remove the glovebox using this tutorial. LHD vehicles can simply remove the coin tray next to the drivers knee. To do this simply squeeze the sides of the tray and it should drop down.
Step 16
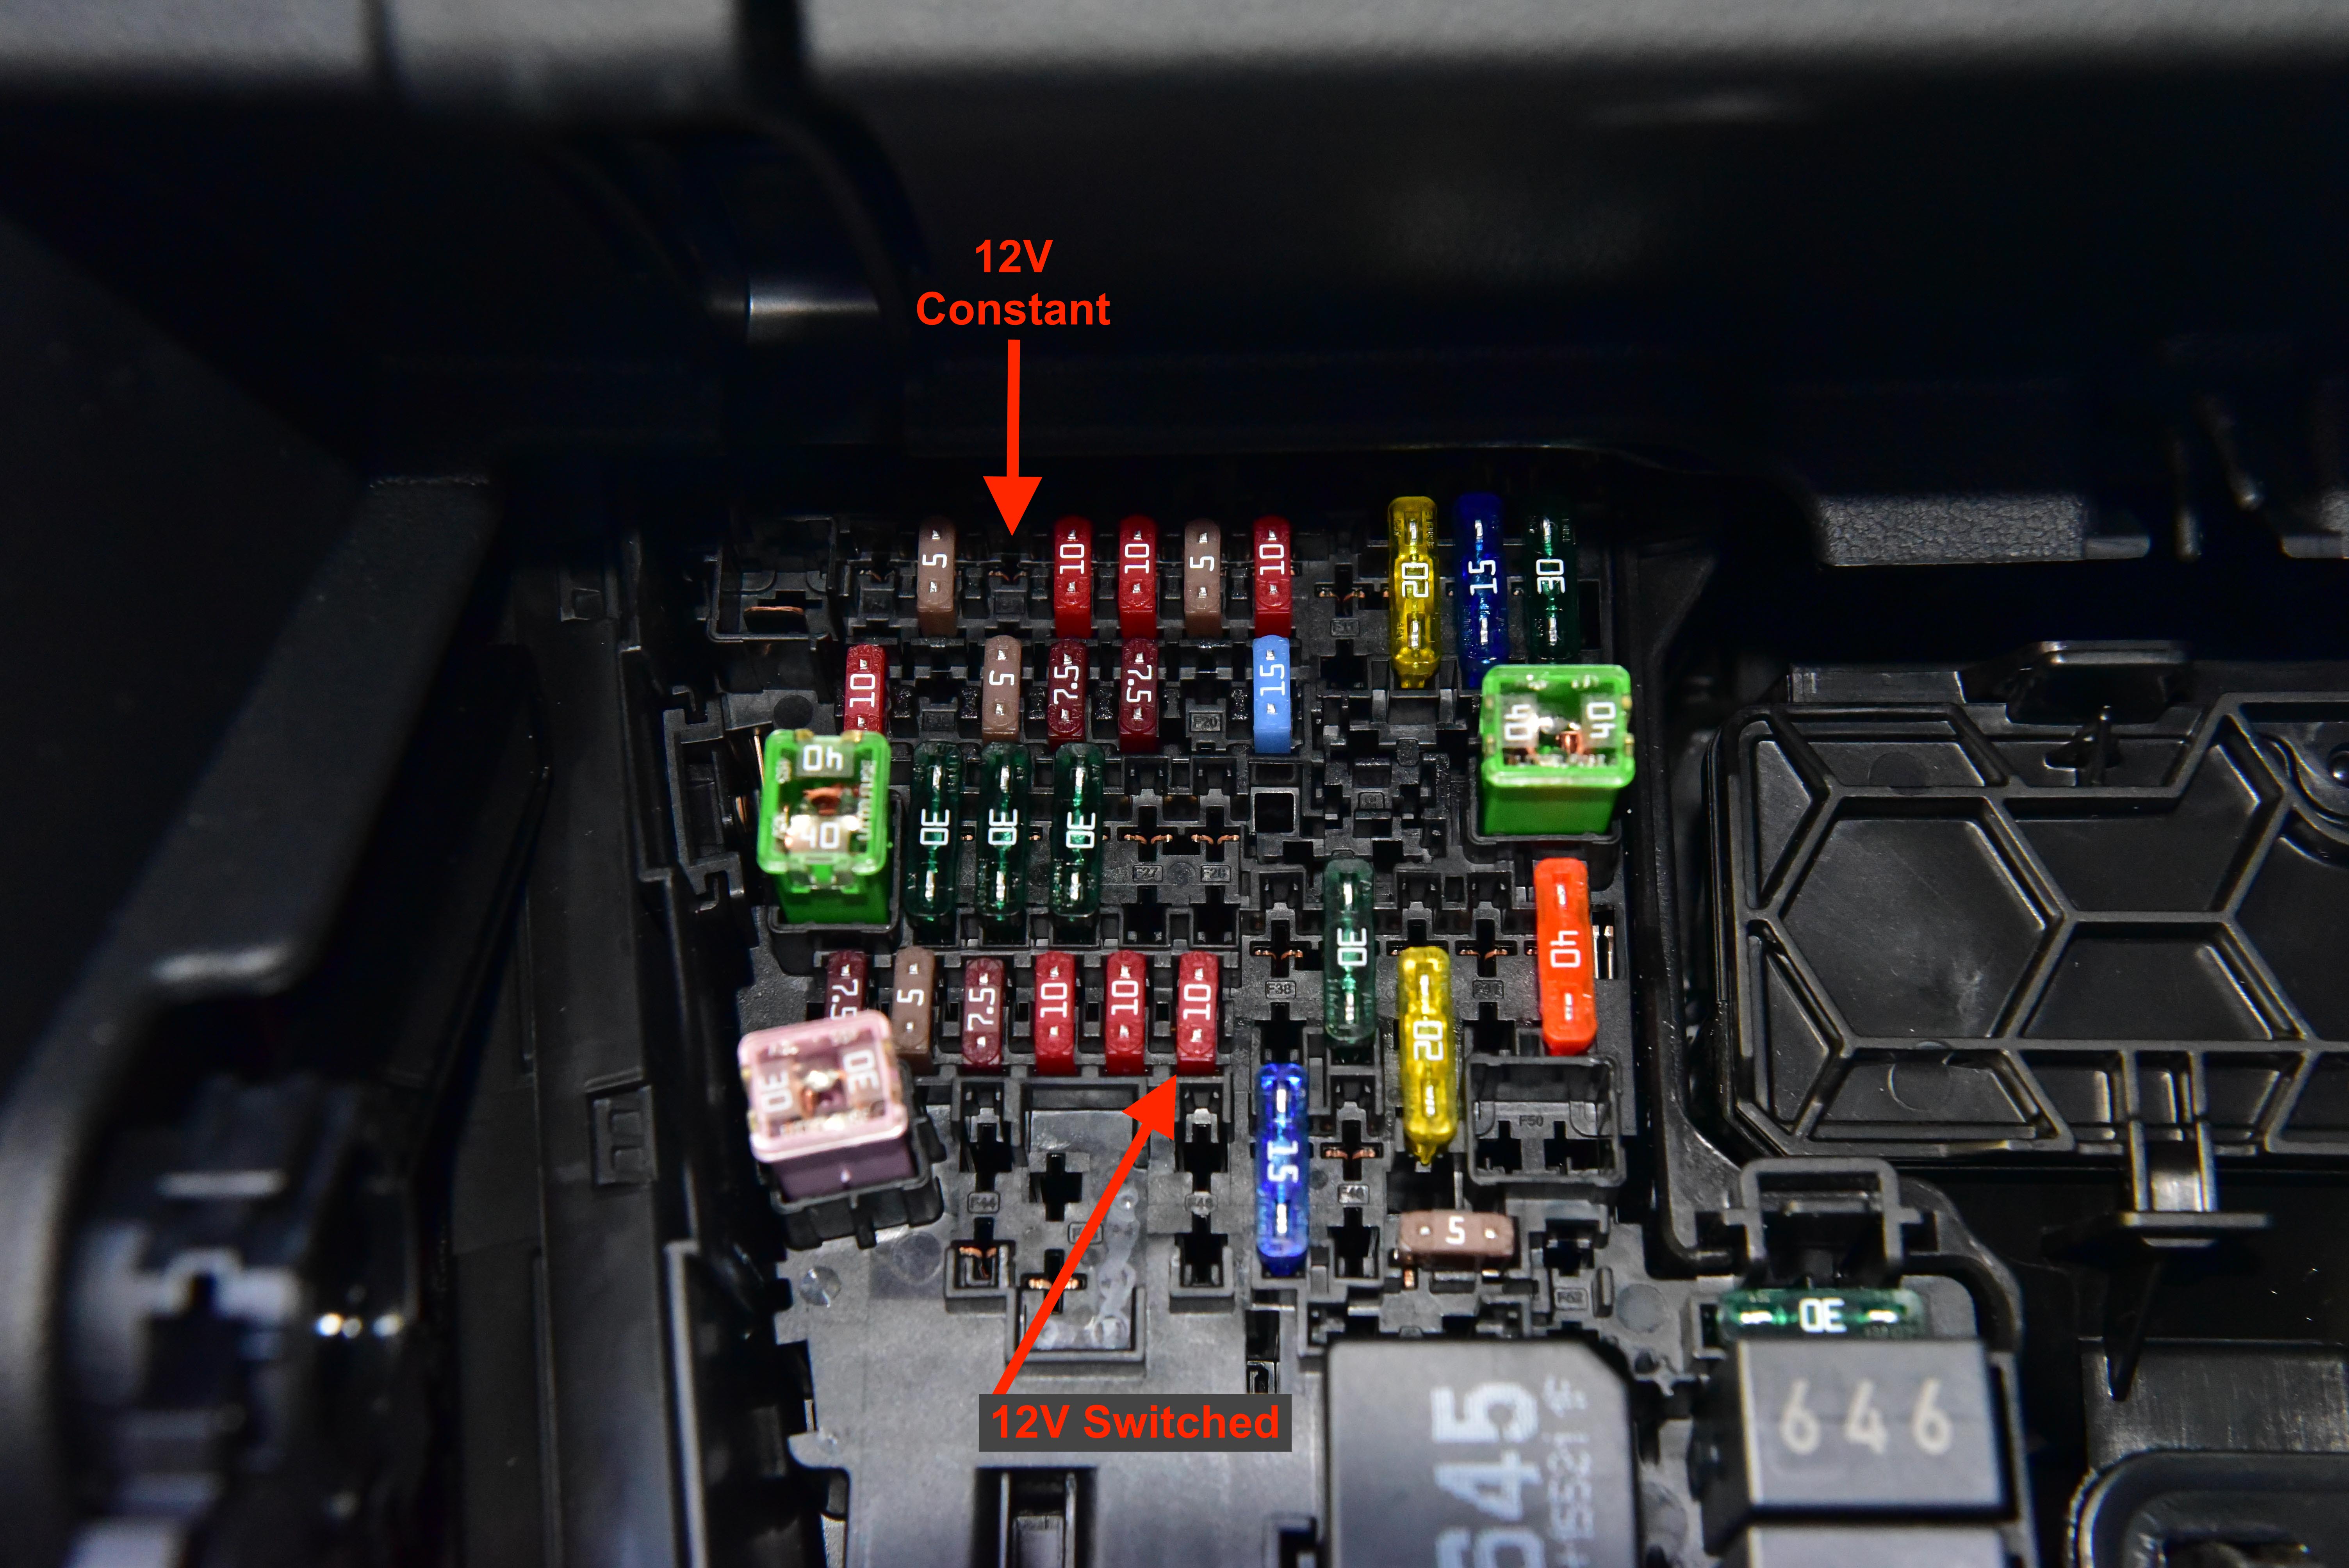
This image will show you the two points required to access constant and switched power for the Power Magic Pro.
Step 17
As pictured we’ve used fuse taps to make the connection, which saves the need to splice factory wiring. Join the switched and constant fuse taps to the Power Magic Pro (PMP), and connect the PMP to the dash cam by feeding the dash cam cable into the glove box void.
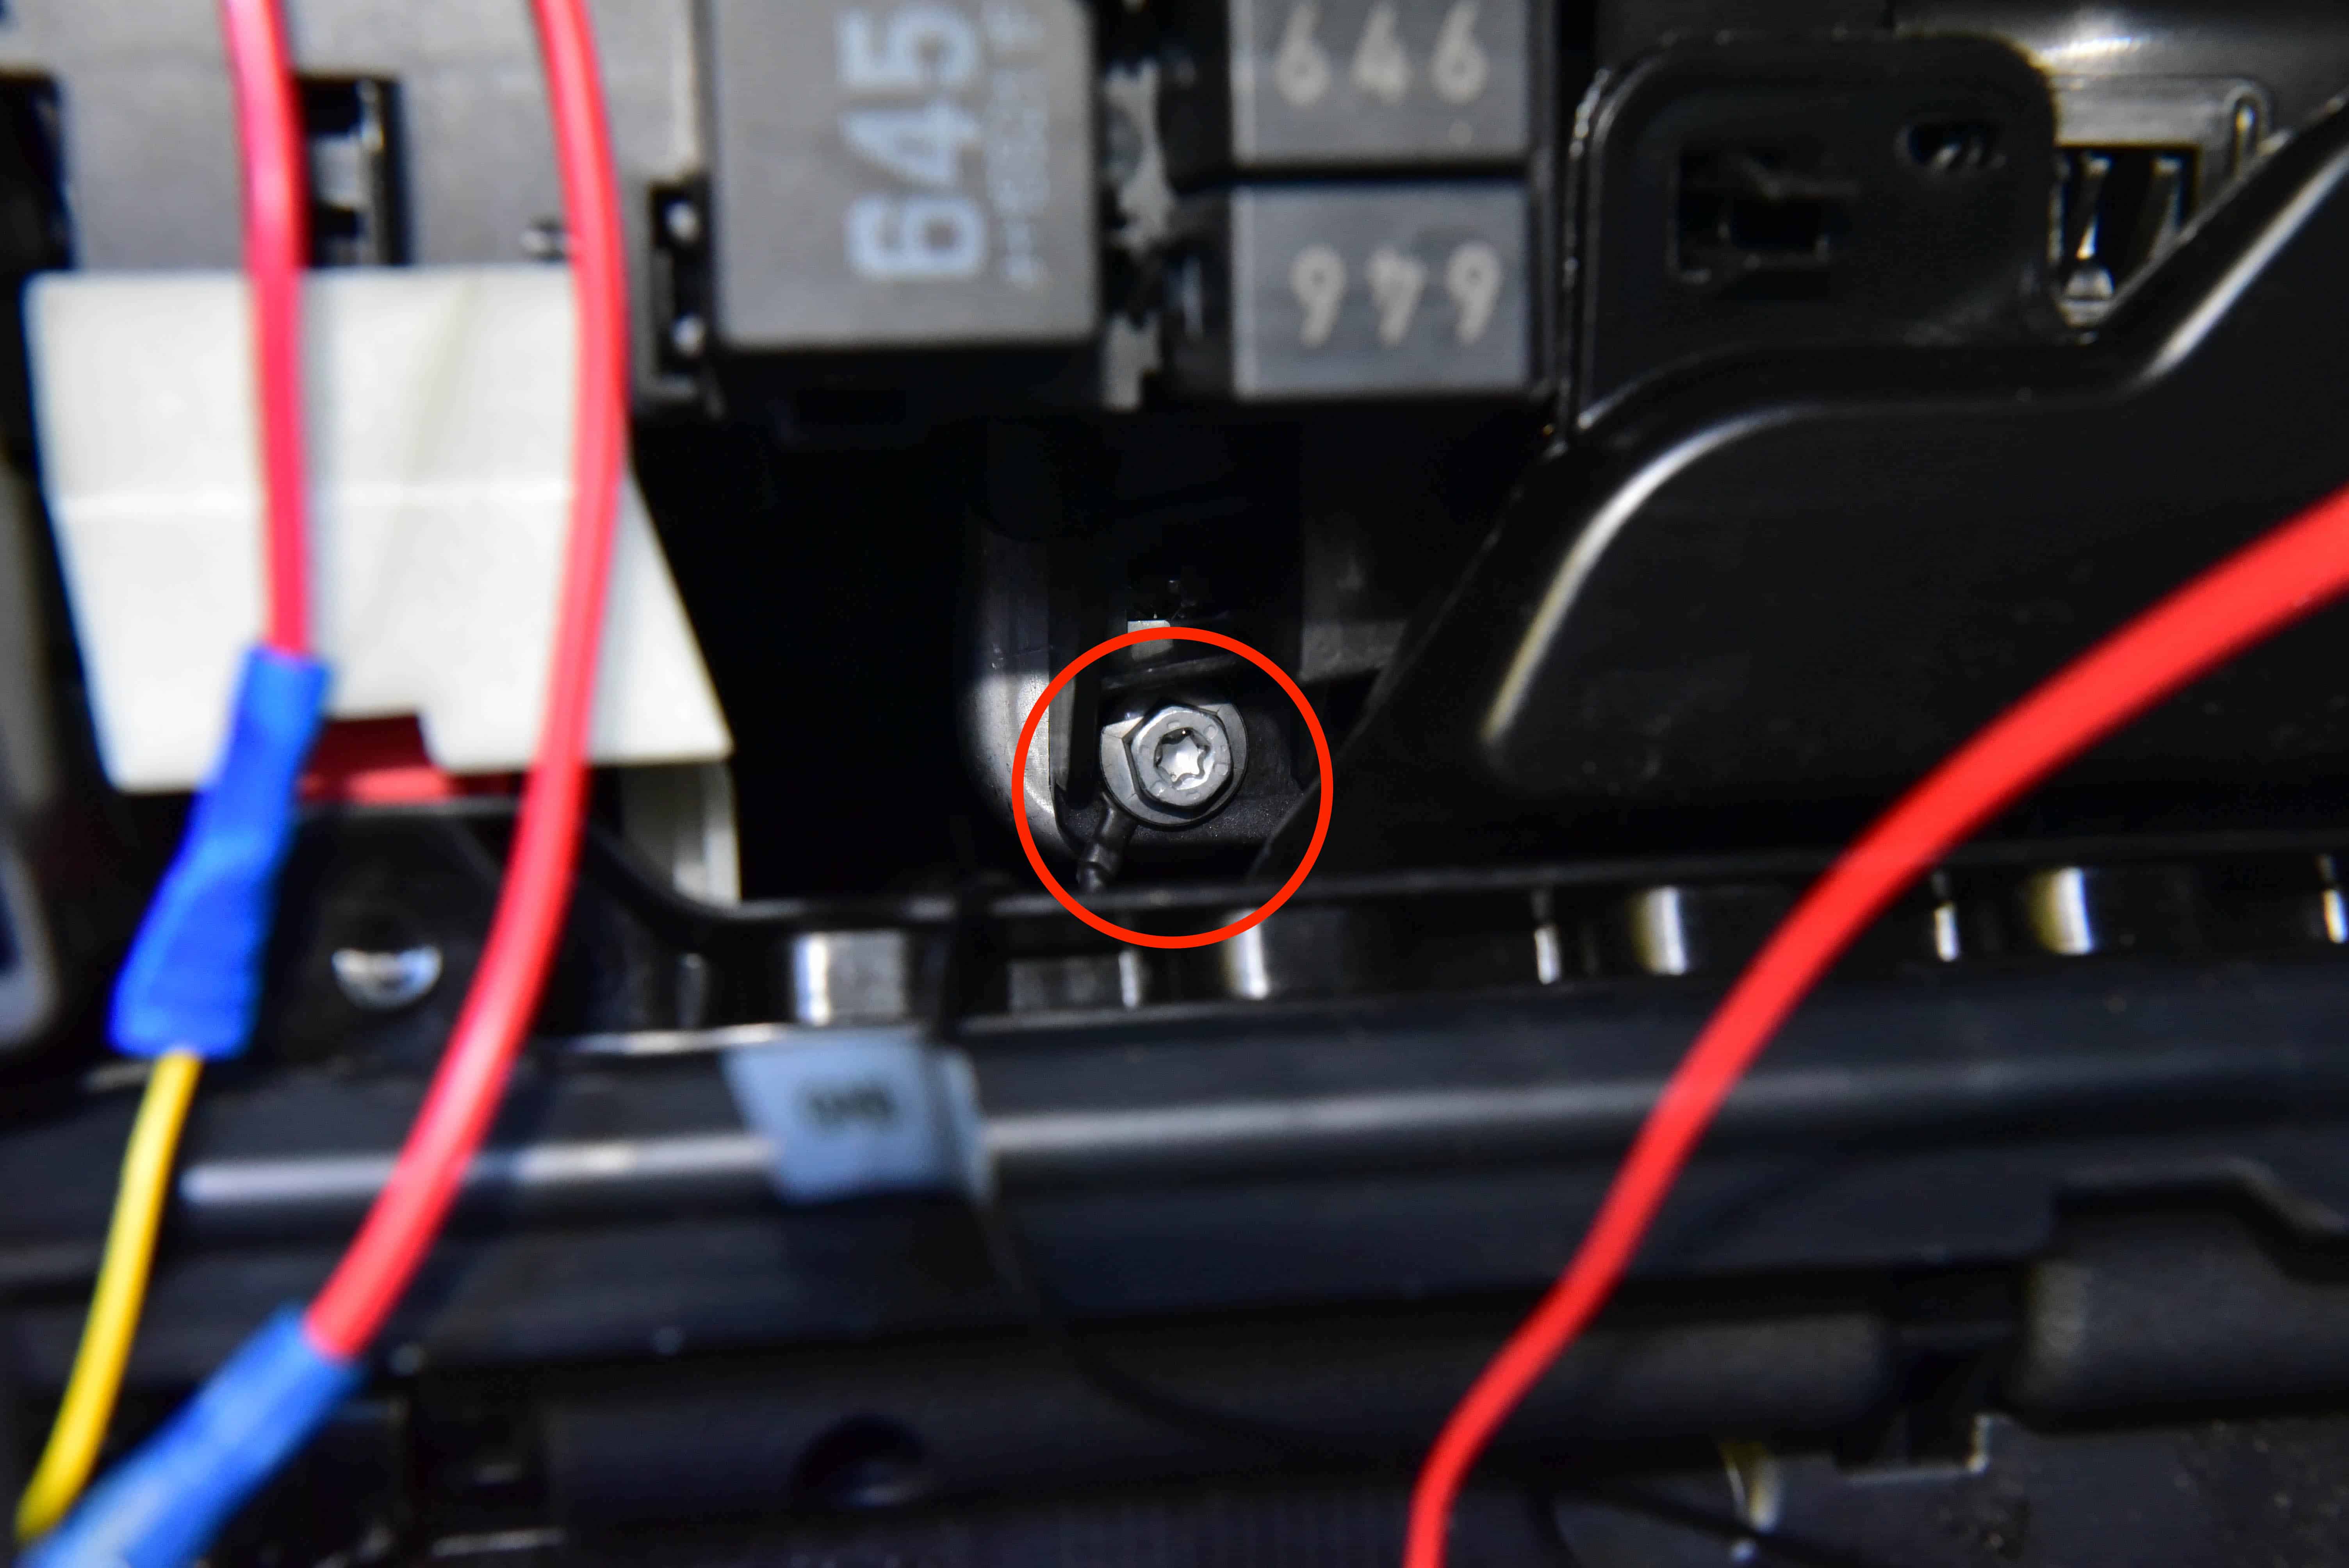
Step 18
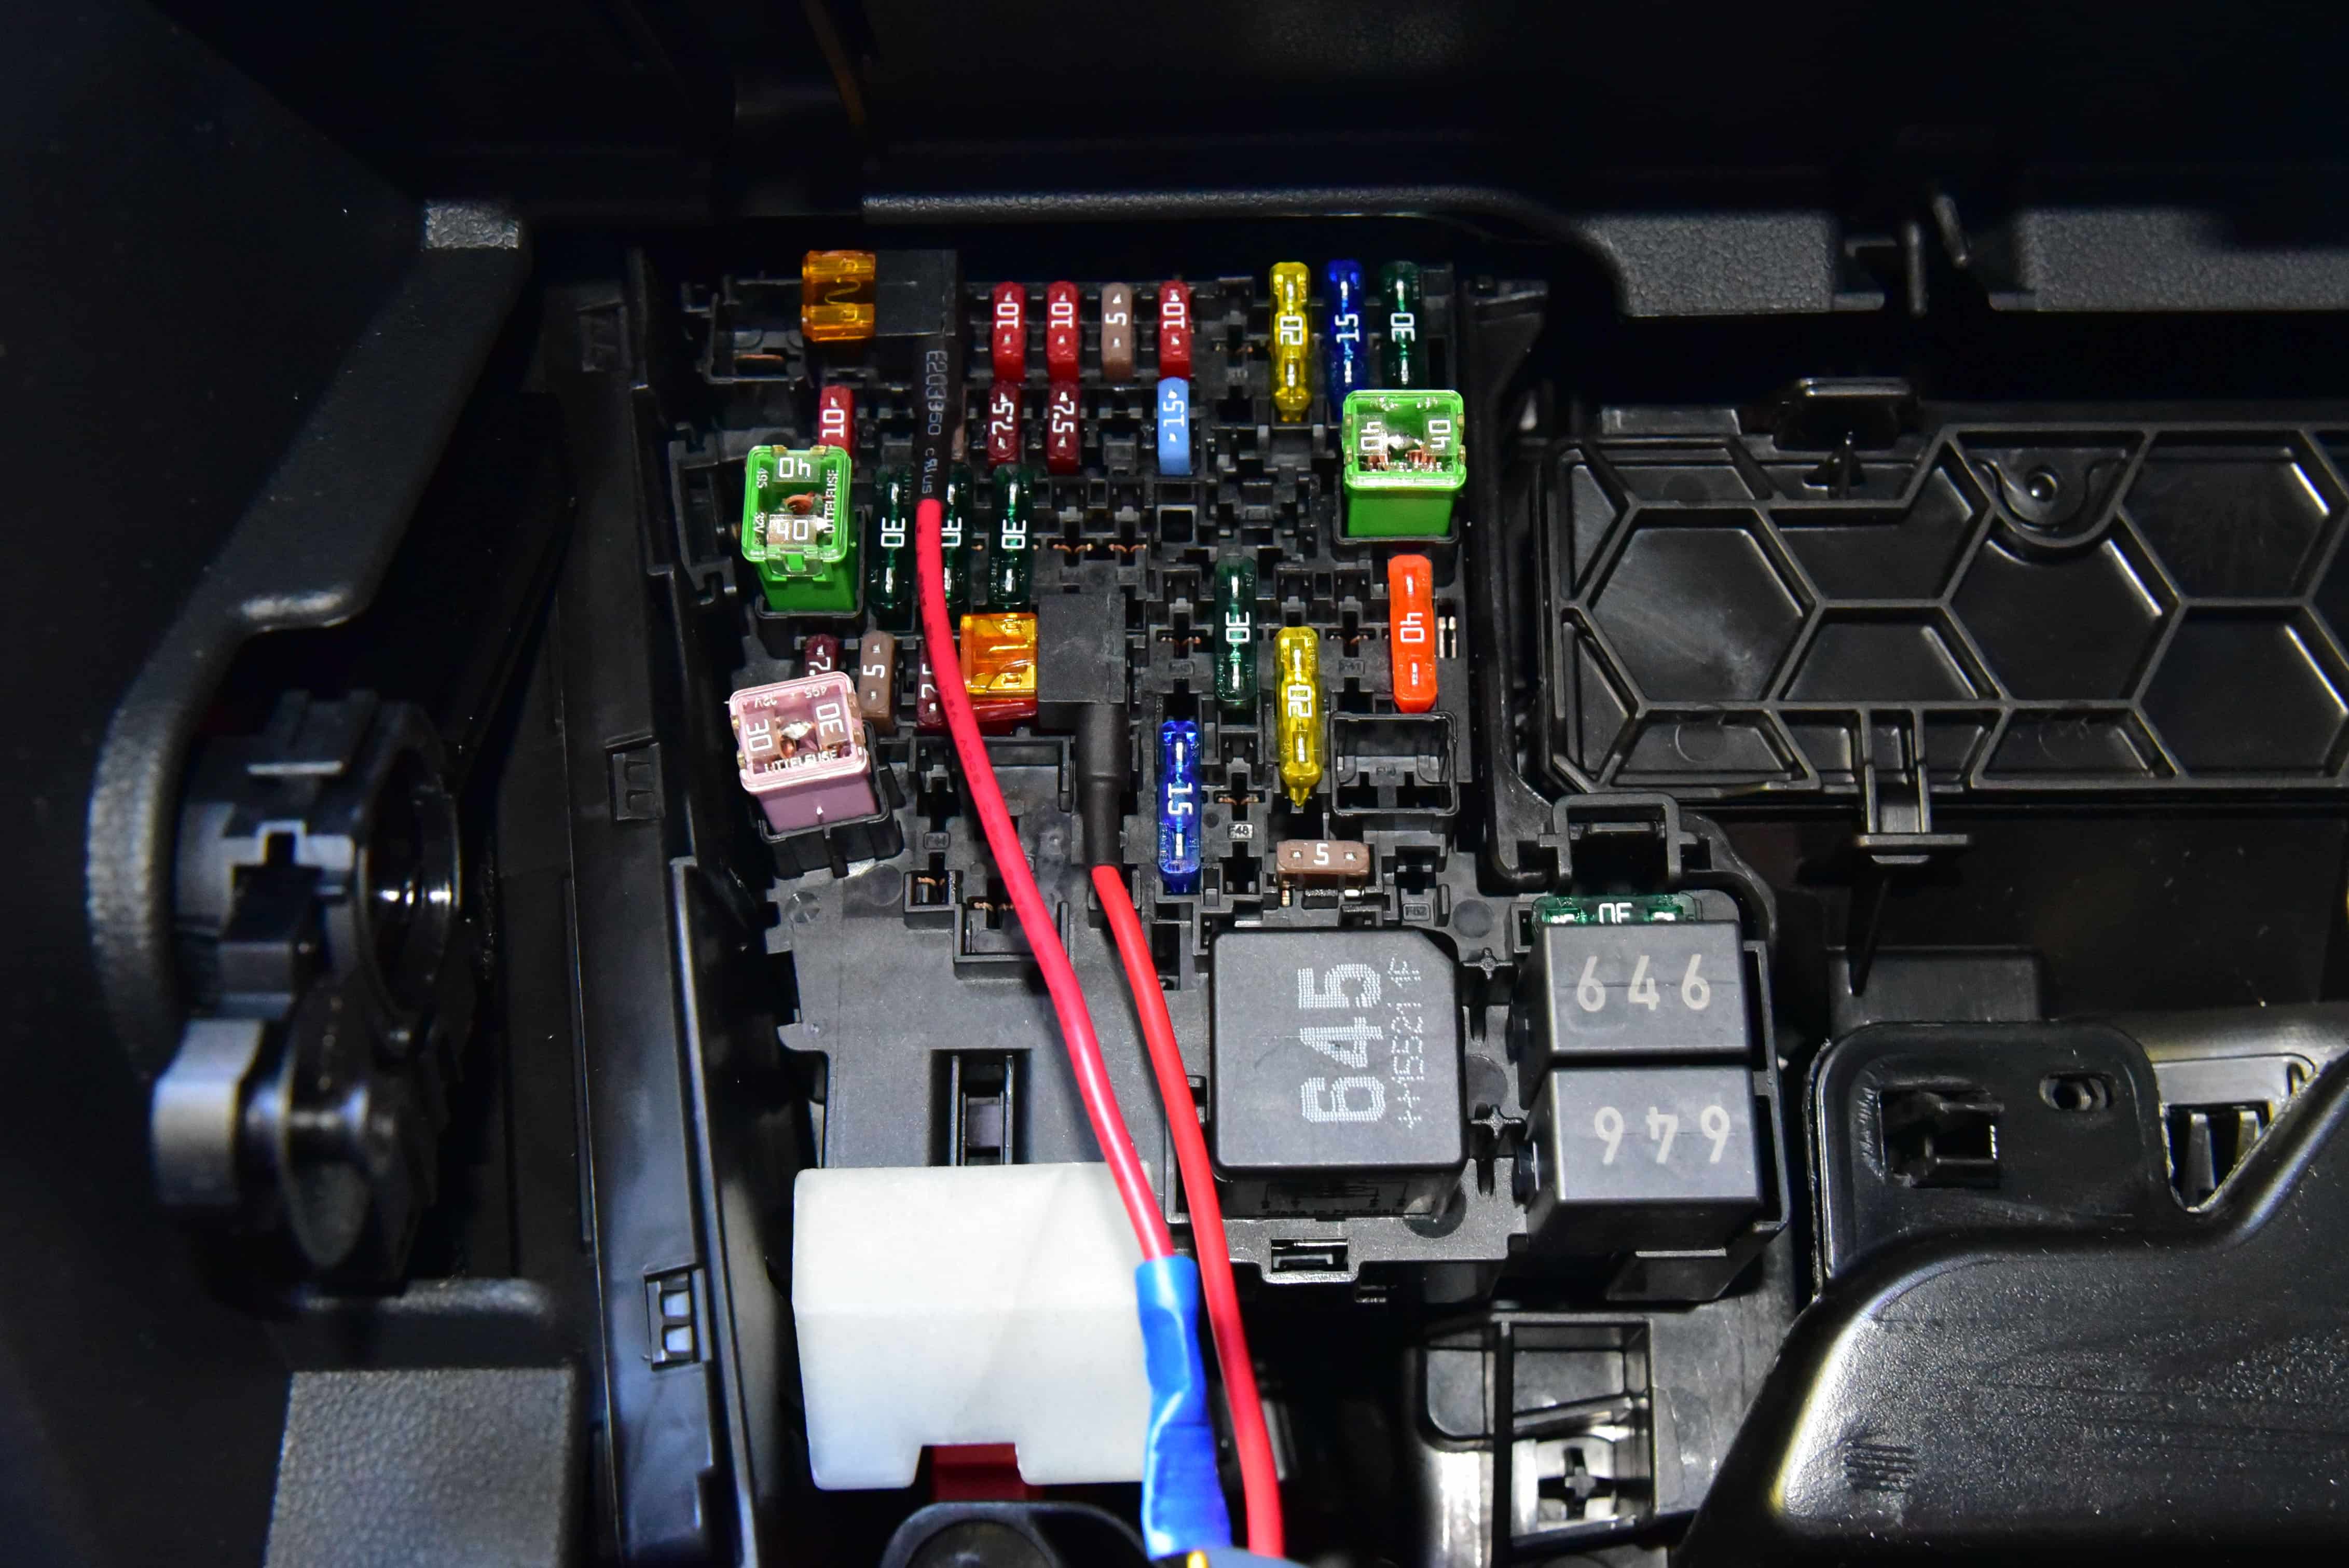
Situated below the fuse panel you will also find a perfect and convenient grounding point! Using a suitable eyelet or fork connector, attach the ground.
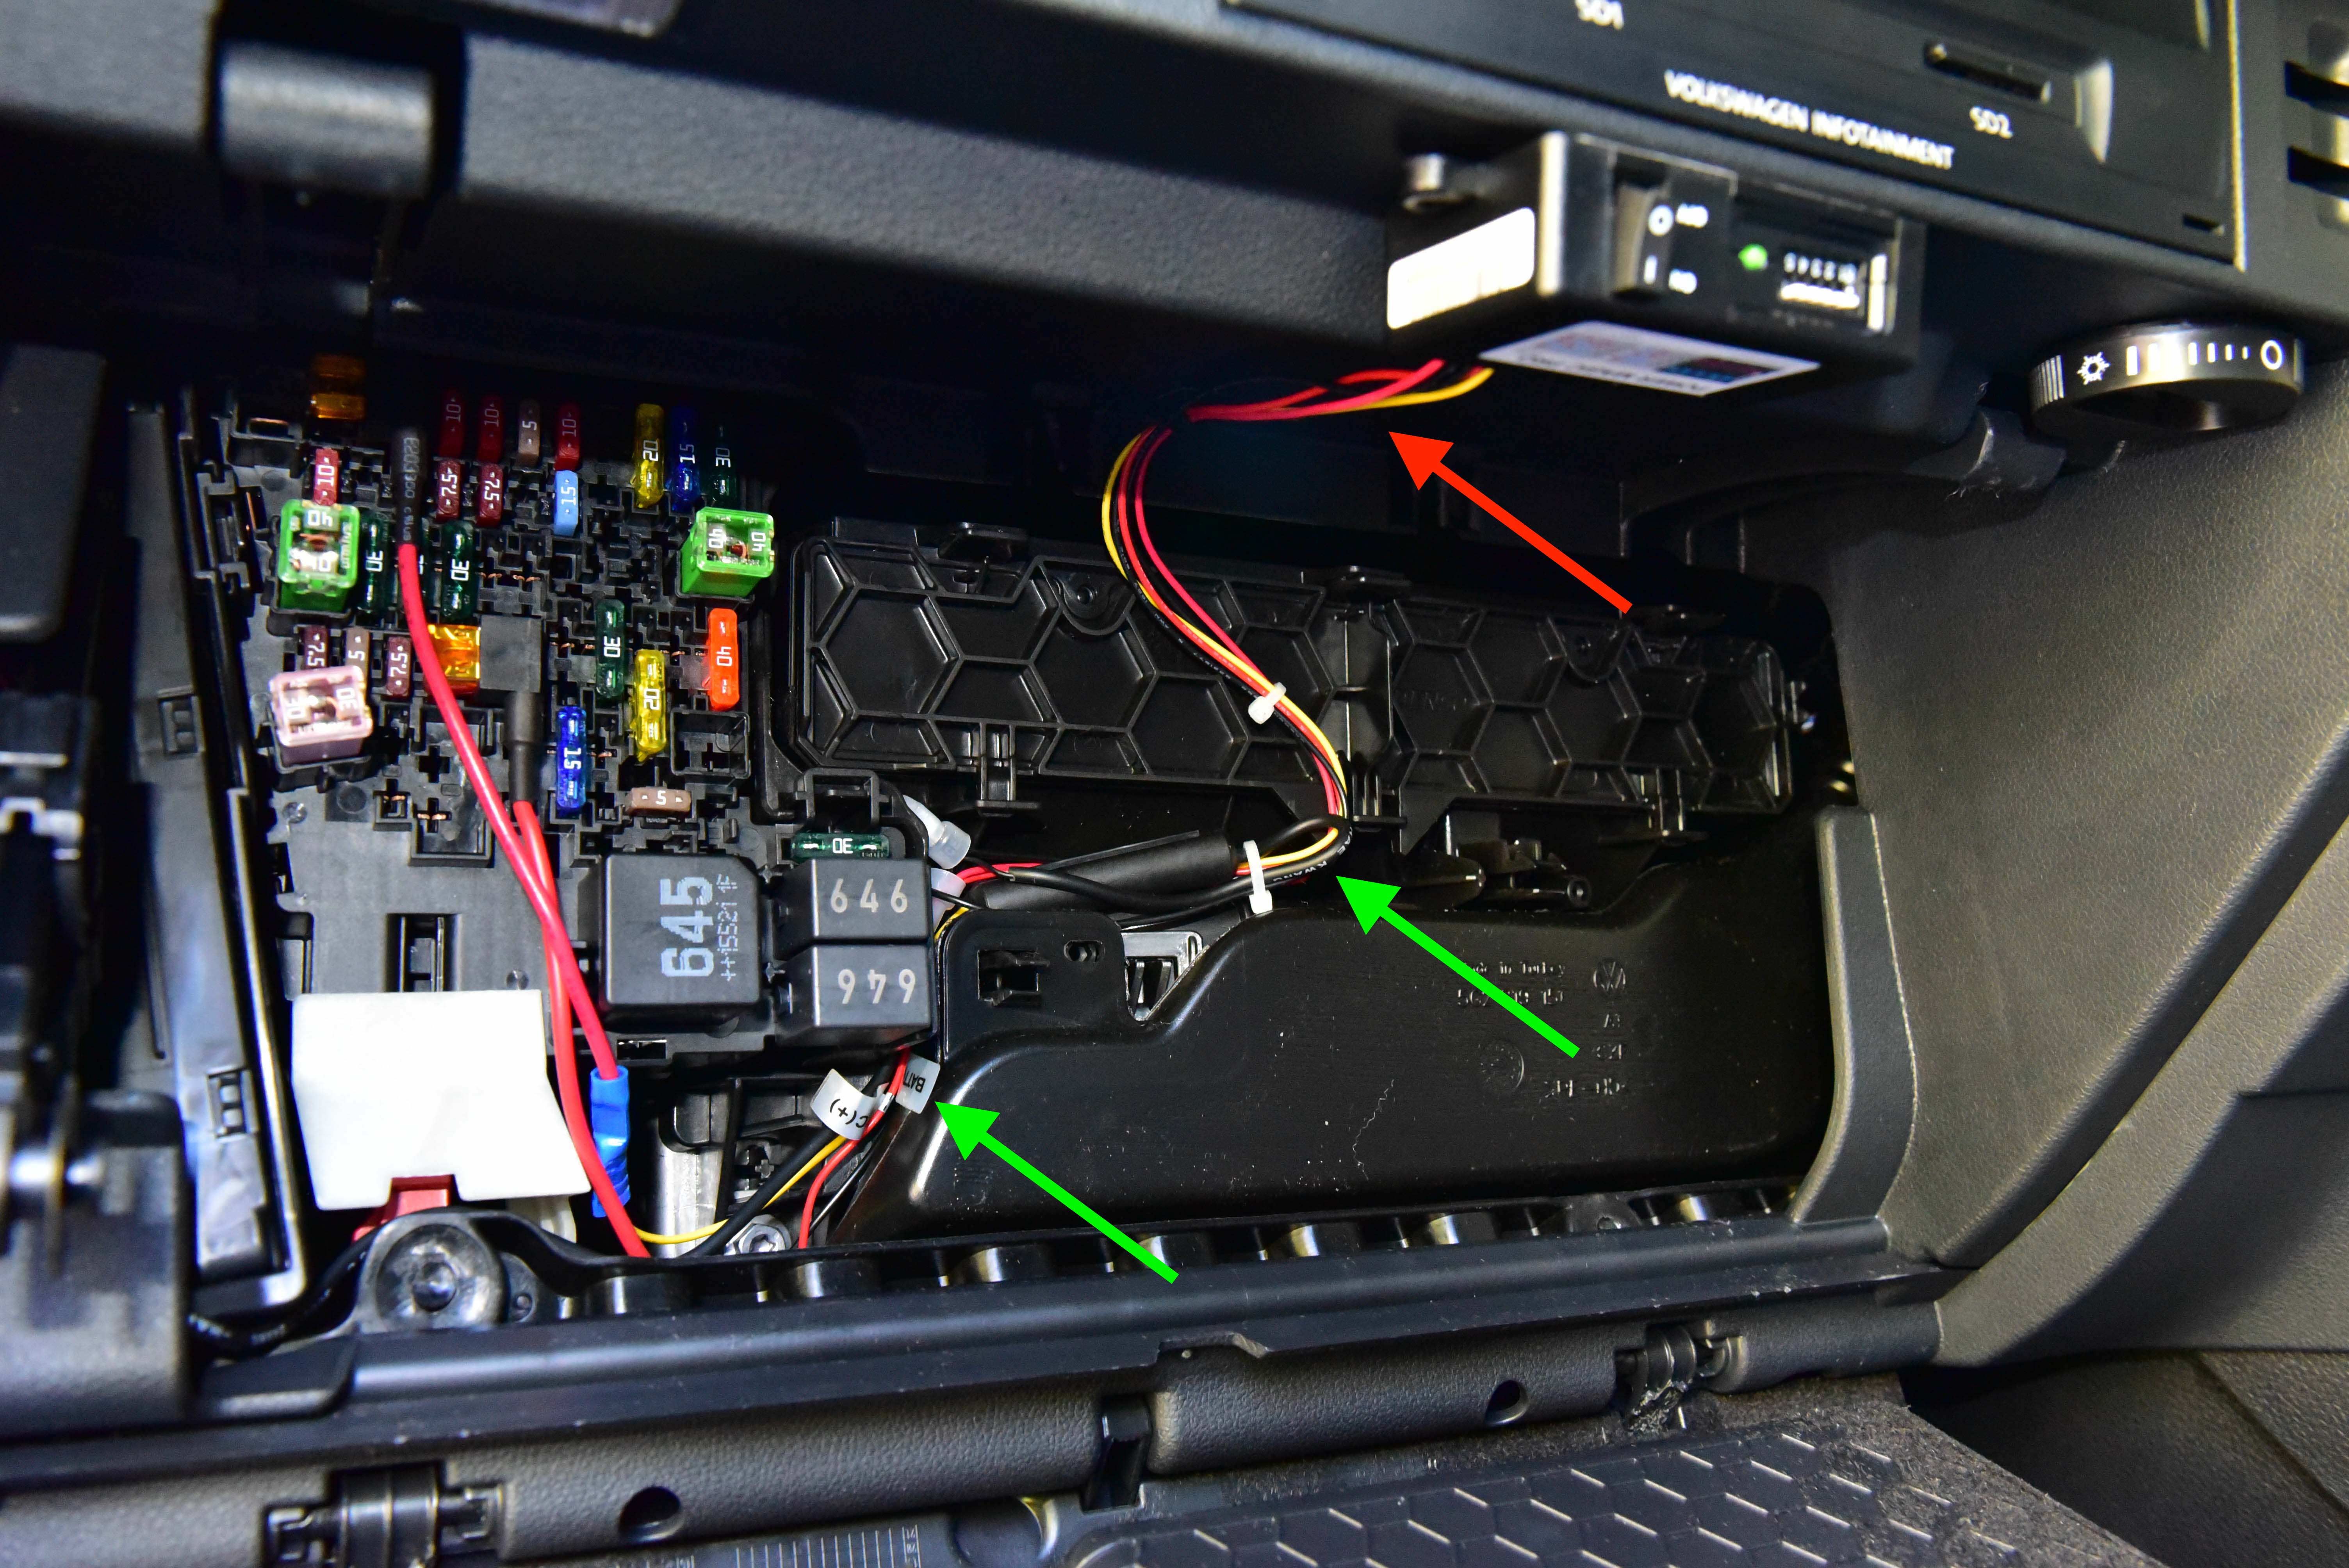
Step 19
Mount the Power Magic Pro in the location of your choice and neaten the wiring installation. We used thick double sided tape to mount the Power Magic Pro (Pictured), then taped the wires against the trim to stop the glovebox catching on them (Not pictured, Red arrow)
Did you find this guide helpful? Consider sharing it to help other car enthusiasts
I couldn’t quite follow how to install the wires “behind the airbag in the A pillar” (Step 5). Even if I removed the cover, wouldn’t the wire have to cross over from near the windscreen to the side entrance (Step 4)? And that rubber seal (Step 6), haven’t been able to pull it off! LOL
Hey! Thanks for the feedback. It’s hard to describe, but the airbag is one long ‘sock’ in the A Pillar and leads all the way to the rear window. You simply need to cross the cable over behind it, nearest to the windshield. Therefore of the airbag deploys, it will not snag on the cable. The rubber seal won’t come off, you simply have to pull it back slightly. I hope that helps!
Hi Lee! There is plenty of slack in the cable to allow for lowering of the glove box and changing the filter. You can always re-route the cabling if you wish.
Used this to install a 2ch system on my US model R. Cable routing information was very helpful, especially the guidance to get behind the airbag in the A pillar. Thanks!
Thanks for the detailed description. There are a few out there, and yours is the most detailed, imo.
My biggest concern, however, is that the fit between the roof lining and the windshield is REALLY tight, so I can’t even push a wire into this crack.
Therefore, could you please answer a couple of questions related to this problem?
1) Did you have to drop the ceiling? If so, how did you do that? If not, how did you circumvent the problem of the tight gap, so to speak?
2) Did you feed the cable into the A-pillar from outside-in or from inside-out? A picture taken from outside in Step 5 would’ve really helped.
3) The wire is really rigid — isn’t there danger that it may rupture the airbag? Did you fix it in place somehow so that it doesn’t wiggle?
4) Did you feed the cable via the A-pillar directly into the roof lining? If so, how did you get it out towards the camera?
Hi Ivan, Thanks for the feedback. In answer to your questions:
1) There is definitely no need to drop the ceiling, there should be plenty of space to feed the wire. Use your hands to gently pull down the roof lining and feed the cable into the roof lining.
2) Either way works, Just depends which end you start at.
3) Are you referring to the power wire? As long as it is above the airbag, there is no risk.
4) We fed the cable out into the windshield. Then simply pulled out enough distance to reach the camera, then tucked the wire into the roof lining along the glass.
Thank you so much for your guide. I just completed the install without a problem. The trickiest part without a doubt is feeding the cable through the a-pillar behind the curtain airbag. Just have to be patient and perhaps attach something rigid to the cable it self so you can feed it straight through, otherwise, it might get caught on something and the wire just keeps folding over itself. Key is to pry open the cover such that you can see light before threading it. Thanks again!
Hey AI, I’ve noticed after a few days, the camera doesn’t power on all the time with the power connected to the switched fuse (F37) as you have in your diagram. Do you know why that is? At times it would send power, but the camera seems to power on, then off, then back on again, and sometimes not on at all.
Staff @ AutoInstruct July 5, 2017
Hi Ken, That’s interesting, we’ve not had any issues with this connection before. It sounds like an electrical connection problem, or bad ground. Please check connections and the fuse tap. Perhaps use a multi-meter to confirm the fuse is delivering power, even when the camera is off.


This Post Has 38 Comments
Great pics and tips.
I couldn’t quite follow how to install the wires “behind the airbag in the A pillar” (Step 5). Even if I removed the cover, wouldn’t the wire have to cross over from near the windscreen to the side entrance (Step 4)? And that rubber seal (Step 6), haven’t been able to pull it off! LOL
Hey! Thanks for the feedback. It’s hard to describe, but the airbag is one long ‘sock’ in the A Pillar and leads all the way to the rear window. You simply need to cross the cable over behind it, nearest to the windshield. Therefore of the airbag deploys, it will not snag on the cable. The rubber seal won’t come off, you simply have to pull it back slightly. I hope that helps!
How does this go when VW try to service the cabin/pollen filter?
Hi Lee! There is plenty of slack in the cable to allow for lowering of the glove box and changing the filter. You can always re-route the cabling if you wish.
Used this to install a 2ch system on my US model R. Cable routing information was very helpful, especially the guidance to get behind the airbag in the A pillar. Thanks!
Awesome, thanks for the feedback!
Thanks for the detailed description. There are a few out there, and yours is the most detailed, imo.
My biggest concern, however, is that the fit between the roof lining and the windshield is REALLY tight, so I can’t even push a wire into this crack.
Therefore, could you please answer a couple of questions related to this problem?
1) Did you have to drop the ceiling? If so, how did you do that? If not, how did you circumvent the problem of the tight gap, so to speak?
2) Did you feed the cable into the A-pillar from outside-in or from inside-out? A picture taken from outside in Step 5 would’ve really helped.
3) The wire is really rigid — isn’t there danger that it may rupture the airbag? Did you fix it in place somehow so that it doesn’t wiggle?
4) Did you feed the cable via the A-pillar directly into the roof lining? If so, how did you get it out towards the camera?
Thanks!
Hi Ivan, Thanks for the feedback. In answer to your questions:
1) There is definitely no need to drop the ceiling, there should be plenty of space to feed the wire. Use your hands to gently pull down the roof lining and feed the cable into the roof lining.
2) Either way works, Just depends which end you start at.
3) Are you referring to the power wire? As long as it is above the airbag, there is no risk.
4) We fed the cable out into the windshield. Then simply pulled out enough distance to reach the camera, then tucked the wire into the roof lining along the glass.
I hope that helps.
Thank you so much for your guide. I just completed the install without a problem. The trickiest part without a doubt is feeding the cable through the a-pillar behind the curtain airbag. Just have to be patient and perhaps attach something rigid to the cable it self so you can feed it straight through, otherwise, it might get caught on something and the wire just keeps folding over itself. Key is to pry open the cover such that you can see light before threading it. Thanks again!
Thanks!
Hey AI, I’ve noticed after a few days, the camera doesn’t power on all the time with the power connected to the switched fuse (F37) as you have in your diagram. Do you know why that is? At times it would send power, but the camera seems to power on, then off, then back on again, and sometimes not on at all.
Hi Ken, That’s interesting, we’ve not had any issues with this connection before. It sounds like an electrical connection problem, or bad ground. Please check connections and the fuse tap. Perhaps use a multi-meter to confirm the fuse is delivering power, even when the camera is off.