This guide will show you how to replace an air conditioner actuator on a VE Commodore. These actuators commonly fail on Series 1 vehicles and have been seen to fail on Series 2, however a revised unit is now being used.
There are multiple actuators behind the dashboard controlling modes, temperatures and air sources. Our guide will show you how to identify the faulty actuator and the steps to replace it.
HVAC = Heating, Ventilation and Air Conditioning
Common symptoms
Vents stuck in a certain mode such as feet, face or demister.
Loud clicking noise behind the dashboard when changing modes or temperature
Heating / Cooling not working properly. Often permanently on heat or cold.
Multiple actuators can be found on both the left and right sides of the dashboard. The same actuator units are used regardless of its purpose. Let’s go through some troubleshooting steps below:
Attempt a HVAC System Relearn
It’s possible that your actuators are not actually faulty but have ‘forgotten’ which position they are in. The relearn process runs all actuators for 10-15 seconds, allowing them to calibrate their positions.
To do this first close your doors and turn the radio off. You’ll need to listen to the motors and they’re very quiet.
Turn the Ignition to ‘on’ but do not start the car. Press and hold the rear demister button until you hear the actuators moving. After 10-15 seconds the actuators will stop and the system will be calibrated. Test the air conditioner system and check if your problem still exists. Be sure to cycle through each mode and heat / cool.
If the problem still exists or you heard loud clicking noises during this process, it is very likely that an actuator is faulty. Proceed to the next step.
Identifying the Faulty Actuator
If you heard loud clicking noises during the relearn process this will help with identification. Run the relearn again and listen for the clicking. Is it on the passenger or drivers side? Listen around the footwell area on both sides and you should be able to determine where it was louder. We now need to access that actuator.
If no clicking was heard and you still suspect the actuator is at fault, visual identification may be required to see if the motor and HVAC arms are moving when the relearn is in progress. This will involve trim removal from the drivers and/or passenger side of the vehicle. We’ll run through this process below.
Note: There is an electrical interlock between the AIR RECIRC function and the HOT/COLD mixing function. If the system detects a malfunction in the AIR RECIRC, the HOT/COLD mixing actuator is disabled. This fault is indicated by the LED on the RECIRC button blinking.When you run “relearn, if the HOT/COLD actuator is not moving, this does not necessarily indicate that the actuator has failed. It might be that the RECIRC system has failed, and the interlock has disabled the HOT/COLD mixing actuator. Confirmation of the fault is indicated by the blinking LED on the RECIRC button.
It is possible to have multiple actuators fail! Keep this in mind when performing your assessment.
Step 1
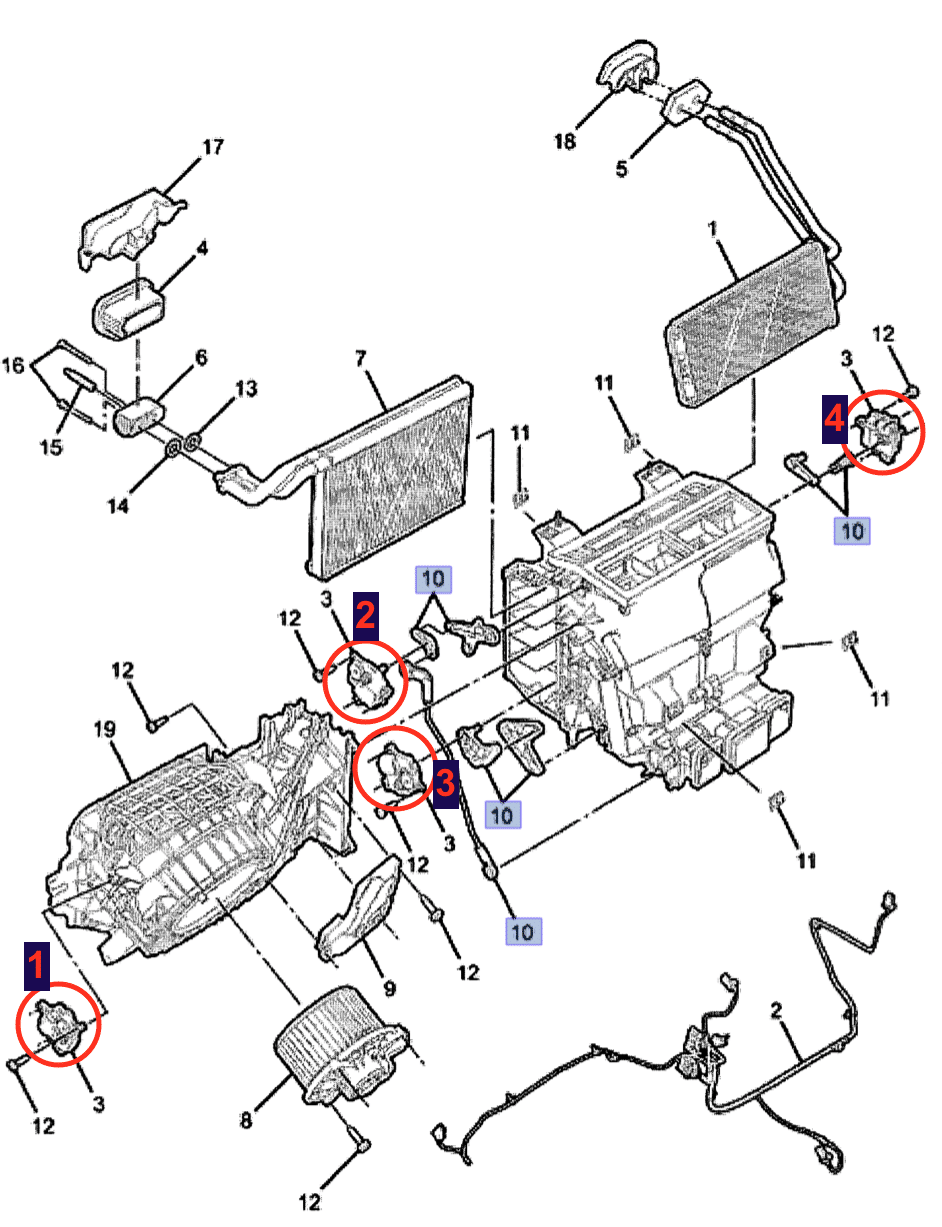
System Overview
There are 4 HVAC actuators in the system, each one is identical
Air Recirculation Door Actuator – Located above the blower fan and controls the recirculation function.
Floor Vents – Upper left side of centre console (Passenger Side)
Heat/Cool – Lower left side of centre console. Uses interconnecting levers to control the butterfly valve inside the heater box
Face Vents – Upper right side of centre console (Drivers Side)
Step 2
Drivers Side Actuator
The drivers side actuator which controls the air directions between feet, face, demister is usually the faulty unit. It is often identified as the air conditioner being ‘stuck’ on feet or demister modes. The process below outlines the actuator replacement procedure.
Using a trim removal tool, pop off the side trim piece. There are three clips, one on each corner.
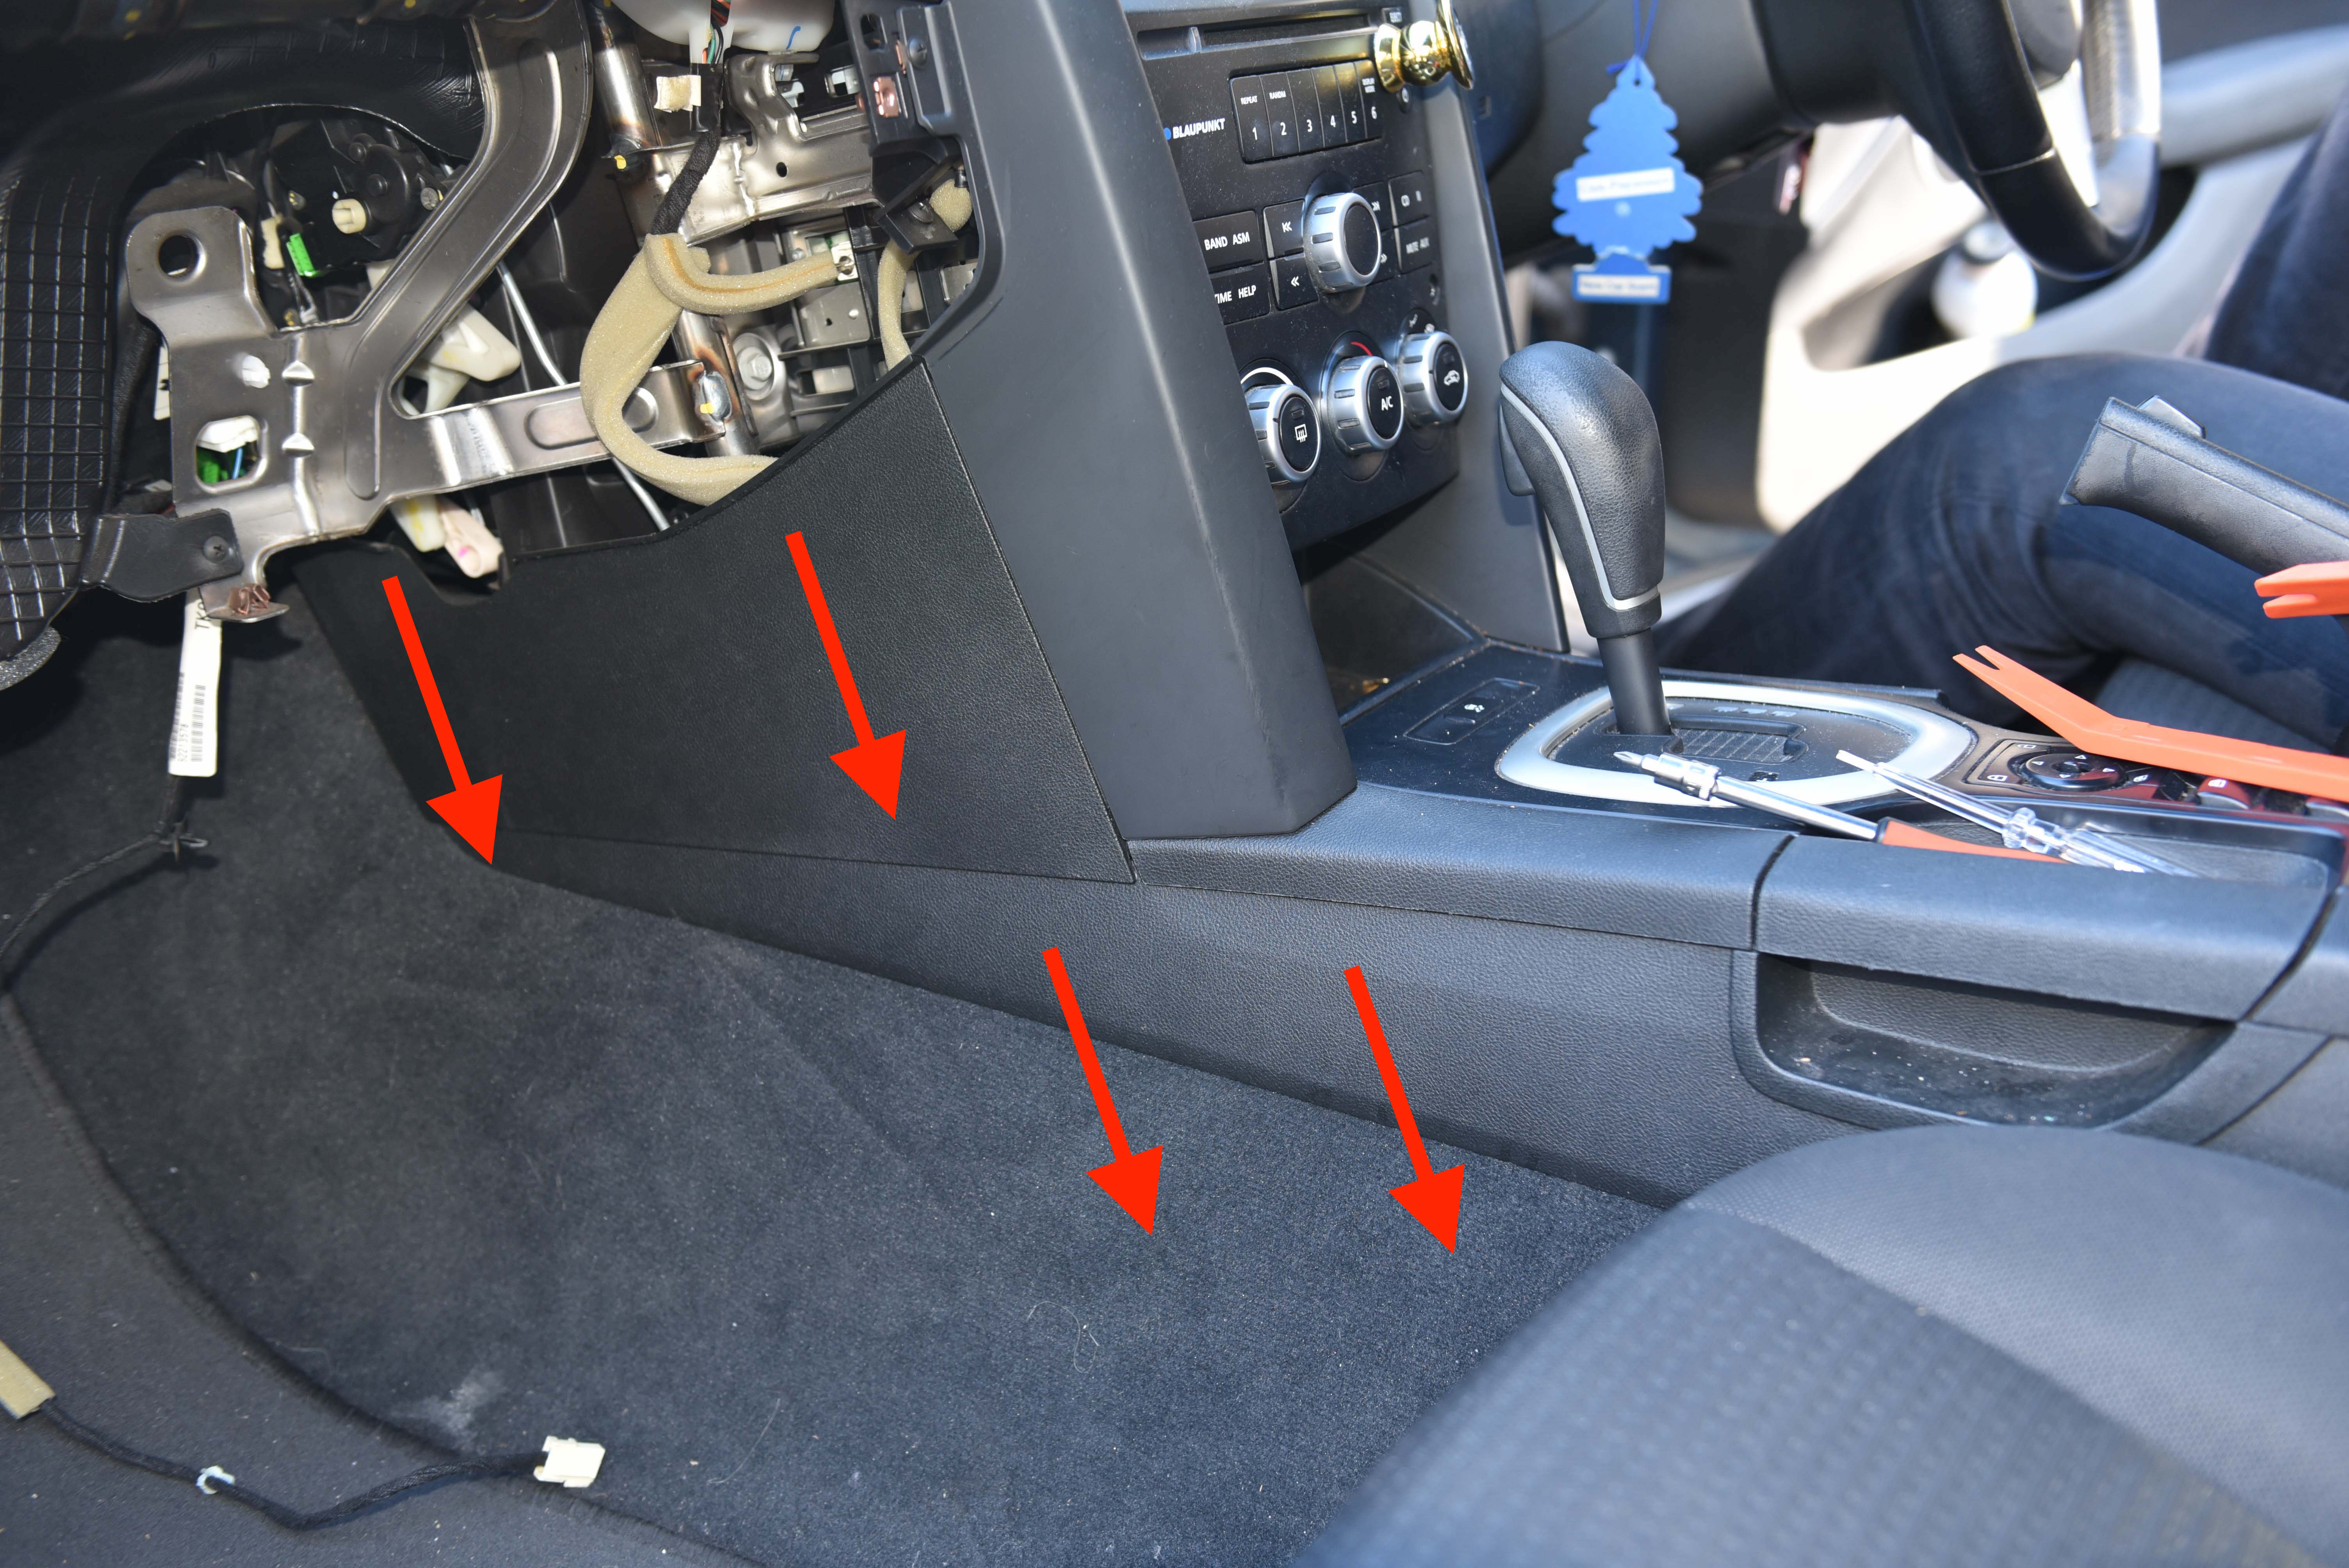
Step 3
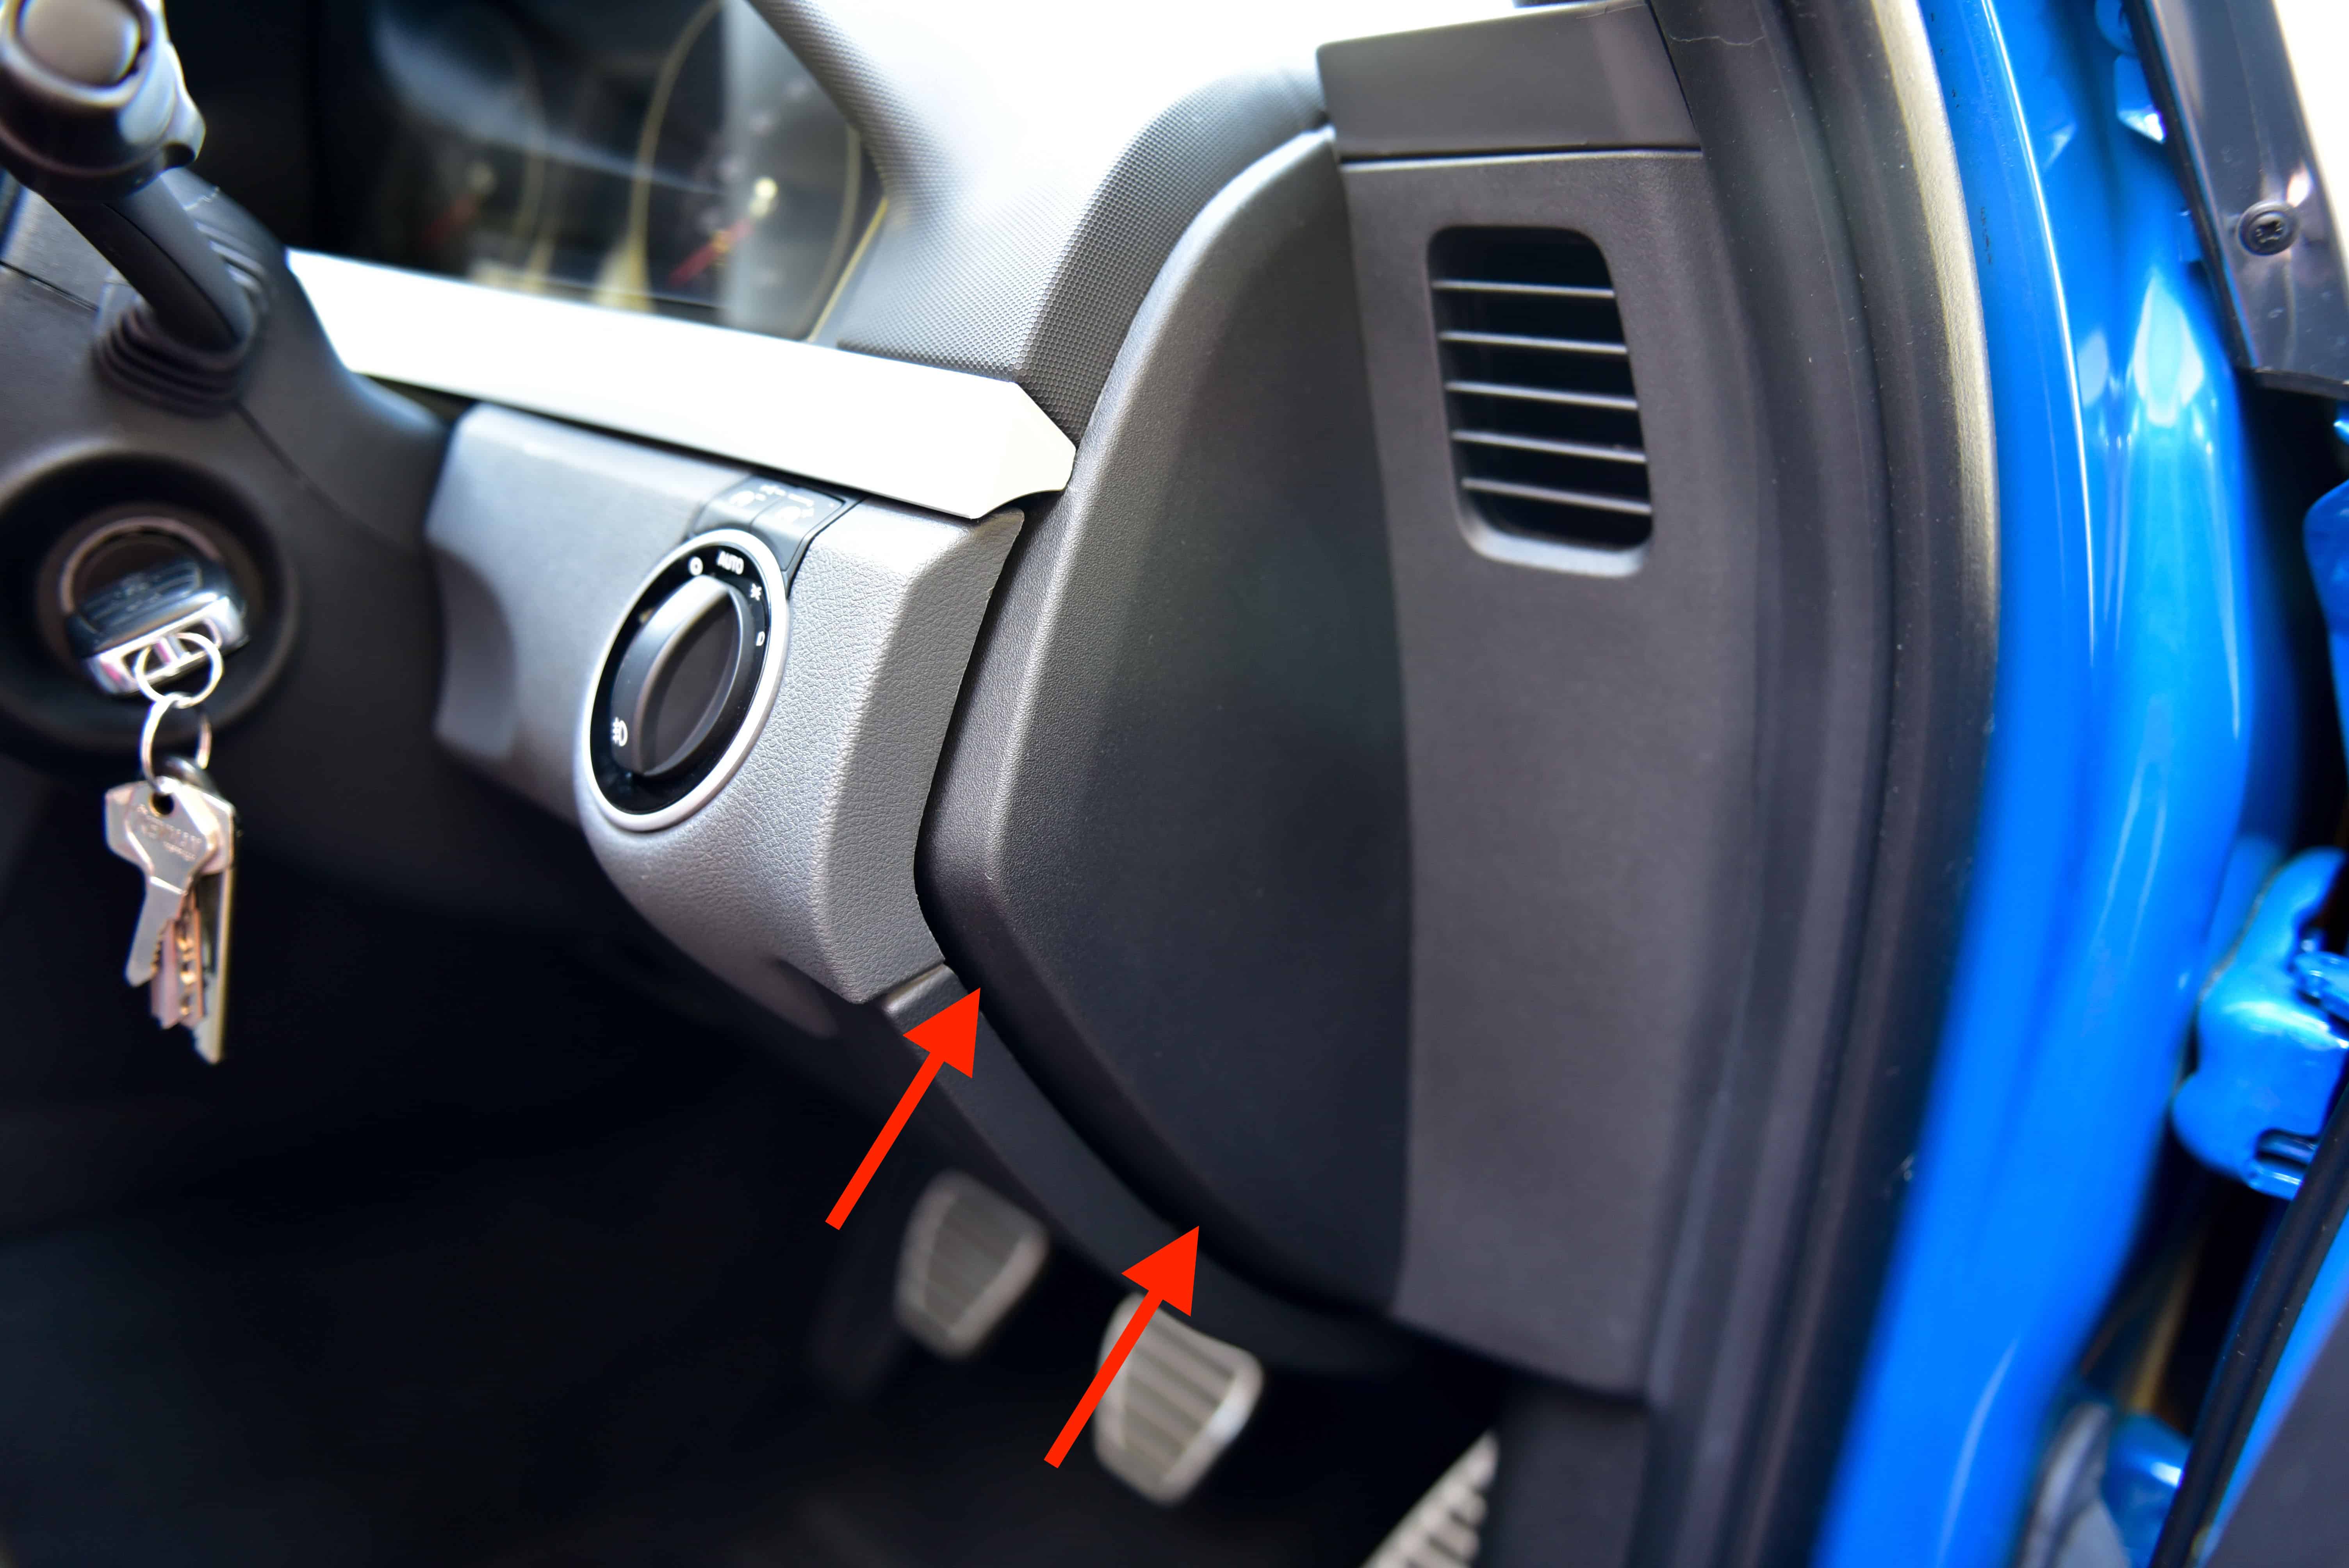
Wedge your fingers behind the lower section of the trim and firmly pull upwards as shown by the red arrows.
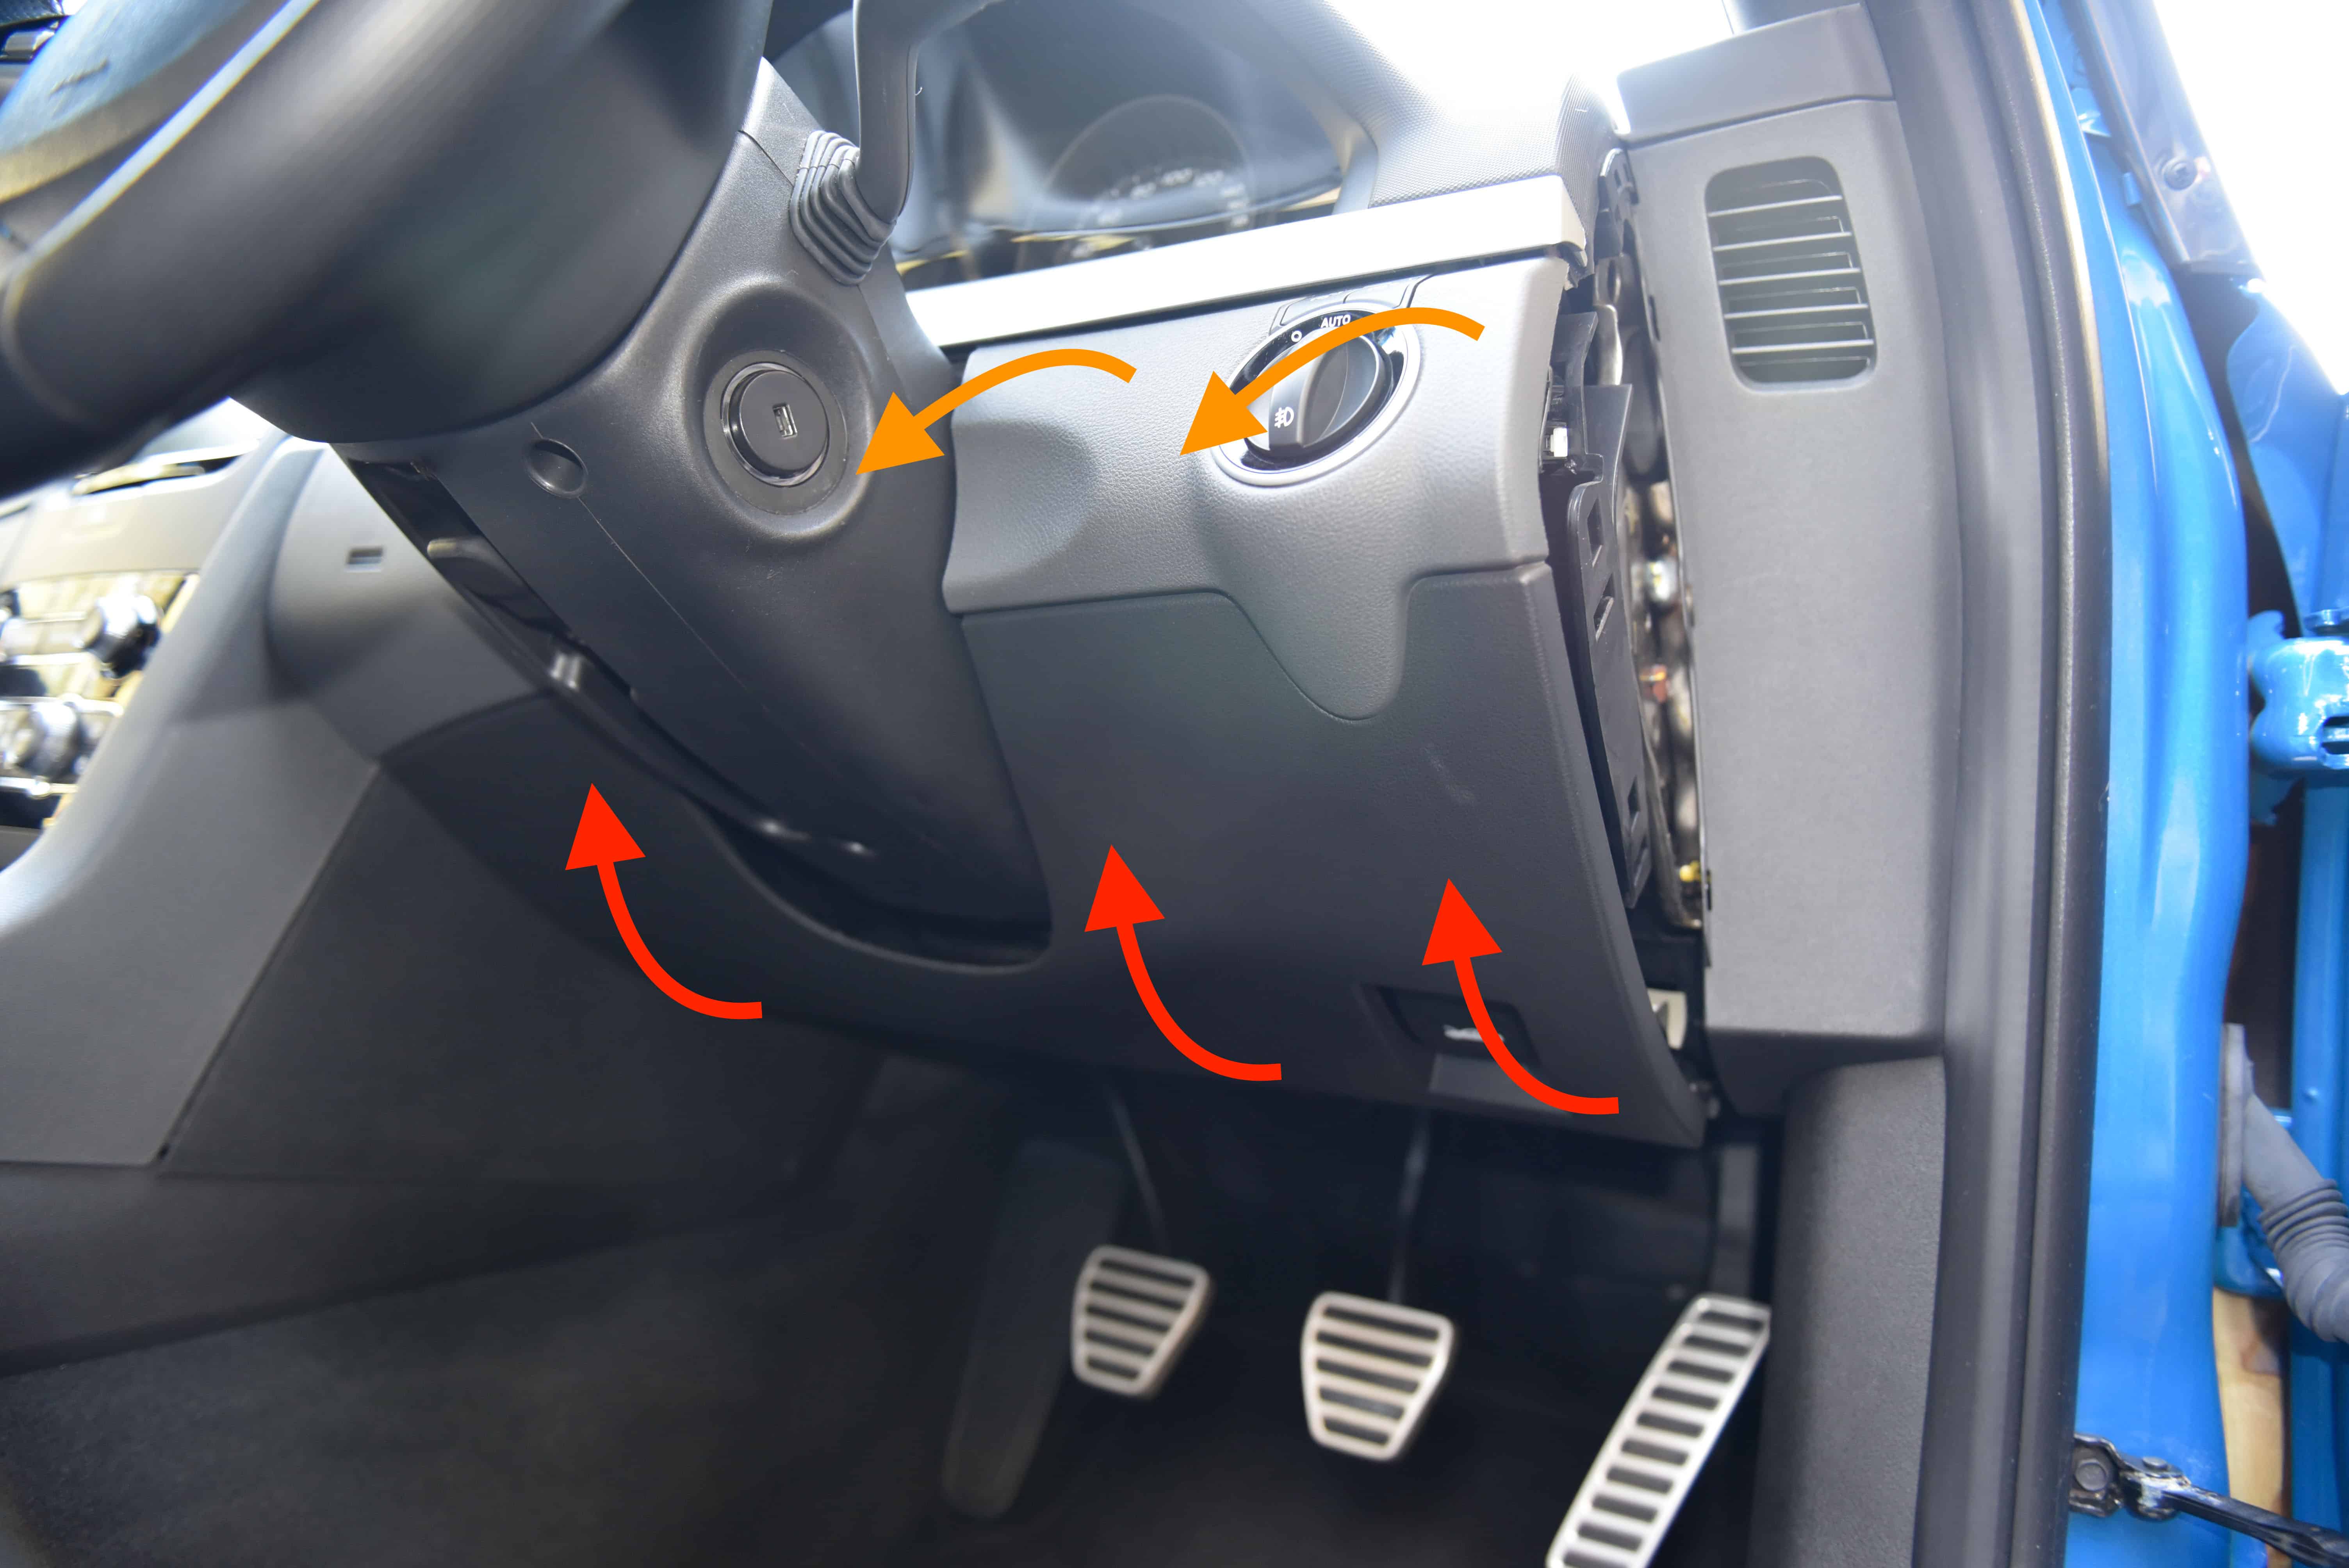
With the bottom clips released use a gentle hinging and pulling motion to release the top clips on both sides of the steering wheel. Pull away as shown by the orange arrows.
Be careful releasing the clips as the trim will drop downwards. It is quiet heavy.
Step 4
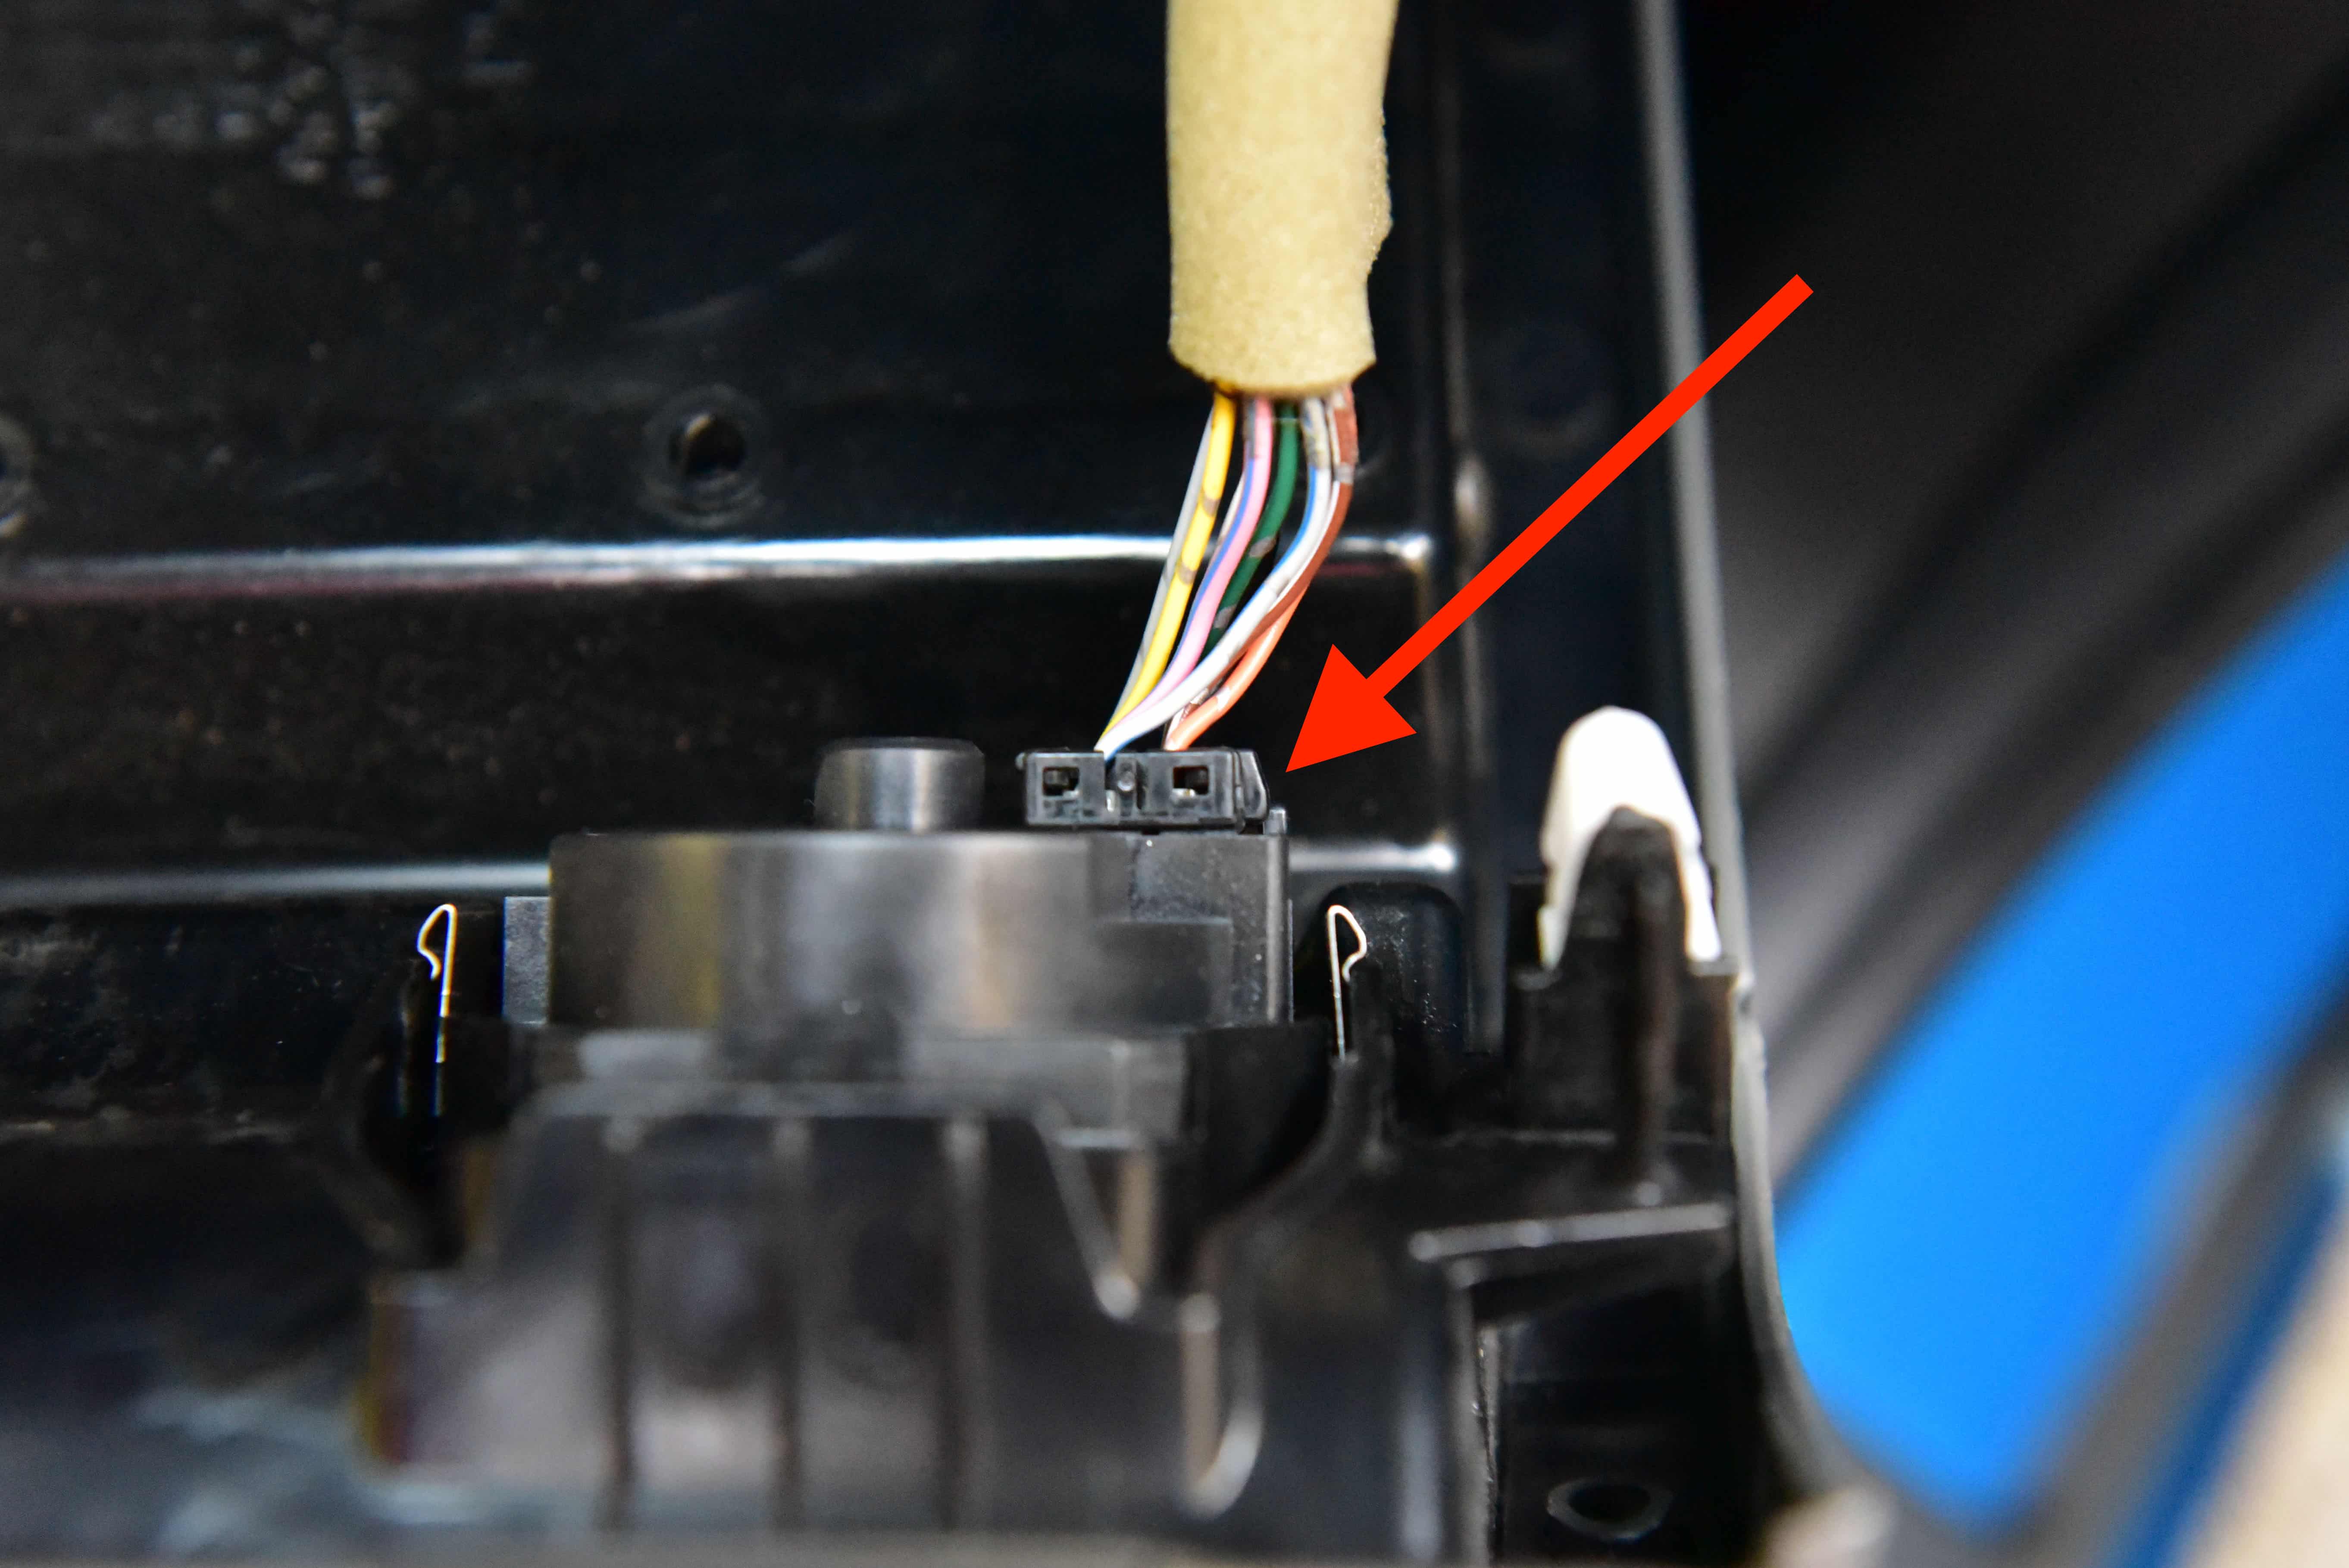
As the trim is released you will need to unplug the headlight switch. Push on the clip and unplug.
Step 5
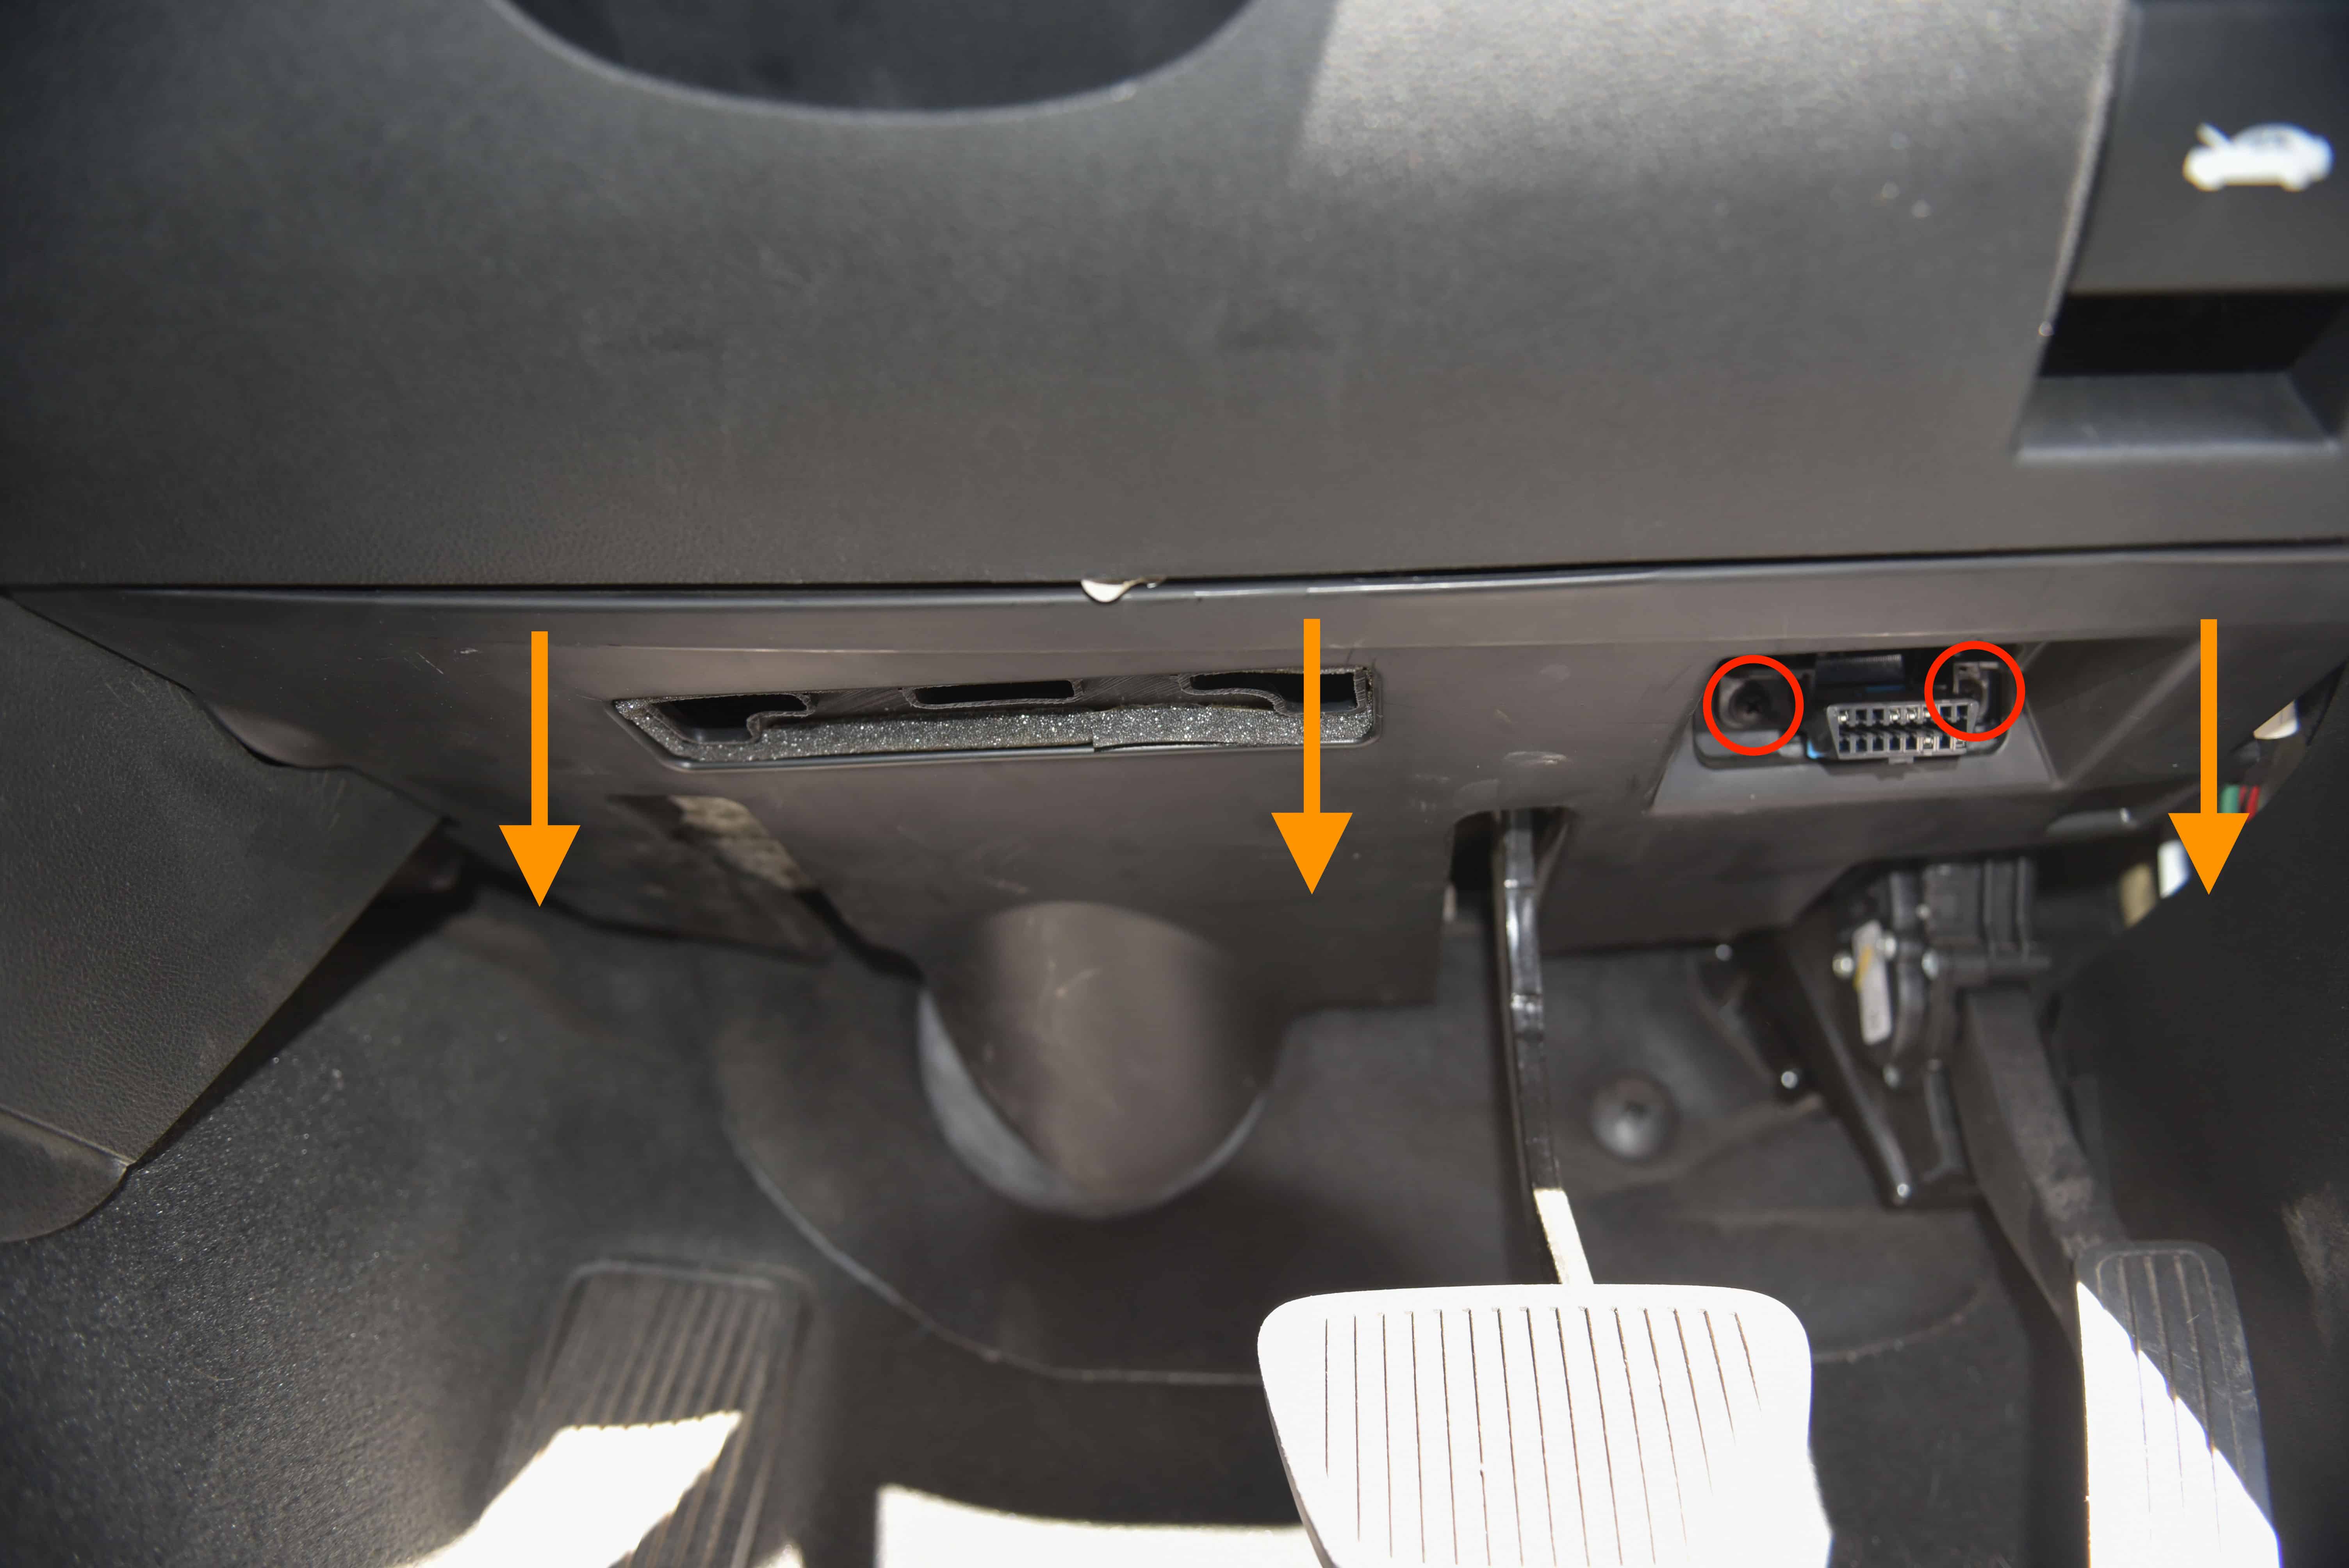
Unscrew the OBD port as circled and pull downwards on the kick panel trim. There are approximately 5 clips holding this trim in place.
Step 6
Remove the air conditioner ducting which is held in place by two screws.
Step 7
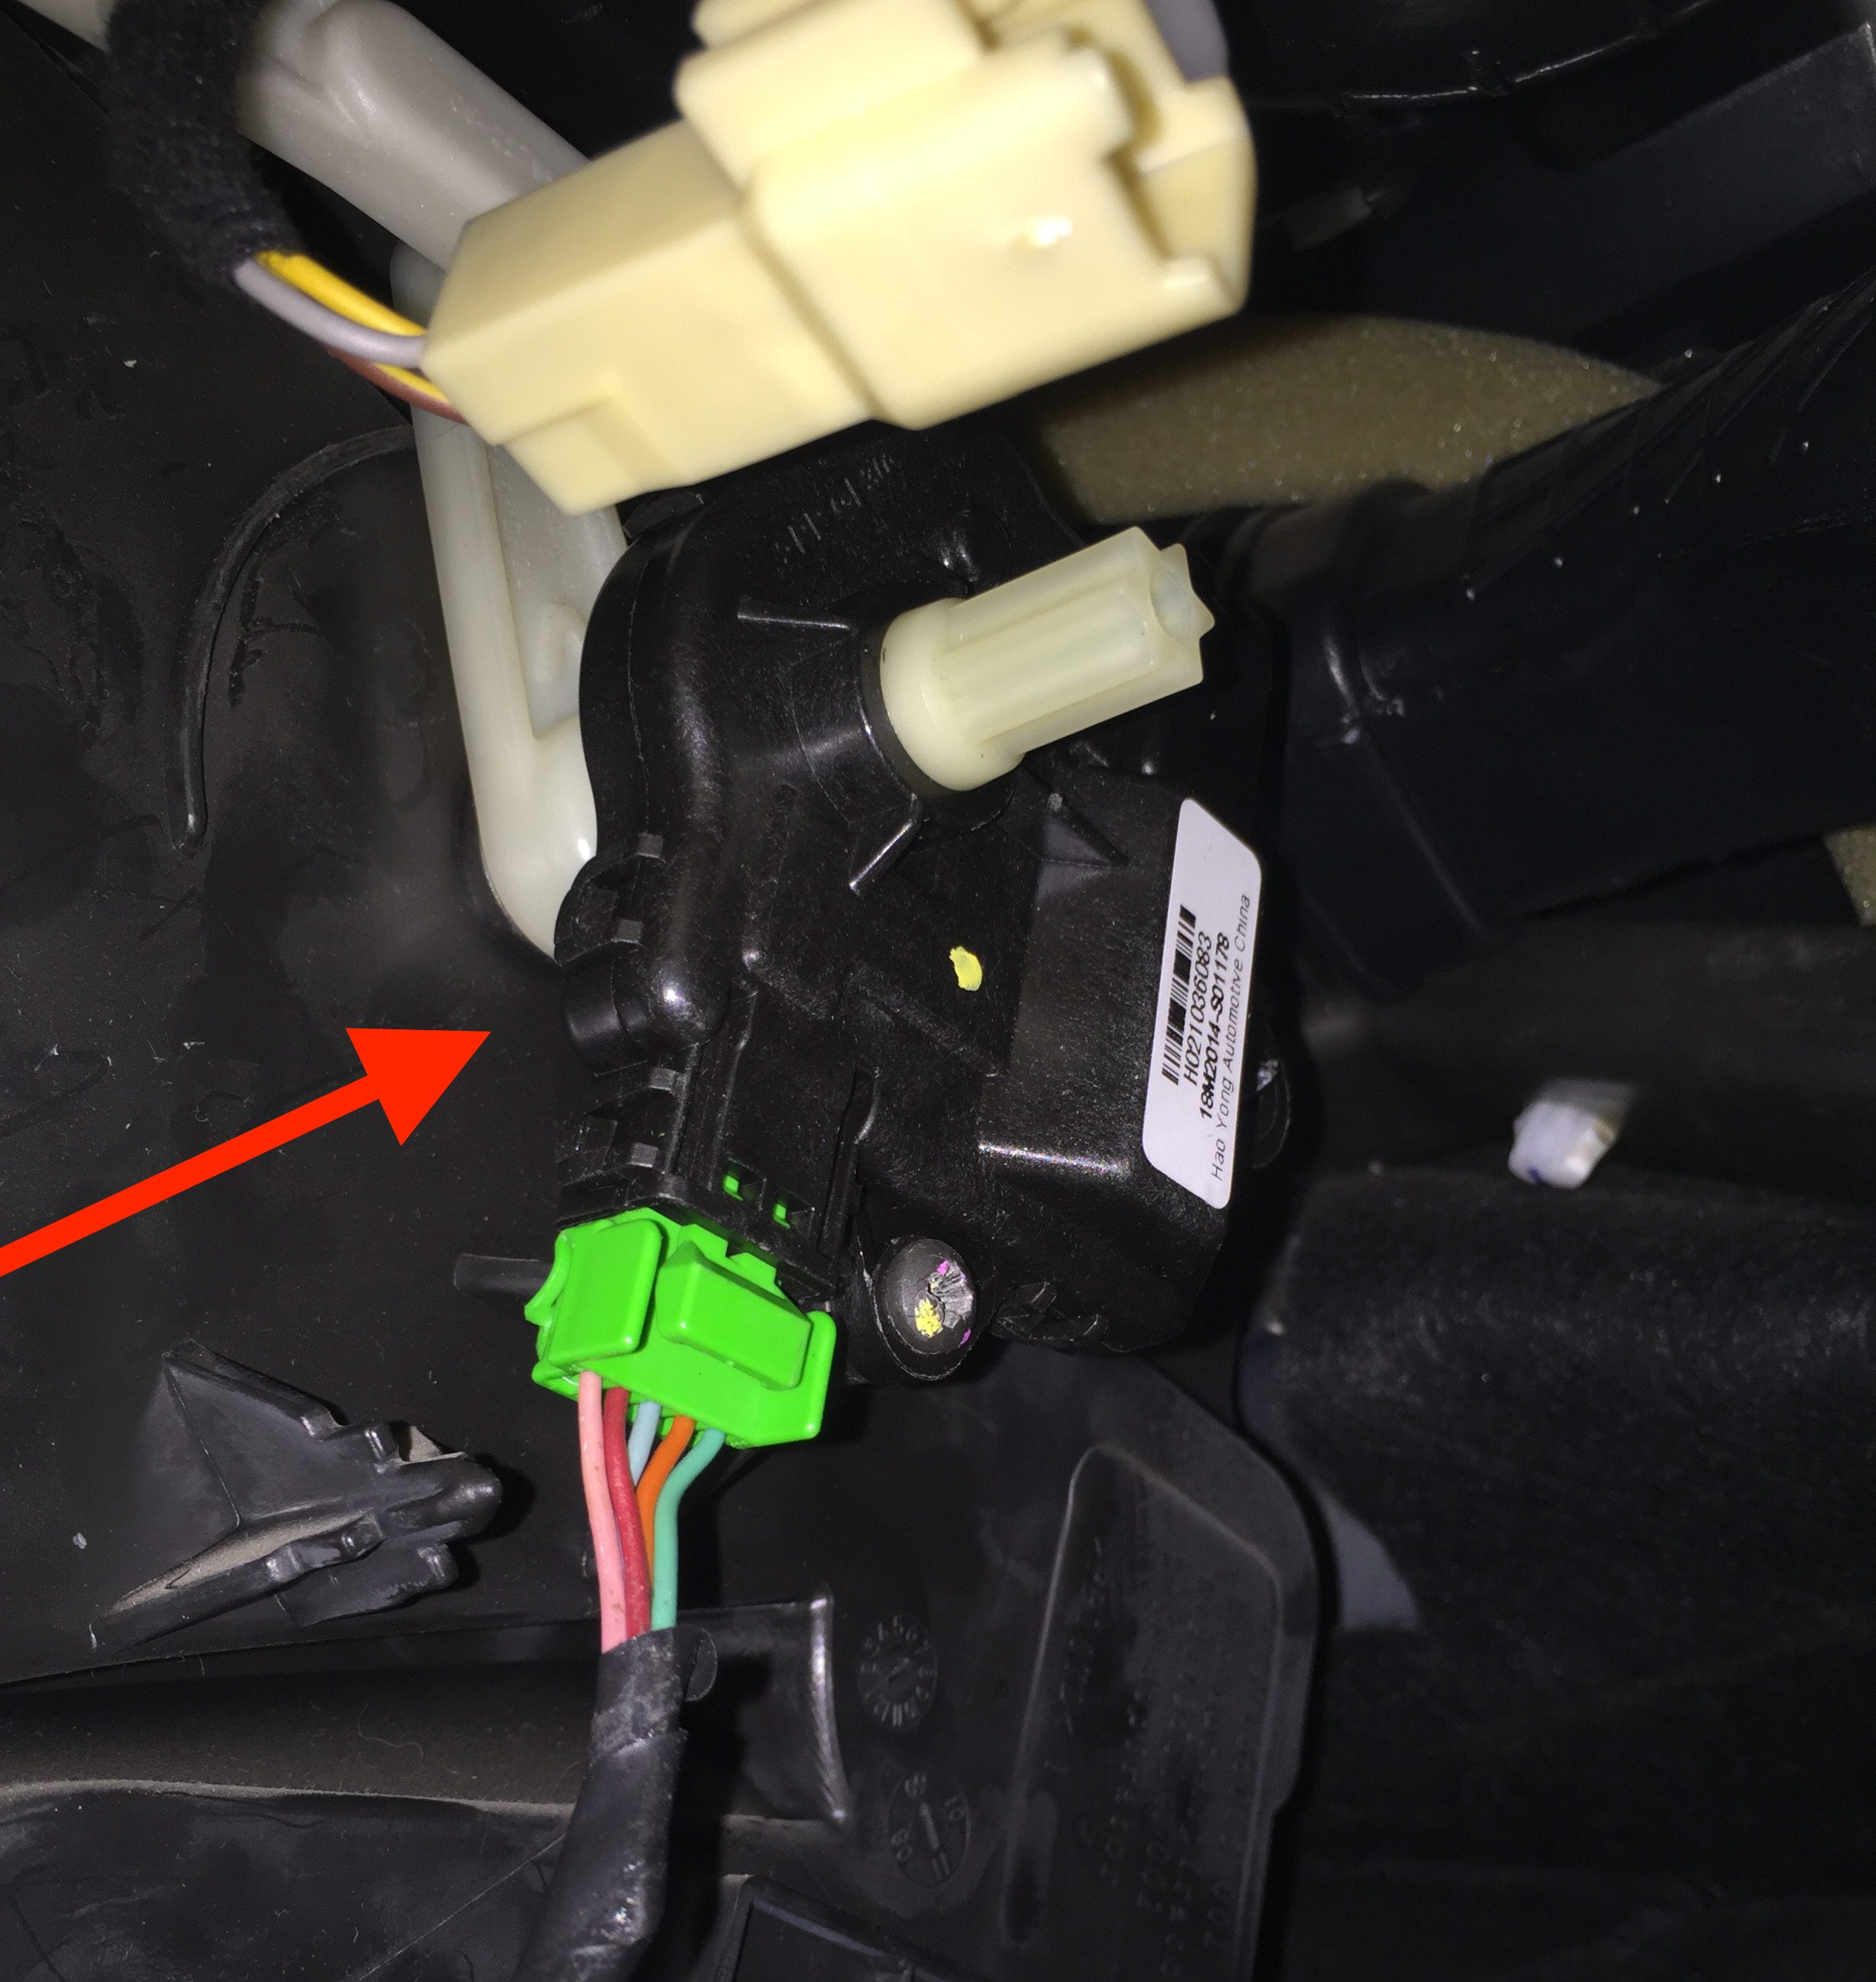
You’ll now need to locate the actuator. Look up beside the headunit and high in the dashboard your will see the actuator as pictured.
To verify the actuator is faulty, run the relearn process as described previously. If you feel or hear the actuator clicking, or the HVAC arms are not moving, the actuator is probably at fault and will need to be replaced.
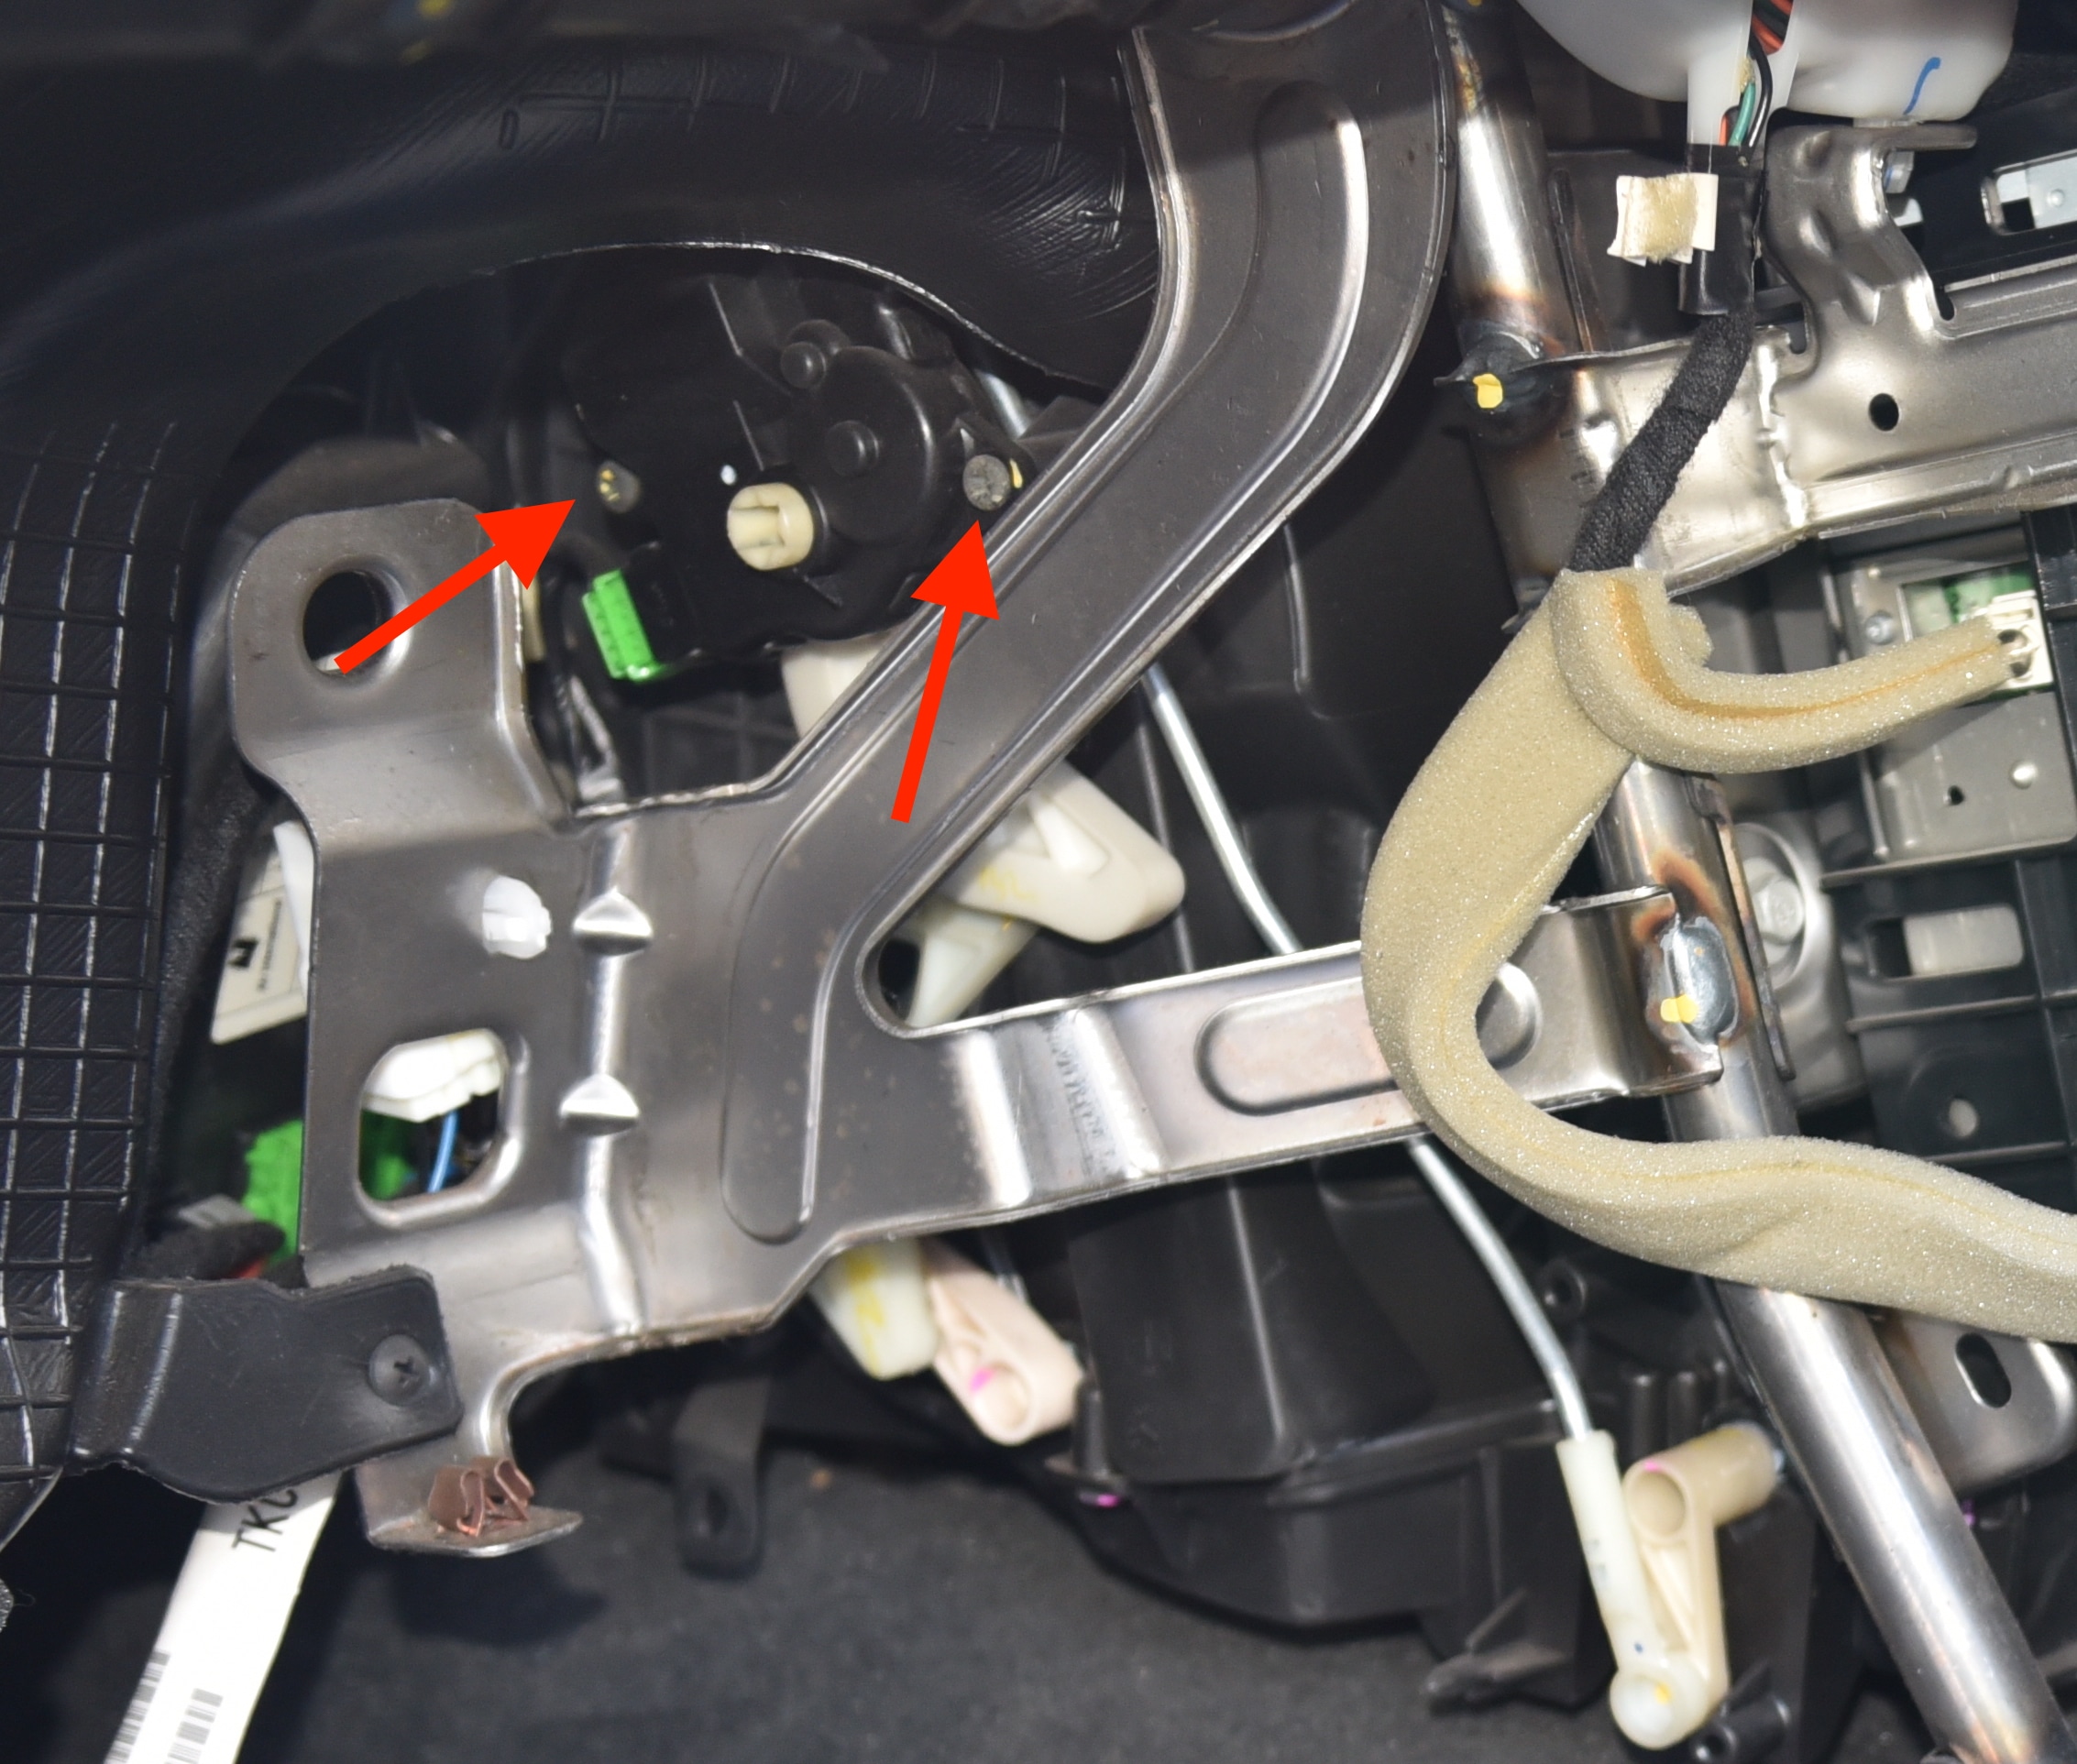
Step 8
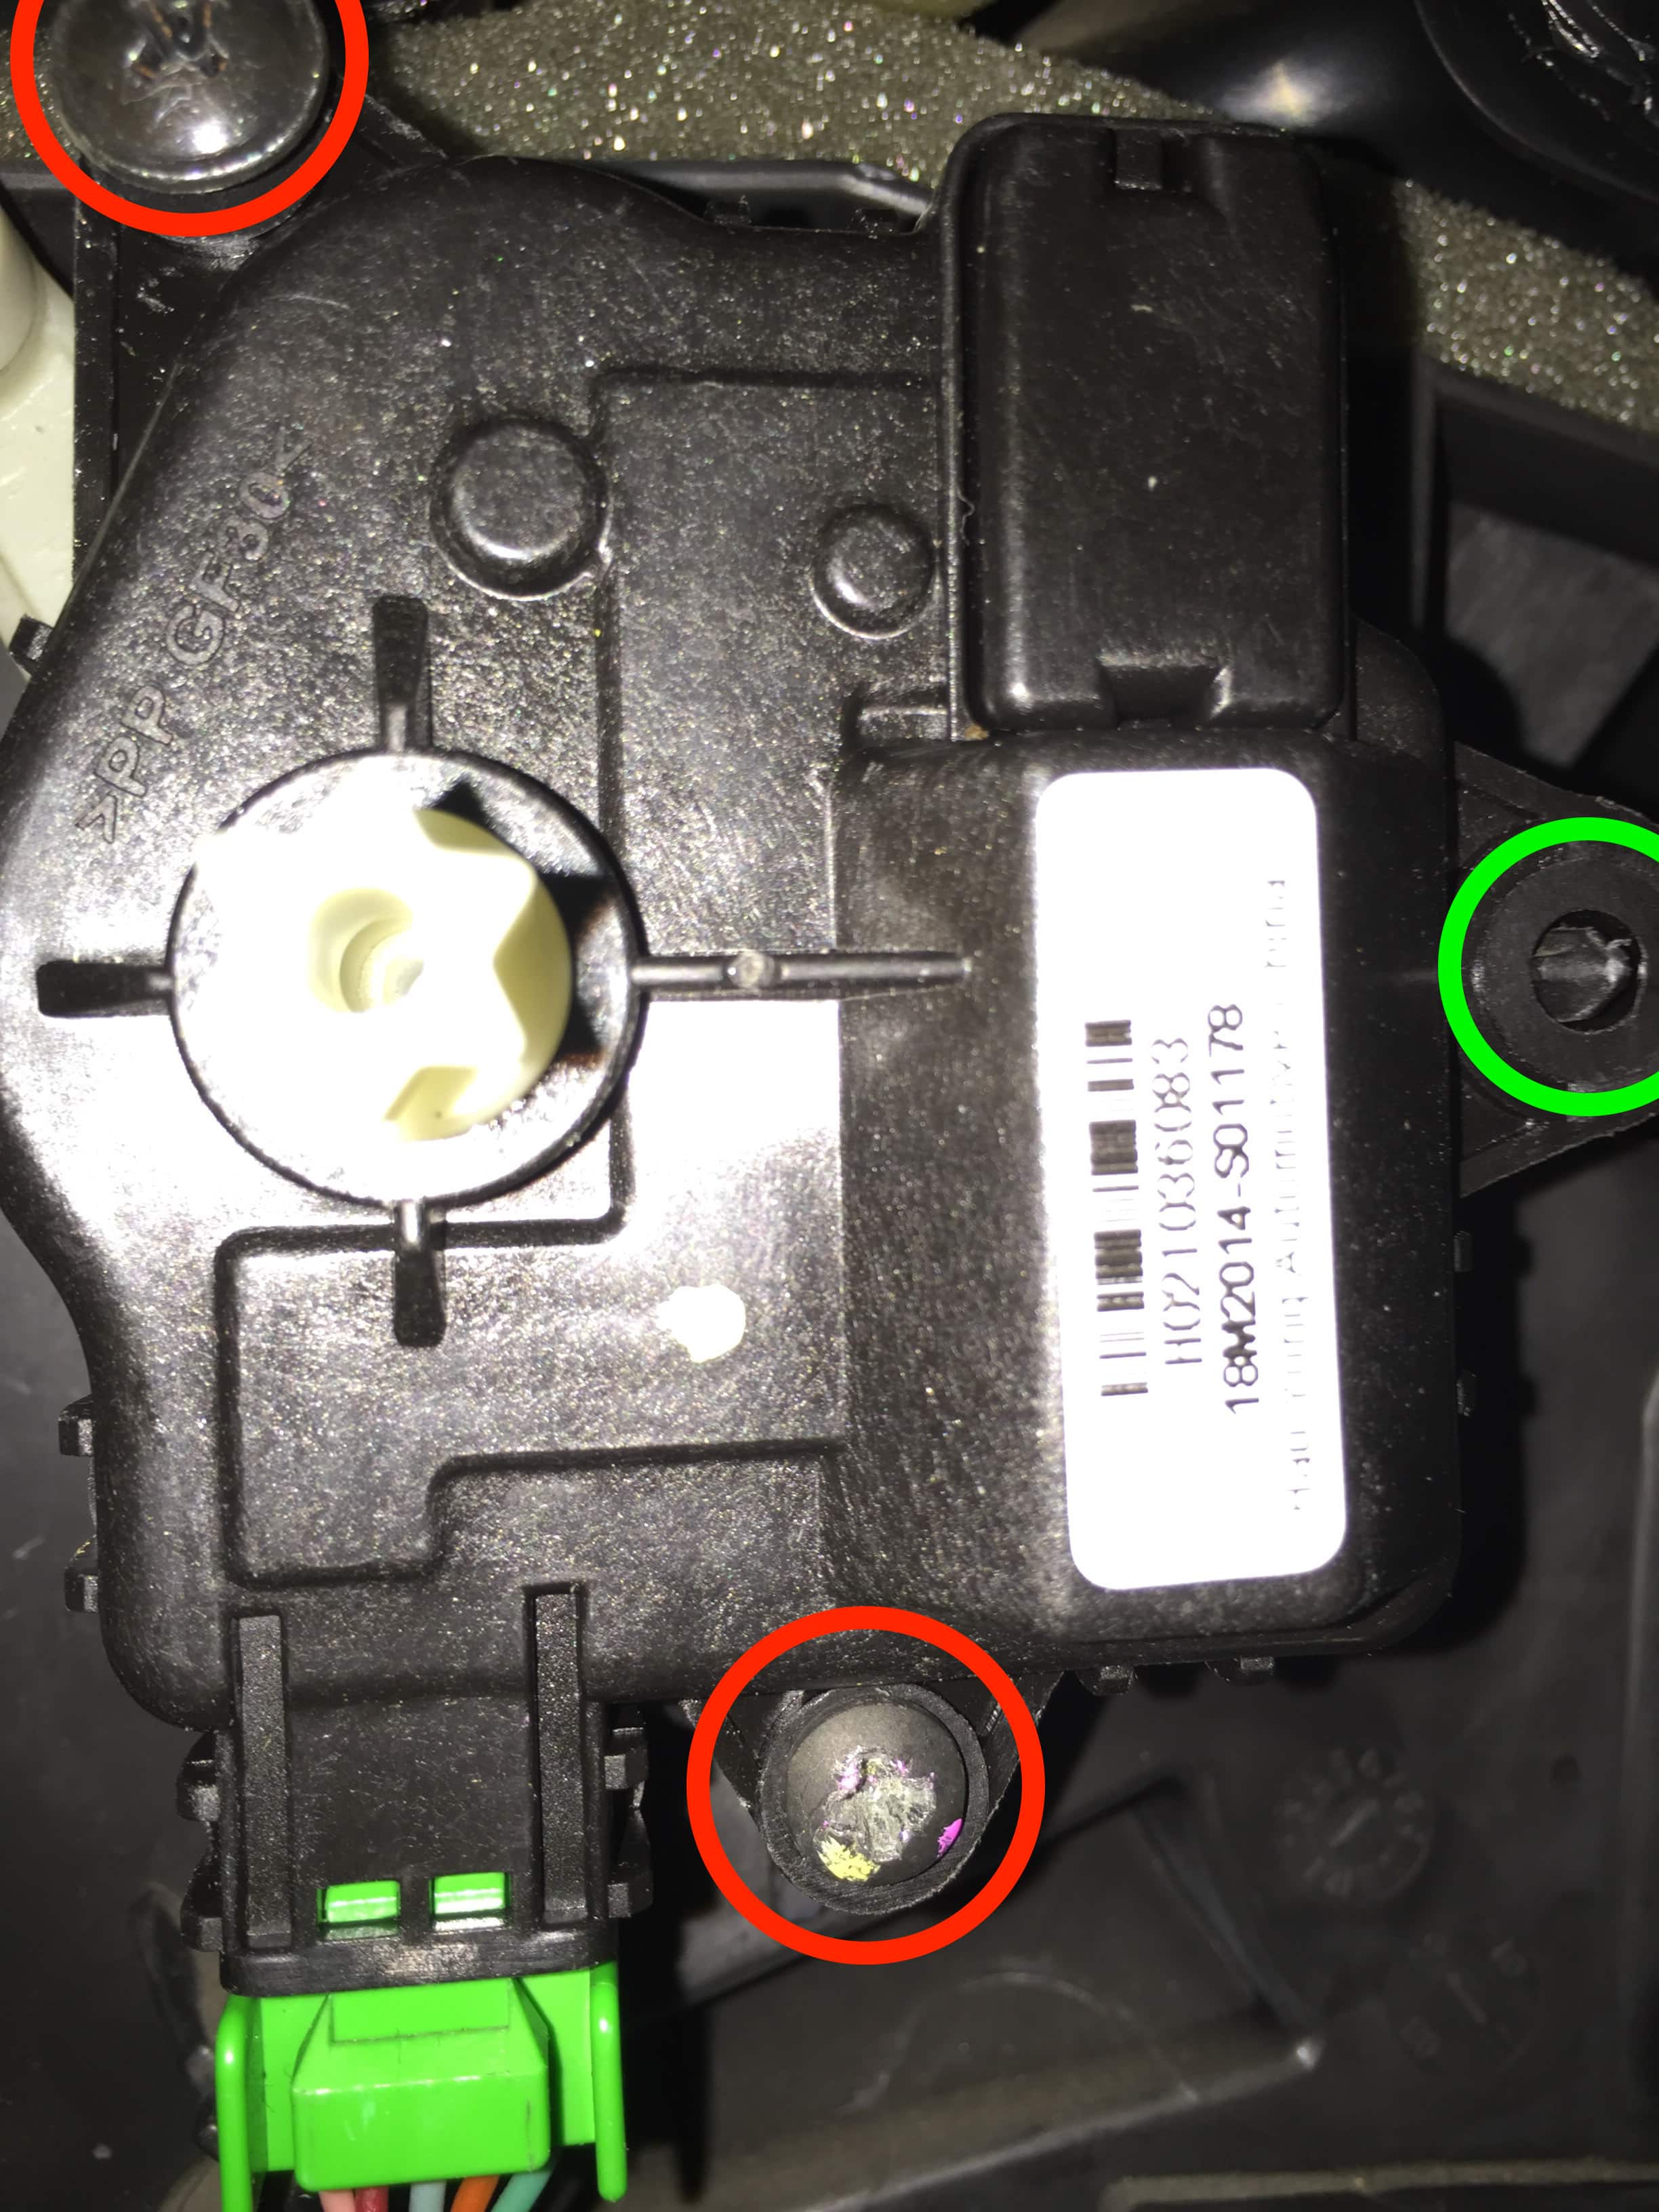
Replacing the actuator is a very difficult process due to the location in the vehicle. There are two screws (Red circles) holding the actuator in place, and one alignment pin (Green circle) to ensure the actuator is in the correct position. There is also a green wiring plug you will need to disconnect.
The bottom screw is relatively easy to access with a small stubby screwdriver or a ratcheting screwdriver set.
The top screw is extremely difficult to remove as there is limited space to operate. You may find yourself lying upside down in the footwell and painstakingly turning the screw millimetre by millimetre.
Once both screws are removed the motor will simply pull off from the HVAC arm. The HVAC arm may fall off, so take note of its orientation and position to simplify reinstallation.
Firstly reinstall any HVAC arms that may have fallen loose, then slide the arm onto the actuator – It can be in any position. Next place the actuator onto the alignment pin and begin to install the lower screw.
Commence installation of the upper screw, checking alignment and position of the actuator and HVAC arms.
Once both screws are tightened, connect the wiring harness and perform a HVAC relearn. You should now see the actuator moving smoothly without any clicking noises. When the relearn is complete, test operation between feet, face and demister. Keep in mind we have removed the ducting on the drivers feet!
Step 10
Passenger Side Actuator
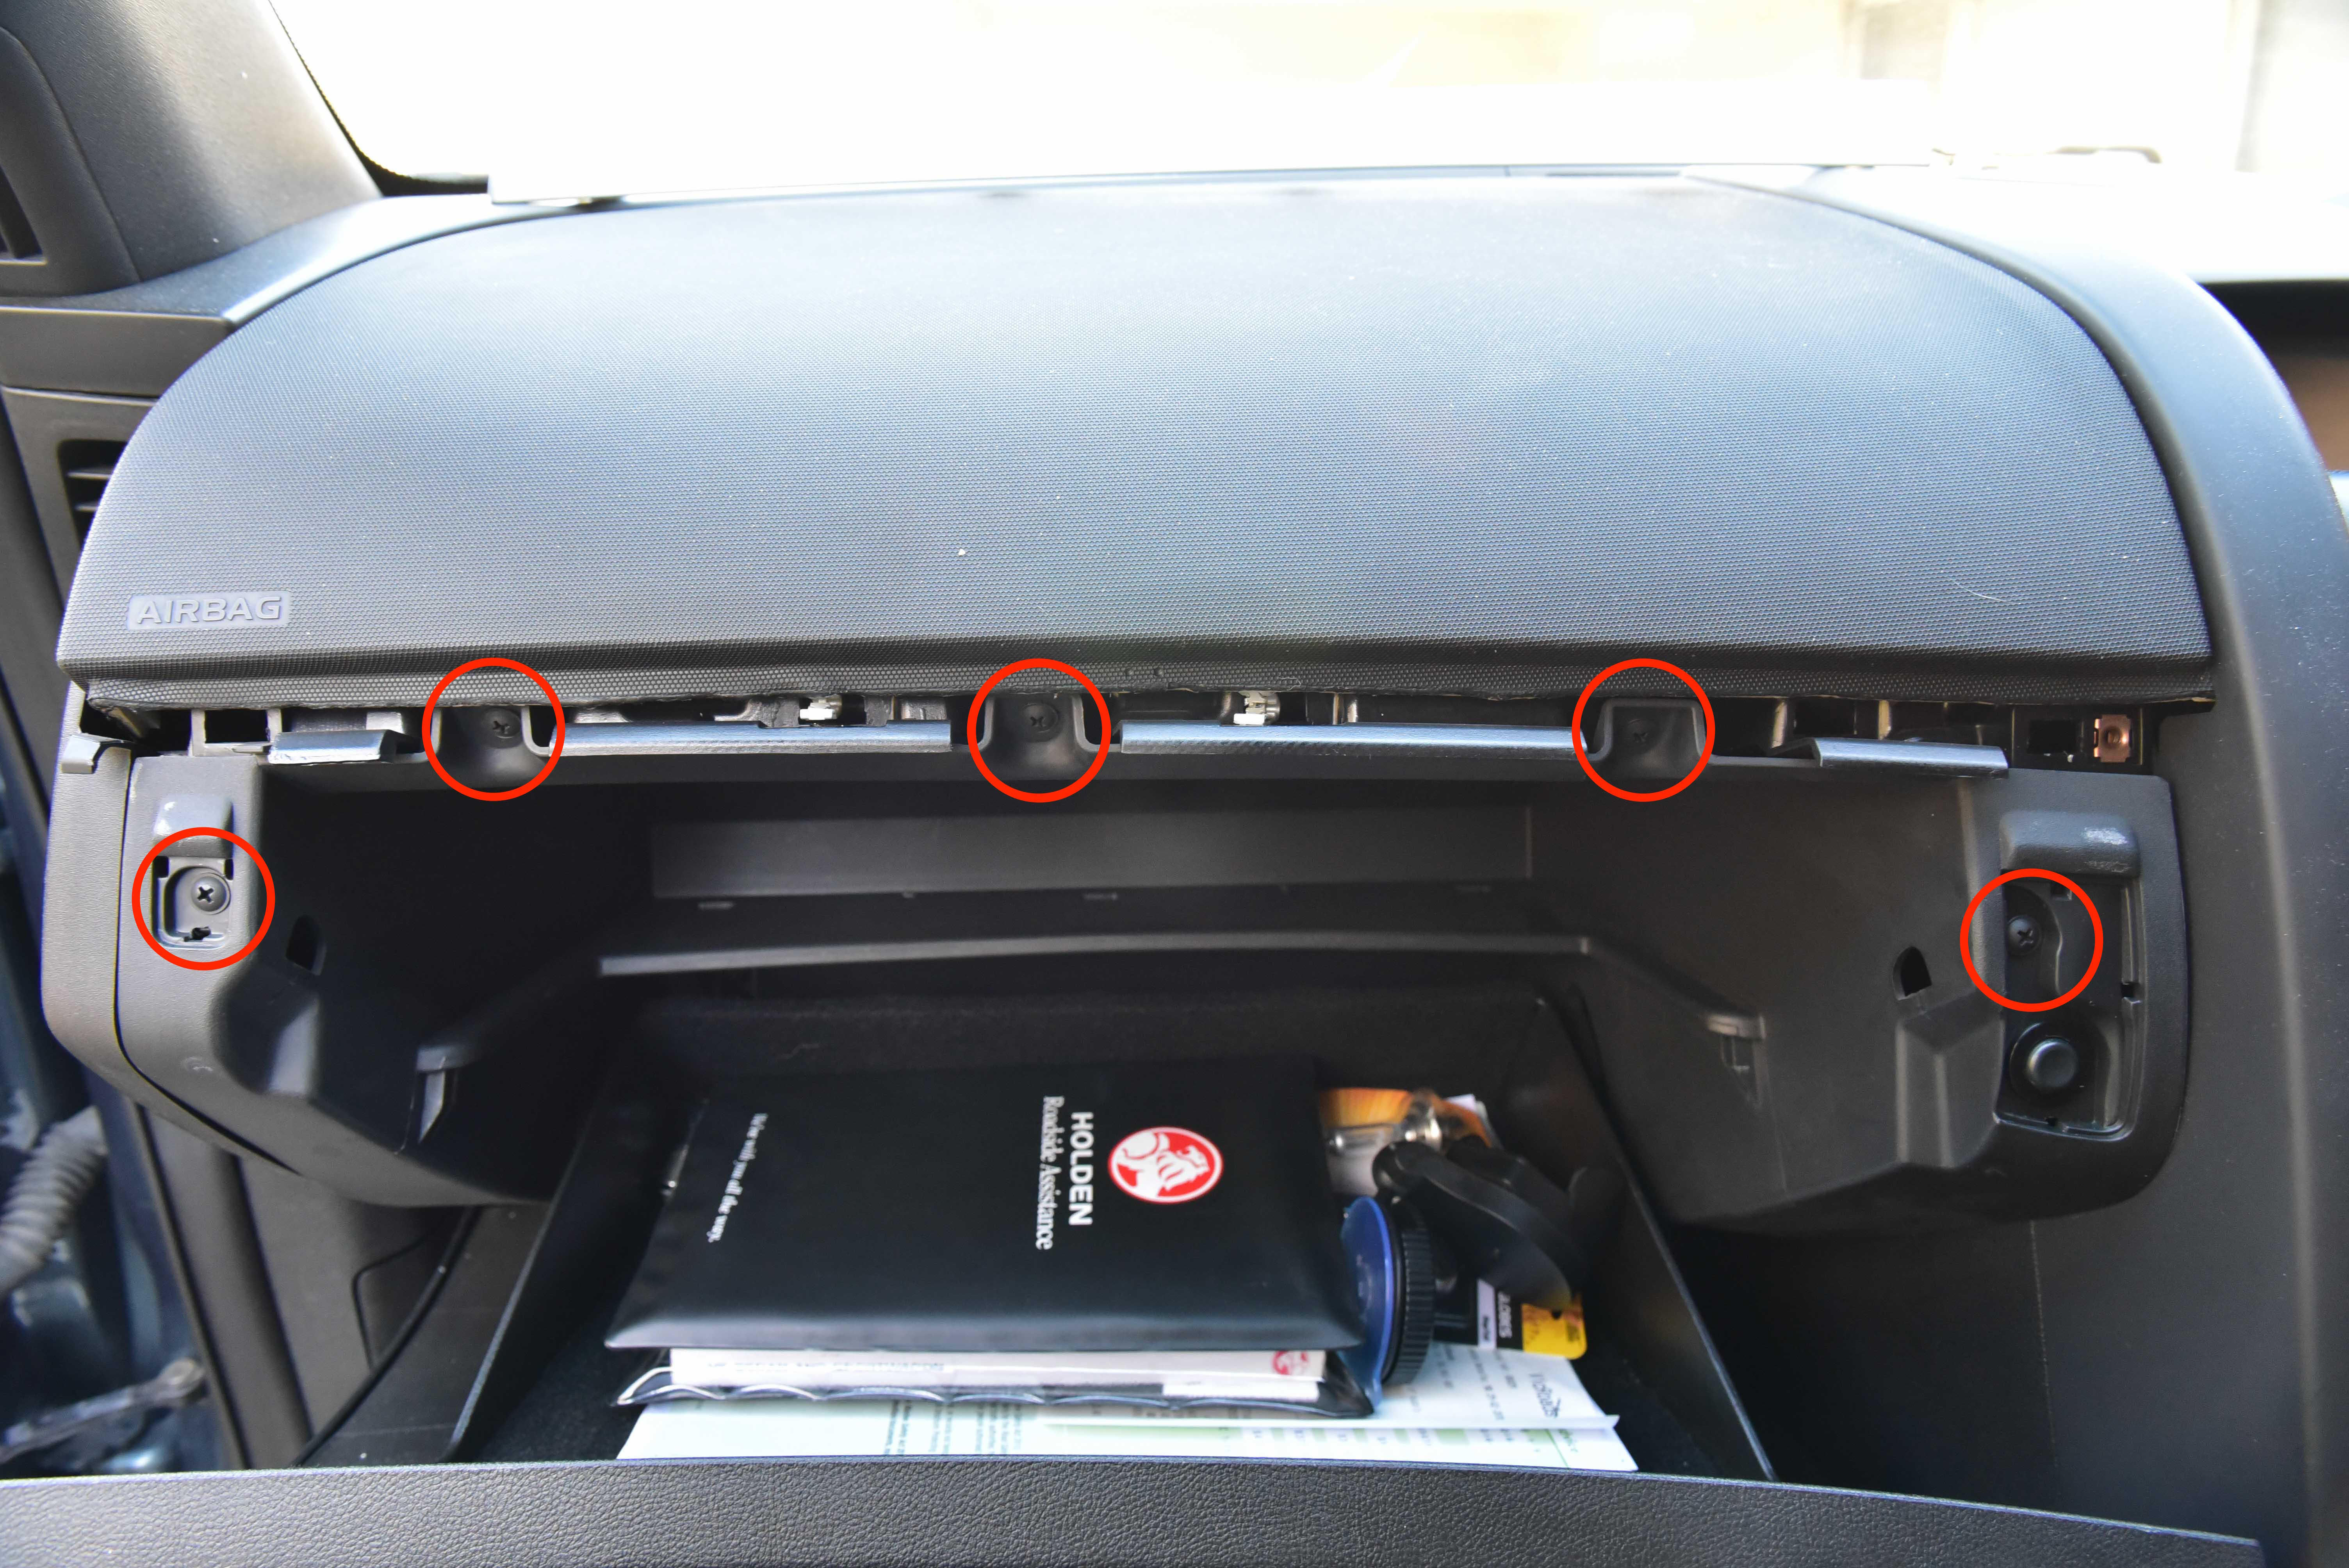
Remove the kick panel below the glove box. This is held in place by five clips.
Step 11
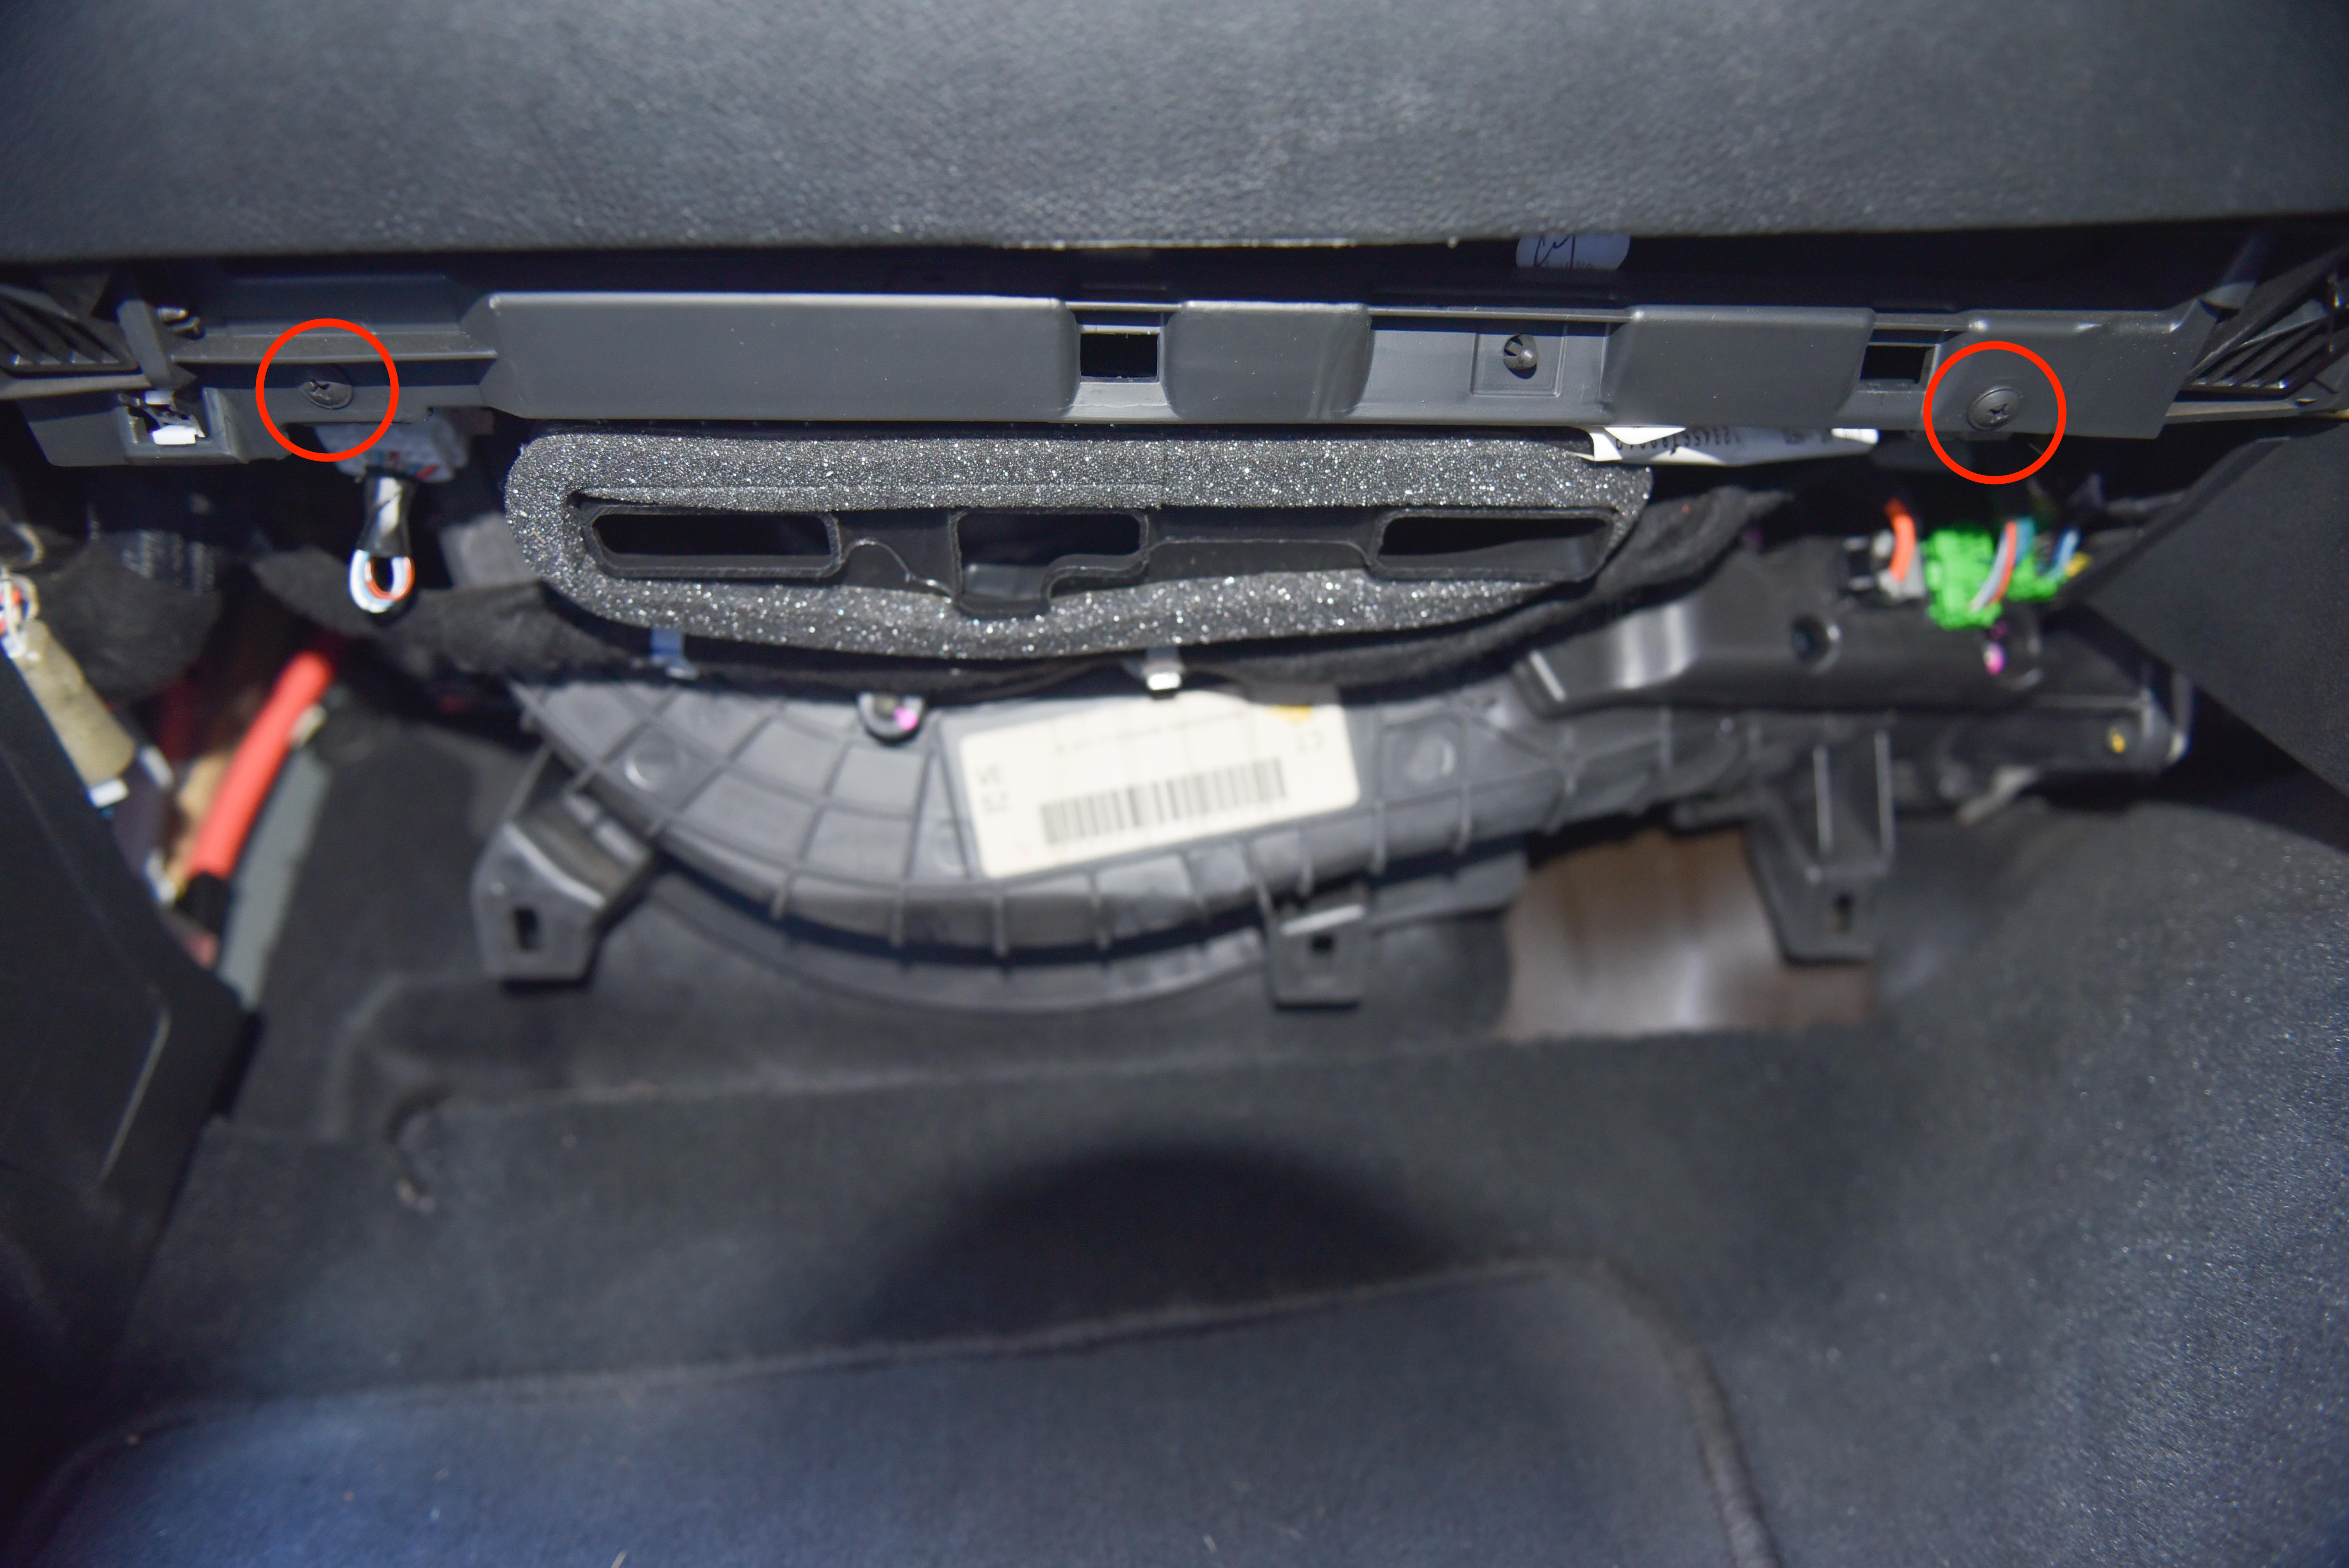
Remove the two screws which are now visible.
Step 12
Remove the five remaining screws. The far left and right screws are hidden behind small covers.
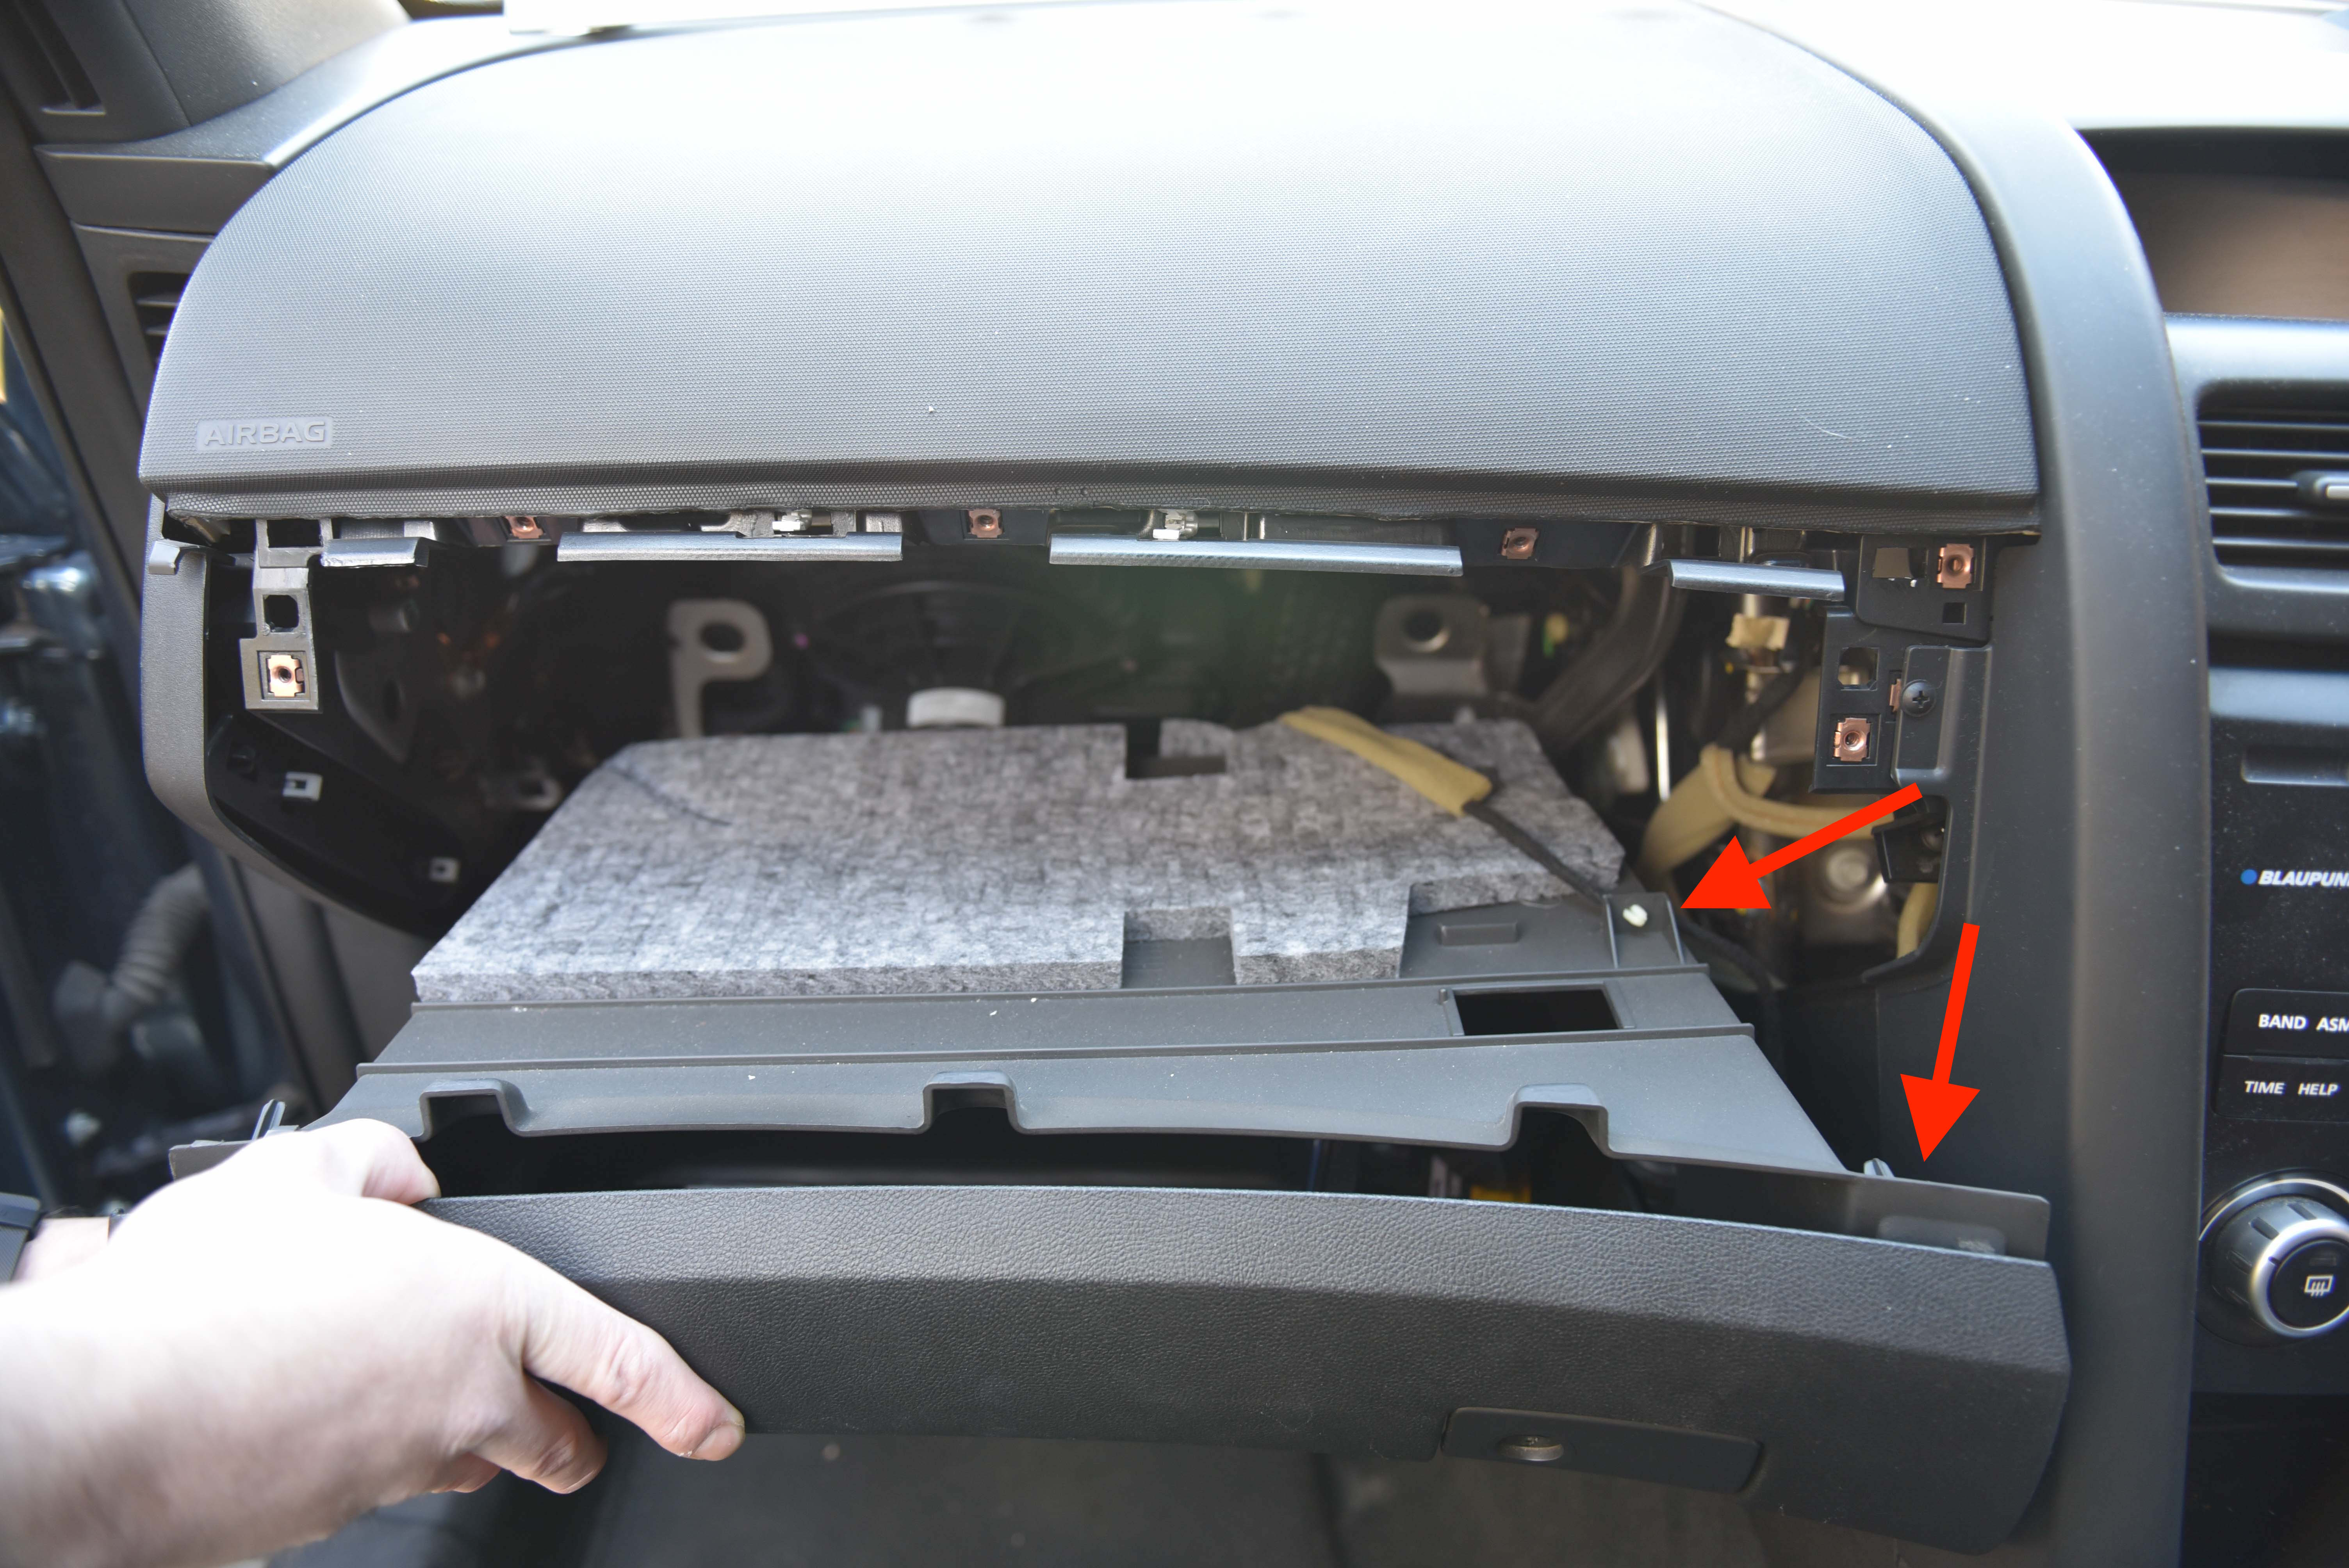
Step 13
The glovebox will now be loose. simply pull outwards and disconnect the boot release plug and loom.
Step 14
Pull outwards and down the side trim piece. It will unclip.
Step 15
Now we can see the passenger side actuator.
To verify the actuator is faulty, run the relearn process as described previously. If you feel or hear the actuator clicking, or the HVAC arms are not moving, the actuator is probably at fault and will need to be replaced.
Step 16
Remove the faulty actuator by unplugging the electrical connector, unscrewing the two screws and pulling the drive gear off the HVAC arm. This actuator is much easier to access compared to the drivers side.
Replace the actuator with a new unit. Screw into place and reconnect the wiring loom.
Once both screws are tightened, connect the wiring harness and perform a HVAC relearn. You should now see the actuator moving smoothly without any clicking noises. When the relearn is complete, test operation between feet, face and demister. Keep in mind we have removed the ducting on the passengers feet!
Did you find this guide helpful? Consider sharing it to help other car enthusiasts
well this has been a fun week trying to get the hot/cold and recirc working 2 days at a auto lecy and today 8 1/2 hours at a holden dealer didn’t even bother looking at it I’ve had it its beat me so much for “good” cars
well finally 100% FIXED and all working great turned out to be the recirculating door was broke and the hvac module needed replacing and new to me is they need to be programmed to your car never heard that before
So it wasn’t the actuator? I’m having this problem now I’m my series 2 ss Ute. No cold air. I’ve changed the actuator But no good. Sounds like I have the same problem?
I’m also having the same problem (sv6 2008)
Note: There is an electrical interlock between the AIR RECIRC function and the HOT/COLD mixing function. If the system detects a malfunction in the AIR RECIRC, the HOT/COLD mixing actuator is disabled. This fault is indicated by the LED on the RECIRC button blinking
except I’m not getting any blinking on the re-learn
will now check the recirculating door
I have a VE Series Commodore SS-V V8 I have owned since new. I have been experiencing intermittent air-conditionng failure. I can go for a short drive and air-conditioned air is available.I can park for a short period and when I come back and restart the car the air blows but it is not airconditioned. The control can be set to C (Cold) or Auto (17C) it doesn’t matter. If I turn the ignition off then restart the car the airconditoned air appears again. Operating Ventilation buttons to Off and ON or Aircon button to off then on doesn’t fix the problem. Operating the auto button for climate control doesn’t fix the problem either. Only a restart of the engine does. The air-conditioning will then keep operating until I have finished the drive. It makes no difference if it is winter or summer hot or cold.
On a separate issue ever since new if the car gets very hot in summer say a 40C day so the inside temperature may be 50+ the whole LCD display conks out and the ventilation goes into some type of limp/safe mode. There is usually just a blank screen. Once the temperature drops in the vehicle the display and ventilation system comes back to normal.
A third issue is when the heater is operating on a cold day and obviously the hot air blowing out the face vents heats up the ventilation control unit, the LED displays above for Oil pressure and voltage go dim dim then go back to normal once heat is turned off. So obviously electronic components nearby heat up and cause this dimming in the LED display circuit.
I had the car in under warranty sometime ago and they did software upgrades but it’s never fixed the problems.
I suspect the whole Eurovox head unit. Has anyone experienced these issues? Holden seem useless at rectifying without trial and error and costing ridiculous amounts of money. I have disconnected the head unit and re installed but whether this fixes it long term I have no idea. The airconditioner failure is intermittent but does happen at least once a week…
Today I did a long drive of some 400kms. Airconditioning was fine for the first 200kms. When I came to do the return trip some 20 minutes later I could not get airconditioned air the entire trip. Restarts did not work. The aircon fan would only blow half strength. After arriving home and the car cooling down everything is back to normal but it did piss out a lot of aircon water I presume because it couldn’t cool the air but the condensor in the dash was still working but maybe not the vents to feed the cooled air in….anyway as usual it’s back to normal.
i have ve series 2 wagon. had car in to holden for aircon not working. they put dye in said it has no leaks and could find an issue. then they said needed regassing. now a month later its blowing hot again no cold air what so ever. could it be actuator or a more serious issue
Hi Markus, hopefully there is an answer to this. I don’t know enough about the plumbing in the vehicle. Mine is a series VE SS-V by the way but I suspect it IS an actuator problem because switching off the engine and restarting it instantly allows airconditioned air again. That would suggest that it restes the actuator position and opens or closes the correct air vent to introduce cooled air from the airconditioner. I noticed a few days ago when my aircon would not reactivate on a return trip after a 200km drive, copious amounts of water, far more than usual, poured out of the car when it stopped on the driveway, indicating that the aircon was working but the cooled air wasn’t being fed into the cabin. The condensed water as a result built up.
Holden should have been smart enough to determine that your airconditioner compressor was working however. Maybe your problm now is unrelated to regassing…
One question, is your car a V8? because a common problem on the VEs is that they don’t have a tensioner pulley on the aircon drive belt between the compressor and the harmonic balancer (the big rotating pully at the end of the engine that drives everything), if you go over a hard bump or speed humps the aircon belt can fly off thus no airconditioner……..happened to me a couple of years ago. Just put a new belt on.
Because the harmonic balancer is on a big rubber coupling it can have a wobble which is exagerated over a speed pump. Without a tensioner the belt can literally be misaligned during the wobble and come of the pully.
Holden has a fix for this but they CHARGE for repairing THEIR design fault. There is a tensioner pully kit and they put on a new harmonic balancer….for a few hundred dollars to fix the problem that should not be there in the first place!. I haven’t done it. I just drive carefully over speed humps.
The test mentioned above and reprinted below looks like one way to self resolve the problem but as mine doas work I am reluctant to try this and make it worse….
Attempt a HVAC System Relearn
It’s possible that your actuators are not actually faulty but have ‘forgotten’ which position they are in. The relearn process runs all actuators for 10-15 seconds, allowing them to calibrate their positions.
To do this first close your doors and turn the radio off. You’ll need to listen to the motors and they’re very quiet.
Turn the Ignition to ‘on’ but do not start the car. Press and hold the rear demister button until you hear the actuators moving. After 10-15 seconds the actuators will stop and the system will be calibrated. Test the air conditioner system and check if your problem still exists. Be sure to cycle through each mode and heat / cool.
If the problem still exists or you heard loud clicking noises during this process, its very likely that an actuator is faulty. Proceed to the next step.


This Post Has 222 Comments
well this has been a fun week trying to get the hot/cold and recirc working 2 days at a auto lecy and today 8 1/2 hours at a holden dealer didn’t even bother looking at it I’ve had it its beat me so much for “good” cars
well finally 100% FIXED and all working great turned out to be the recirculating door was broke and the hvac module needed replacing and new to me is they need to be programmed to your car never heard that before
So it wasn’t the actuator? I’m having this problem now I’m my series 2 ss Ute. No cold air. I’ve changed the actuator But no good. Sounds like I have the same problem?
I’m also having the same problem (sv6 2008)
Note: There is an electrical interlock between the AIR RECIRC function and the HOT/COLD mixing function. If the system detects a malfunction in the AIR RECIRC, the HOT/COLD mixing actuator is disabled. This fault is indicated by the LED on the RECIRC button blinking
except I’m not getting any blinking on the re-learn
will now check the recirculating door
I have a VE Series Commodore SS-V V8 I have owned since new. I have been experiencing intermittent air-conditionng failure. I can go for a short drive and air-conditioned air is available.I can park for a short period and when I come back and restart the car the air blows but it is not airconditioned. The control can be set to C (Cold) or Auto (17C) it doesn’t matter. If I turn the ignition off then restart the car the airconditoned air appears again. Operating Ventilation buttons to Off and ON or Aircon button to off then on doesn’t fix the problem. Operating the auto button for climate control doesn’t fix the problem either. Only a restart of the engine does. The air-conditioning will then keep operating until I have finished the drive. It makes no difference if it is winter or summer hot or cold.
On a separate issue ever since new if the car gets very hot in summer say a 40C day so the inside temperature may be 50+ the whole LCD display conks out and the ventilation goes into some type of limp/safe mode. There is usually just a blank screen. Once the temperature drops in the vehicle the display and ventilation system comes back to normal.
A third issue is when the heater is operating on a cold day and obviously the hot air blowing out the face vents heats up the ventilation control unit, the LED displays above for Oil pressure and voltage go dim dim then go back to normal once heat is turned off. So obviously electronic components nearby heat up and cause this dimming in the LED display circuit.
I had the car in under warranty sometime ago and they did software upgrades but it’s never fixed the problems.
I suspect the whole Eurovox head unit. Has anyone experienced these issues? Holden seem useless at rectifying without trial and error and costing ridiculous amounts of money. I have disconnected the head unit and re installed but whether this fixes it long term I have no idea. The airconditioner failure is intermittent but does happen at least once a week…
Today I did a long drive of some 400kms. Airconditioning was fine for the first 200kms. When I came to do the return trip some 20 minutes later I could not get airconditioned air the entire trip. Restarts did not work. The aircon fan would only blow half strength. After arriving home and the car cooling down everything is back to normal but it did piss out a lot of aircon water I presume because it couldn’t cool the air but the condensor in the dash was still working but maybe not the vents to feed the cooled air in….anyway as usual it’s back to normal.
i have ve series 2 wagon. had car in to holden for aircon not working. they put dye in said it has no leaks and could find an issue. then they said needed regassing. now a month later its blowing hot again no cold air what so ever. could it be actuator or a more serious issue
Hi Markus, hopefully there is an answer to this. I don’t know enough about the plumbing in the vehicle. Mine is a series VE SS-V by the way but I suspect it IS an actuator problem because switching off the engine and restarting it instantly allows airconditioned air again. That would suggest that it restes the actuator position and opens or closes the correct air vent to introduce cooled air from the airconditioner. I noticed a few days ago when my aircon would not reactivate on a return trip after a 200km drive, copious amounts of water, far more than usual, poured out of the car when it stopped on the driveway, indicating that the aircon was working but the cooled air wasn’t being fed into the cabin. The condensed water as a result built up.
Holden should have been smart enough to determine that your airconditioner compressor was working however. Maybe your problm now is unrelated to regassing…
One question, is your car a V8? because a common problem on the VEs is that they don’t have a tensioner pulley on the aircon drive belt between the compressor and the harmonic balancer (the big rotating pully at the end of the engine that drives everything), if you go over a hard bump or speed humps the aircon belt can fly off thus no airconditioner……..happened to me a couple of years ago. Just put a new belt on.
Because the harmonic balancer is on a big rubber coupling it can have a wobble which is exagerated over a speed pump. Without a tensioner the belt can literally be misaligned during the wobble and come of the pully.
Holden has a fix for this but they CHARGE for repairing THEIR design fault. There is a tensioner pully kit and they put on a new harmonic balancer….for a few hundred dollars to fix the problem that should not be there in the first place!. I haven’t done it. I just drive carefully over speed humps.
The test mentioned above and reprinted below looks like one way to self resolve the problem but as mine doas work I am reluctant to try this and make it worse….
Attempt a HVAC System Relearn
It’s possible that your actuators are not actually faulty but have ‘forgotten’ which position they are in. The relearn process runs all actuators for 10-15 seconds, allowing them to calibrate their positions.
To do this first close your doors and turn the radio off. You’ll need to listen to the motors and they’re very quiet.
Turn the Ignition to ‘on’ but do not start the car. Press and hold the rear demister button until you hear the actuators moving. After 10-15 seconds the actuators will stop and the system will be calibrated. Test the air conditioner system and check if your problem still exists. Be sure to cycle through each mode and heat / cool.
If the problem still exists or you heard loud clicking noises during this process, its very likely that an actuator is faulty. Proceed to the next step.